Overview
-
Download Vimba for Windows.
-
Install Vimba Viewer to configure the cameras.
-
Network setup.
-
Verify camera connections.
-
Adjust exposure & focal length.
OmniCal MV system
Network setup
Warning: OmniCal MV system cameras use all the available network bandwidth, so they must always remain on a dedicated network, away from any other traffic.
Please note: When Camera Discovery is enabled, machine vision cameras continuously capture images and send them to master. This only affects the camera network and not disguise directly, however it consumes CPU time processing these packets.
Please note: Camera Discovery can be disabled explicitly in the OmniCal Calibrator window and is also turned off automatically when the OmniCalCalibrator and Plan windows are not open.
Network infrastructure:
The OmniCal MV system is based on the GigE Vision (R) standard and requires a bandwidth of 1 Gb/s or higher. For example, on 10 Gb/s setups the discovery of disguise MV cameras and the transmission of captured images will be faster.
The disguise MV cameras are powered via PoE, which needs to be provided either by the network switch or a PoE injector. The power requirement over PoE is quite low at 2.8W.
Make sure that all parts of the network infrastructure (switches, cables…) match the desired bandwidth and power specifications.
In case of wired cables (as opposed to fibre), we recommend using at least Cat6 cables, because they are more reliable then Cat5e over longer distances or in the presence of electromagnetic interference (EMI).
Network Adapter Setup
You may need to update to the latest drivers to see some of these advanced options.
-
Jumbo Frames: Enabled, with packet size (MTU) 8228 bytes or larger (e.g. 9000 or 9014, depending if the adapter counts the packet header or not).
-
DMA Coalescing: Disabled (since it may increase latency)
-
Flow Control:
-
Can be left in default setting. (In most network situations enabling it for Rx/Tx is beneficial, but it will not have an impact on GigEVision performance).
-
-
Interrupt Moderation Rate: Extreme
-
Transmit buffers: 256 bytes
-
Receive buffers: max setting available, e.g. 4096 bytes
-
See here for further explanation.
Setting up the Network adapter
-
Navigate to the Network and Sharing Center and click to open the D - Media 10Gbit adapter.

-
On the General tab, click to open Properties.

-
Enable the following settings and click Configure.

-
On the Advanced tab, select Performance Options.

-
Select Jumbo Packet and assign it a value of 9014 bytes.

-
Select Flow Control and click Disabled.

-
Set the Interrupt Moderation Rate to Extreme.

-
Select Receive Buffers and set it to 4096.

-
Select Transmit Buffers, set it to 256 and click OK.

Please note: A 1 Gb port should work fine but we normally use a 10 Gb port when available as the max receive buffer size is larger. Some network adapters may show some of the above settings under an Advanced button. Others may not provide some at all. E.g. the external Promise SANLink3 adapter only offers the Jumbo Frames setting.
Switch Setup
-
Connect a PoE network switch with bandwidth 1 Gb/s or higher.
-
Enable jumbo frames/packets by setting the max packet size to the highest it will go (usually around 9k).
OmniCal MV system setup (in windows)
The Vimba software installs camera drivers, SDK and the Vimba Viewer application used for testing and trouble shooting.
-
Install Vimba for windows SDK from here.
Please note: We recommend Vimba Viewer v2.1.3
-
In the Vimba installer, select Application Development.
-
Keep install drivers checked and complete the installation as normal.
-
Hit Start.
Open Vimba Viewer
-
Plug your cameras in if they are not already.
-
They will show up in the Detected Cameras list in Vimba, in white.
-
These may have a red lock icon on them if the disguise software is running. Camera access is exclusive to each application. I.e. if you have a camera capturing in the disguise software you will not be able to view it in Vimba and vice versa.
-
Verify camera communication
-
Open Vimba and select a camera.
-
Press play button and verify images are streaming
Please note: In case camera connections are lost, and replugged, the software should detect them again, but in case they don’t you can press the refresh button in the top left corner.
Troubleshooting
-
No image is displayed in Vimba Viewer: try disabling jumbo frames on the network adapter. We’ve seen this can be an issue on 4x4s. When using jumbo frames over 2034 bytes we aren't able to get complete images from the cameras (due to packet loss). The other workaround is to limit the packet size on the switch. Use Vimba Viewer to verify the GVSP packet size setting is 2034 or below. This is negotiated automatically so you don't set this directly.
-
Network adapter becomes disabled after applying the above settings: try reverting the interrupt moderation rate to the default.
-
Capturing images is very slow / cameras become unresponsive: try reverting the interrupt moderation rate to the default.
Configuring cameras in Vimba
You can right-click or double-click on the cameras to see and adjust metadata of the camera.
This window also shows the Play button in the top left hand corner, on pressing this the camera image should appear in this window, this can be zoomed using the mouse scroll button.
Focus, aperture and focal length
Align the cameras to look at the object that is to be projected onto. Adjust focus as needed. We recommend that you open the aperture as far as it can go, so you can use the exposure time to control the amount of light that comes in. Make note of the focal lengths used by the cameras, you will need these later.
The Brightness Tab
Exposure time
Exposure time will heavily depend on the light levels in the calibration environment. On the right hand side you will see a value in milliseconds that allows you to calculate roughly the FPS the camera is producing. High exposure time will make it slow.
The other parameter we will not touch. The only other tab we’ll interface with is the All tab.
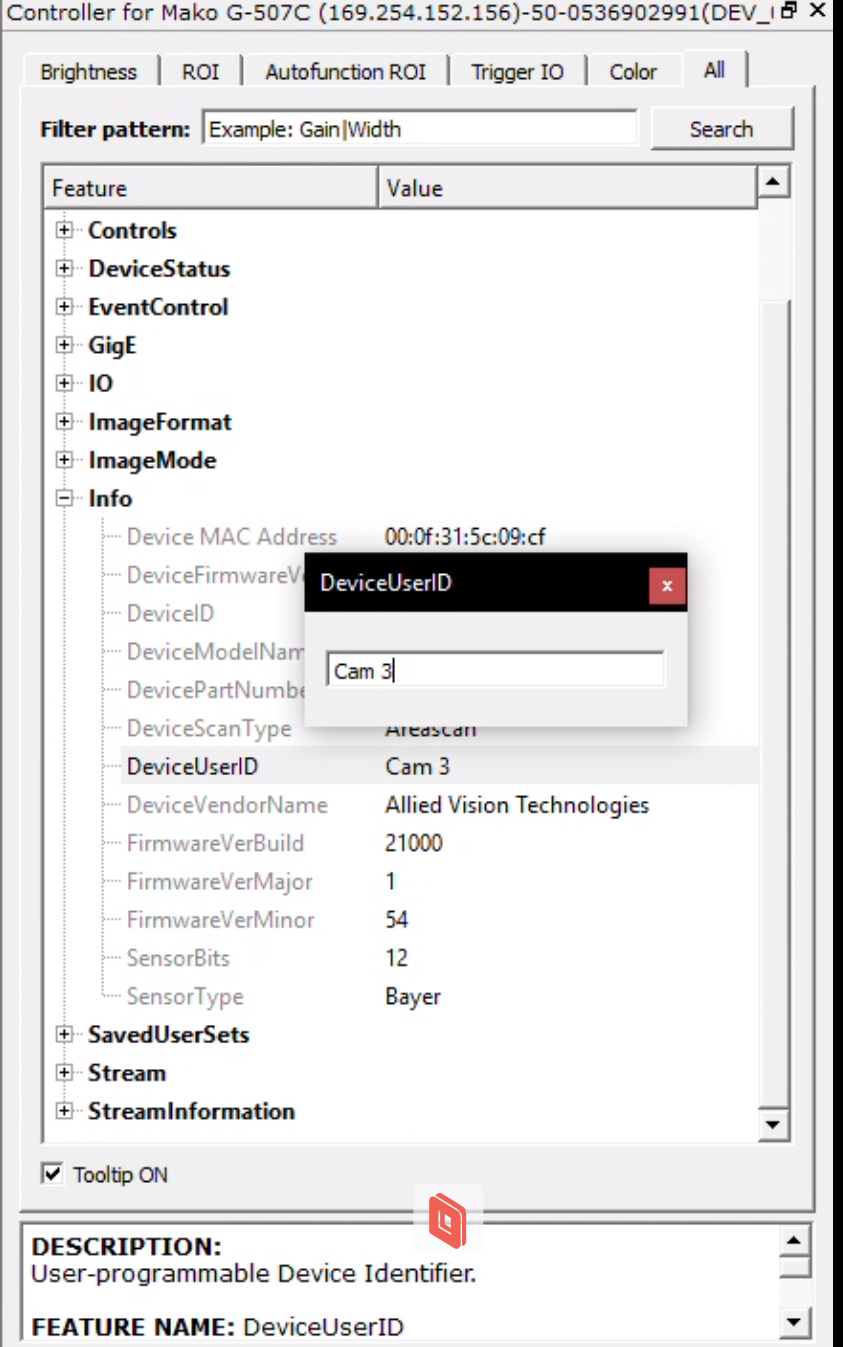
All
Here we can type in a filter pattern and search through settings. We might need to change the DeviceUserID here. Just type it in and click search. The ID will be visible inside disguise.
Connecting to cameras in the disguise software
Part of the disguise software is a separate program called VimbaCamServer.exe which is used to discover and connect to one or more OmniCal MV system cameras on a network.
-
In the disguise software the OmniCal Calibration editor configures and enables camera discovery on the network.
-
Usually, the VimbaCamServer is launched automatically from within disguise, as soon as the Discovery Adapter is set to the localhost Loopback adapter. In that case, the network switch with the cameras needs to be connected directly to a separate network adapter on the disguise server.
-
The VimbaCamServer can also be run separately, e.g. on a standalone computer. In that case the Discovery Adapter inside disguise needs to be selected as the network port with which the disguise server machine is connected to this other computer. The disguise server then does not need a direct connection to the OmniCal MV system cameras or the network switch they are on.
-
In other words, the Discovery Adapter needs to be set to the network adapter that the camera server app is on. For an OmniCal MV system the VimbaCamServer can be anywhere as long as it can somehow see and connect to the cameras.
The Mobile Cameras button opens a list of cameras that are currently connected to disguise. If you have many MV cameras on a network (especially if it is only 1Gb/s), then the cameras may appear one by one over the course of several seconds.
Renaming cameras in Vimba Viewer
It is recommended to add unique names for each camera for easier identification within the disguise software. Follow these steps to set this up:
-
Open Vimba Viewer.
-
Locate the setting "DeviceUserID" (not to be confused with a similiar setting labelled "DeviceID" which can not be changed).
-
Rename the camera as desired.
-
Press Enter and close this window. Note that Vimba must be closed in order for the re-name to be visible.
Further Reading
GeniCam Network Card Performance Settings
Advanced Driver Settings for Intel® Ethernet 10 Gigabit Server Adapters