With some modifications to the project settings, the Unreal Engine plugin offers live multi-user editing. If a Multi-User Server is configured and running, any additional machine on the same network as the render nodes will be able to run the project in Edit mode and make live changes. Any changes to the project made while there is an active workload will be reflected in real-time.
Multi-user editing
Configuring multi-user editing in the Unreal Engine project:
-
Go to Edit and navigate to Plugins, enable Multi-User Editing plugin.
-
Go to Edit and navigate to Project Settings…
-
Navigate to Plugins and Multi-User Editing.
-
-
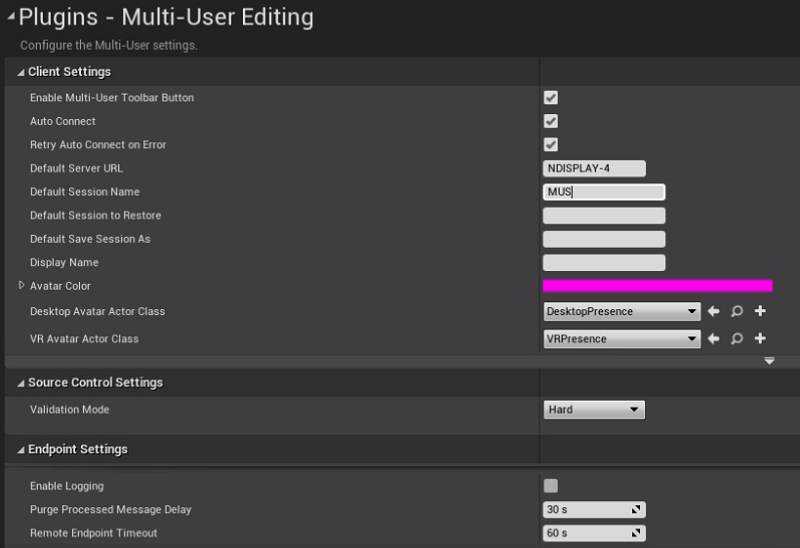
Ensure Enable Multi-User Toolbar Button, Auto Connect and Retry Auto Connect on Error are enabled.
-
Set the Default Server URL to the name of the machine that will be running the Multi-User Server (e.g. “NDISPLAY-4”).
-
Set Default Session Name to something unique (e.g. “MUS”).
-
-
Save and close Unreal Engine.
-
Distribute modified project to all nodes (this can be done through Disguise software).
-
Launch the Multi-User Server on the machine specified as the Default Server URL (either launched standalone UnrealMultiUserServer.exe or through the Unreal Editor.
-
Make sure the server is visible on the network the nodes are connected to.
-
Open the RenderStream Layer in Disguise software and Start the workload.
-
Connect to the Multi-User Server using an editor and make modifications.
Please note:
The project's Preferred Sync Adapter must be set to a network accessible by all required machines.
For more information on configuring Multi-User Editing, including network and UDP messaging settings in Unreal, please refer to the Unreal-Engine-Remote-Multi-User-Editing-Guide
