Object libraries
The object library is a quick way to access stored objects within the system. Each object type has its own object library.
For example, the Screen uses a bitmap object as one of its properties in the Bitmap object editor. The bitmap property has its own object library where you can select which bitmap you want to project onto a Screen object.
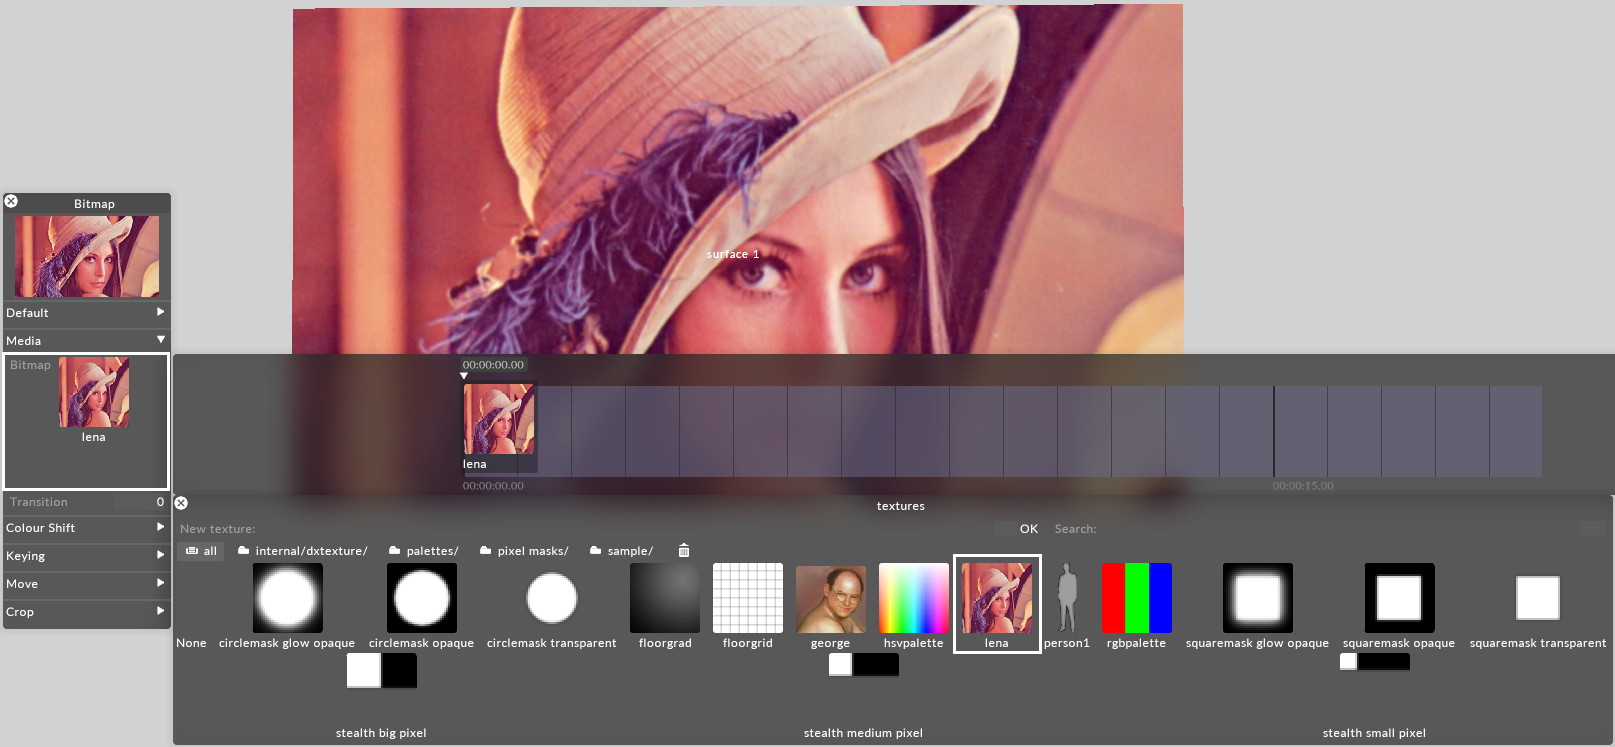
Using the Bitmap object library to select a bitmap to be projected onto a Screen object.
Selecting an object
You can open an object library by left clicking a property in the standard object editor. Left clicking any object in the library will select that object.
Selecting a bitmap object from the Bitmap object library
Organising objects in boxes
Objects are stored in named boxes and can be ordered from within those boxes (i.e. each box is like a playlist). One object may also appear in more than one box. Left-clicking a box will show you objects of that particular type only.
These boxes are represented by a list of tabs. Left-clicking a box tab opens up an array of objects below the box tab while highlighting the selected box. For these reasons an object library can also be known as an object box viewer.
Bitmap object boxes used to organise bitmaps by different types within the Bitmap object library
The all box contains all objects of that type, sorted either alphabetically or by date of creation (the most recently added objects will come first). The trash box (represented by a trash-can icon) contains objects that are no longer required.

All and Trash boxes used to organise bitmaps within the Bitmap object library
The Object Librarys top row contains a New Object field and a search text box.

The Search box will help you locate objects more efficiently within the Bitmap object library
Reordering objects within an object box
Select the object box by left-clicking its tab. When the sort button is not highlighted, objects are displayed in the order you choose. In this mode, you can click on any object, drag it left or right and release the mouse button to drop it in its new place in the list.
Searching for an object
Left-click the search textfield at the top right corner of the object library and type in a search term. All object boxes will be filtered to contain only those objects whose names contain the search term (case insensitive). Clearing the search text field restores the view of all available objects.
Removing an object from the library
Click the all box tab and drag the object thumbnail to the trash box tab.
Restoring a deleted object
Click the trash box tab. Find the object you want to restore and drag it back to the all box tab.
Emptying the trash
To permanently delete the removed objects, right click the trash box tab and select empty trash.
![]()
Empty Trash deletes objects permanently from an object library
Warning: this operation cannot be undone. The objects in the trash-can are permanently deleted. If you wish to restore an object that has been emptied from the trash, you will need to go to a previous .d3 Project file in the History folder. Please see the sub-chapter Auto-backup for more information.
Moving an object from one box to another
Simply drag the object thumbnail and drop it on top of the tab of the destination box. This will copy the object rather than moving it. By default, the object will be added to the top of the box.
Removing an object from a box
Drag the object from the box and drop it onto the desktop background.
Creating a new object box
Right-click any box tab to see an option that says new box followed by an editable text field. Left-click the text field, type in the name of the new box and hit Enter (or click ok). This will create an empty box with that name.
Renaming an object box
Right-click the object box tab to see an option that says rename box followed by a text field. Type in the new name and hit Enter or click ok .
Renaming the User Manual box to User Manual 1
Removing an object box
Right-click the object box tab and select remove box .
Organising boxes to reflect folder structure
By default, creating a folder within the objects folder on the drive will create a new box with that name.
If the folder contains other folders, then left-clicking this box will show you a second level of boxes, representing the lower level of folders. Boxes that represent folders cannot be removed, reordered or renamed; they are indicated with a small folder icon at the left of the box tab.