Using Expressions to drive camera angle
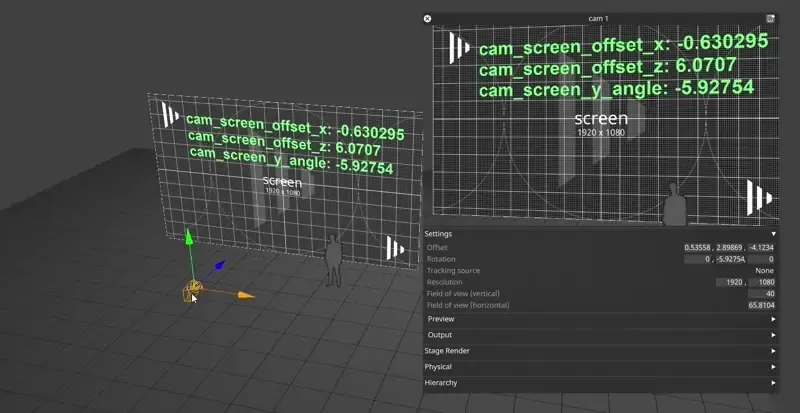
In this example, we will build a system which drives the rotation of a camera to always point at a specific screen.
The goal is to ensure that a camera will always point at a given screen, no matter where either one moves along the floor. The example doesn’t attempt to compensate for changes in height, only position changes on the X and Z axis within the stage.
How the example works
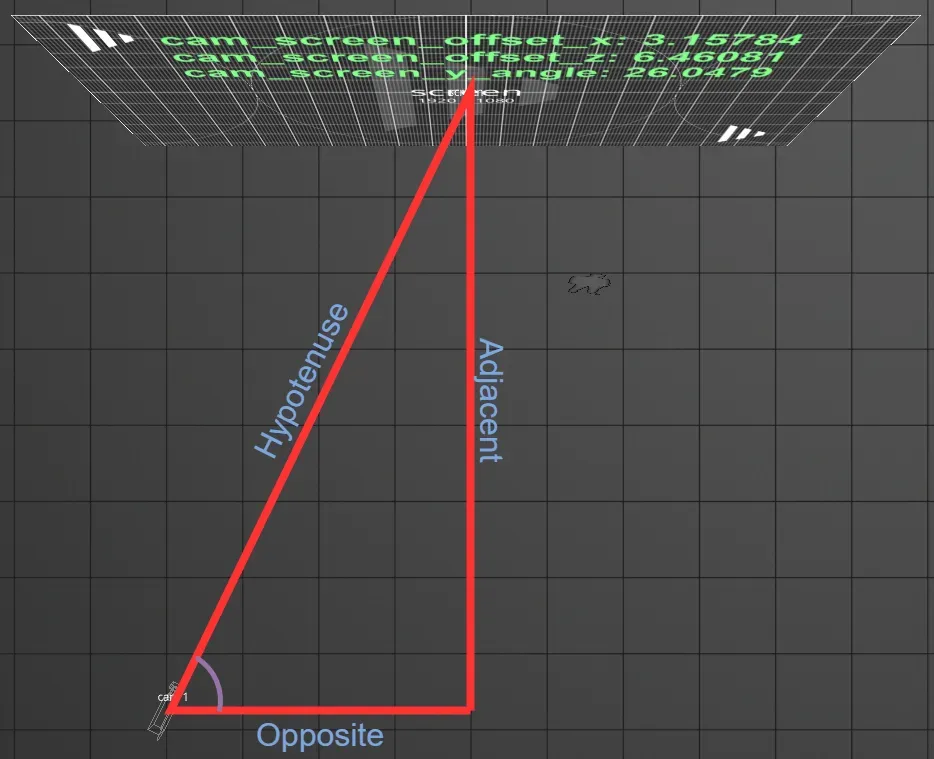
Section titled “How the example works”The idea is to build a right-angled triangle laying on the floor between the camera and the target screen. Using trigonometry, we are able to calculate the angle from the camera to the screen.
The basic functionality of this example is provided by the function atan2. We use it to calculate the opposite angle of the triangle we construct from the relative positions of the camera and target screen.
Determining the angle
Section titled “Determining the angle”In order to construct the triangle above, we must build the two straight sides, one for the X axis (side to side) and one for the Z axis (forward and back.) We will do this by first creating an ExpressionVariables device to hold our variables, and define each side individually.
Constructing the triangle sides
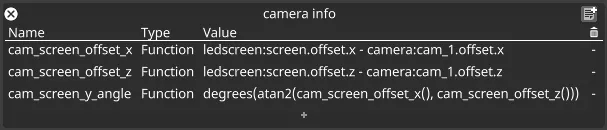
Section titled “Constructing the triangle sides”The two expressions will be named cam_screen_offset_x and cam_screen_offset_z. These will be function variables, that is they are small expressions which can be used later in other expressions to aid readability, validate the results are as expected and show the thought process which built the system.
Let’s look in detail at how to calculate cam_screen_offset_x
ledscreen:screen.offset.x - camera:cam_1.offset.x
This is the difference between the camera’s position on the X axis compared to the screen’s X position. This creates the opposite side of the triangle above.
We can repeat this for the Z axis by simply replacing the .x with .z for both the screen and camera. This creates the adjacent side of the triangle.
Calculating the angle
Section titled “Calculating the angle”Once the sides of the triangle are constructed, we are able to use trigonometry to build the desired angle. We will again use an expression variable to calculate this and give it a name we can use elsewhere, in this example, we will use cam_screen_y_angle.
This expression needs to convert from the side lengths to the desired angle. This is accomplished by using the atan2 function, which takes 2 arguments, x and y. It computes the inverse of the tangent which would be created by x / y, however it is also aware of the sign of these values and can compensate for that, giving accurate values for any inputs.
Since we know that the tangent of the angle is equal to opposite / adjacent, we can use the cam_screen_offset_x() as the opposite, and cam_screen_offset_z() as the adjacent. Therefore:
atan2(cam_screen_offset_x(), cam_screen_offset_z()) will return the opposite angle, in radians. Since we want to convert to degrees we can wrap that further in a call to degrees, like so:
degrees(atan2(cam_screen_offset_x(), cam_screen_offset_z()))
The expressions in place
Section titled “The expressions in place”Once the above expressions are determined, the expressions variable device will look something like the following:
Applying the angle
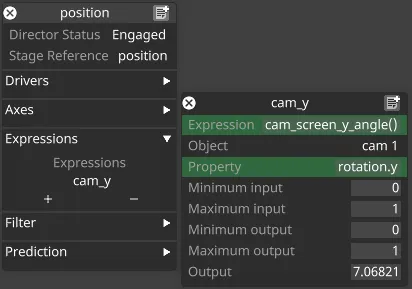
Section titled “Applying the angle”Once the angle has been determined, the expression cam_screen_y_angle() would evaluate to the angle the camera’s Y rotation field would need to be set to in order to point at the target screen.
We can accomplish this by creating a position receiver device, and an axis expression to control the camera’s Y rotation.
Further work
Section titled “Further work”It can be possible to extend systems like this, for example the target of the camera can be switched by replacing the ledscreen:screen with yet another function variable which returns the target screen. This itself could be driven by an External protocol and an if function to select which screen is returned.
Alternatively, the system could be duplicated to allow for targeting upon changing the relative height of the camera & screen.