Blending and masking outputs
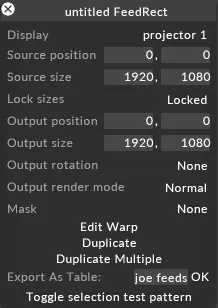
Designer allows the user to generate custom softedge textures and masks inside it. You can then apply the softedge texture directly on the output and update the shape, gradient and gamma settings in real-time.
Create a softedge mask on the output
Section titled “Create a softedge mask on the output”Select Mask option is used to create a custom SoftEdgeTexture mask

This will open the Texture object library which shows all of the still image files saved on your local hard-drive in the DxTexture folder. For more information on the DxTexture and other folders please see the sub-chapter Placing media files for a project.
-
In the top-left corner of the library, where it says new texture , type in the name of the softedge mask, for example Output1_softedge.
-
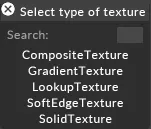
Hit Enter and select the texture type SoftEdgeTexture.
- Open the Feed level by left-clicking Feed from the dashboard (bar at the top of the screen), right-click the appropriate output and select select mask from the options list.
 Texture object library being used to create a SoftEdgeTexture mask.
- Open the Feed level by left-clicking Feed from the dashboard (bar at the top of the screen), right-click the appropriate output and select select mask from the options list.
-
Create a new Texture, and choose SoftEdge Texture when prompted.

Softedge editor
Section titled “Softedge editor”
Resolution
Section titled “Resolution”The resolution values are shown in the top right corner of the softedge editor. The resolution is automatically set to the resolution of the output head.
Adjust global gradients through gamma
Section titled “Adjust global gradients through gamma”The gamma value adjusts the global gradient between the inner and outer points in the softedge mask.
Select and move points
Section titled “Select and move points”- Select individual points, pairs of inner and outer points, or drag-select multiple points to adjust the blend level.
Add and remove points
Section titled “Add and remove points”-
Add more points by holding down Ctrl and left-clicking between existing points.
-
Remove points by right-clicking a point.
Adjust local gradients
Section titled “Adjust local gradients”Adjust the gradient between an inner and outer point by dragging them further apart, or closer together.
Press Esc to exit texture editing. Right-click the output feed and select ‘Edit mask (Name) to edit the texture again.
Create a mask rather than a softedge
Section titled “Create a mask rather than a softedge”To create a mask rather than a softedge, set either gamma to 0 (this will set a sharp edge between the inner and outer points regardless of spacing between them) or move the inner and outer points closer together.
Composite multiple textures
Section titled “Composite multiple textures”Disguise allows the user to generate two different textures and composite them into one single texture. To do this:
-
Create two different textures (they do not have to be of the type SoftEdgeTexture but can also be of the types GradientTexture and SolidTexture).
-
Repeat the same process as above when creating a texture but this time choose the texture type CompositeTexture and name it, for example, SoftEdge_output1 and Gradient_output1.
-
After creating the the CompositeTexture texures, their corresponding outputs will turn grey. This is because the CompositeTexture textures need to be told what textures they contain.
-
Right-click the output head and select edit mask (SoftEdge_output1) and edit mask (Gradient_output1) in the options window.
-
Set the resolution of the CompositeTexture texture.
-
Add the first texture by left-clicking add new layer, and then selecting the image from the Texture library.
-
Click add new layer again and select the second image.
-
To multiply the two images together, set the blend mode of image two to multiply .
-
Press Esc to exit texture editing.