Mesh Mapping
Mesh mapping enables you to project 3D content onto the entirety of one or more screens, automatically adjusting to the extent of the surfaces it targets. It can be very useful for mapping 3D content onto large projection installations, or rendering out-of-frustum content for VP/xR shoots.
Mesh mapping is similar to a Perspective mapping, in that it projects content onto the screens from an eyepoint, and sends the projection viewpoint to 3D content engines so that the rendered content matches the viewpoint frustum.
The main differences between mesh and perspective mappings are:
- The mesh mapping viewpoint frustum is automatically calculated to tightly bound the extent of the screen, whereas the perspective mapping frustum properties (rotation, field of view etc.) must be set manually.
- When using RenderStream, mesh mapping applies the projection to the screen on the render node, then transports the image in UV space. This is more efficient as it avoids transporting pixels which will be lost in the projection. Perspective mapping transports the rendered image, then projects into UV space on the receiving machine.
See How it Works
Section titled “See How it Works” Click the image to watch the video on YouTube
Mesh mappings are created like any other mapping type, from within a layer’s Mapping field. Screens should then be added and other properties configured in the mapping editor.
Creating a Mesh Mapping
Section titled “Creating a Mesh Mapping”Mesh mappings can be created in a similar way to other mappings, however, once created, they must be further configured for 3D content.
- In your track, add a new visual layer. This can be a content layer, generative layer, or effect layer.
- Left-click the new layer in the track to open the Layer Editor.
- Under the Default tab, left-click the Mapping parameter to display the Mappings manager which lists all of the mappings in the project.
- In the New Mapping text field, add a name for your new mapping. A list will appear prompting you to select a mapping type.
- Select Mesh from the list. The Mesh Mapping editor will appear.
- In the Mapping editor, assign the screens to be used for the mapping, and specify the resolution of the content.
Add 3D content by following the RenderStream Workflows below.
Common Mapping Properties
Section titled “Common Mapping Properties”This section explains the properties that are shared by the different mapping types.
Filtering
Section titled “Filtering”-
Nearest: Nearest neighbour filtering. Use nearest-neighbour sampling, to disable blending between pixels when scaling. Can be used to create pixellated looks, or to ensure hard edges on certain types of content.
-
Bilinear: Bilinear filtering is a texture filtering method used to smooth textures when displayed larger or smaller than they actually are.
-
2x Multi-sample: Multi-Sample filtering can help fix issues with scaled content, but can introduce some blurriness.
Screens
Section titled “Screens”This is a list of screens that the selected mapping type can copy content to.
- Left-click + to open the Screens manager.
- Left-click + to add the Screens you want to map. This will copy the individual canvas content onto these three Screens simultaneously and will add the Screen names to the mapping object editor.
- Left-click and drag the Screens listed in the mapping object editor to -. This will remove the canvas content from the Screens and delete the Screen names from the mapping object editor.
Find/Replace Usages
Section titled “Find/Replace Usages”Finds all usages of the current mapping in the project, and allows these to be replaced with an alternative mapping. Note that replacement only works for sequenced, non-sockpuppeted mappings.
Hierarchy
Section titled “Hierarchy”The hierarchy section allows the mapping to be set as a parent or child of another object, like any other object. See Object Overview for details.
Mesh Mapping Resolution Properties
Section titled “Mesh Mapping Resolution Properties”Resolution method
Section titled “Resolution method”Since mesh mapping creates different viewpoints for each screen it renders to, it has several different options for deciding how to set the mapping resolution for each viewpoint:
- Constant: Each viewpoint is rendered at the same constant resolution, defined in the mapping’s Resolution property.
- Scaled: The resolution of each viewpoint is equal to the resolution of the screen it is mapped to, multiplied by the Mapping resolution scale.
- Pixels Per Degree. The resolution of each viewpoint is calculated based on the horizontal and vertical field of view of the frustum, to maintain a consistent angular resolution set in the Pixels per degree property.
Resolution
Section titled “Resolution”When the Resolution method is set to Constant, this property controls the resolution of all viewpoints, in pixels.
Mapping resolution scale
Section titled “Mapping resolution scale”When the Resolution method is set to Scaled, the resolution that the content is rendered and projected for a given screen is equal to the screen’s resolution, multiplied by the mapping resolution scale.
Pixels per degree
Section titled “Pixels per degree”When the Resolution method is set to Pixels Per Degree, this property defines the angular resolution of the mapping.
Render resolution scale
Section titled “Render resolution scale”When using mesh mapping with RenderStream, the render engine first renders a view of the scene at resolution A. This view is then projected onto the screen and transported over the network in UV-space, at resolution B. Occasionally helpful for screens with complicated UV maps, render resolution scale can be set to adjust the render resolution A relative to the mapping resolution B, so that:
- Resolution B is equal to the screen resolution multiplied by the Mapping resolution scale, as described above.
- Resolution A is equal to resolution B multiplied by the Render resolution scale.
Other Mesh Mapping Properties
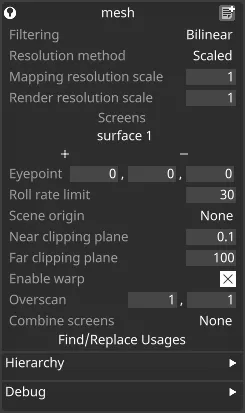
Section titled “Other Mesh Mapping Properties”Other properties which are specific to mesh mapping include:
Eyepoint
Section titled “Eyepoint”The point from which the 3D content is rendered and mapped to the screens. This is the point in the world from which the perspective of the 3D content will look correct.
Scene origin
Section titled “Scene origin”This can be used to offset the origin of the 3D content from the Designer coordinate space, to modify the alignment of the scene relative to the screens.
Roll rate limit
Section titled “Roll rate limit”It is possible to add the mesh mapping to a parent object, such as a camera, so that the eyepoint follows that camera (see below). Following a tracked camera can cause sudden jumps in the roll of the frustum, which can result in artefacts in the rendered content. Roll rate limit avoids these jumps by limiting how quickly the roll of the frustum can change.
Near clipping plane
Section titled “Near clipping plane”The distance (in metres) from the eyepoint of your frustum’s near clipping plane. Objects in the content closer than this are not rendered.
Far clipping plane
Section titled “Far clipping plane”The distance (in metres) from the eyepoint of your frustum’s far clipping plane. Objects in the content further than this are not rendered.
Enable warp
Section titled “Enable warp”Mesh mappings render views of a 3D scene from the eyepoint, and then apply a perspective warp onto the meshes of the selected displays. If Enable warp is ticked, when using Renderstream the perspective warping will be applied on the render node, saving performance on the machine receiving the streams and avoiding streaming pixels which will ultimately be cut off in the perspective warping. If Enable warp is unticked, RenderStream will stream the rendered views, and the perspective warp will happen on the receiving machine. This option has no effect for locally rendered modules.
Overscan
Section titled “Overscan”Renders extra content outside the original canvas to compensate for edge effects. 1 means 100 % of the original size, 2 means 200 %, etc. Note that the resolution of the total rendered content doesn’t change even though the field of view is increased. You may wish to increase the mapping resolution to account for the overscan added.
Combine Screens
Section titled “Combine Screens”By default, Mesh Mapping renders a separate content viewpoint for each screen in the mapping. However, the Combine Screens option can be used to cover multiple screens with a single viewpoint. This can be helpful for improving performance in setups with lots of screens close together. The available options are:
- None: Each screen has its own separate viewpoint frustum (default).
- All: All screens share a single combined viewpoint frustum.
- Non-Output: Viewpoints are combined on non-output machines (e.g. Editor, Dedicated Director), separate on output machines (e.g. Actor, Non-Dedicated Director).
- All Active: Each machine combines its locally active screens into a single viewpoint. Note that this option does not work with RenderStream; RenderStream modules will render a separate viewpoint per screen as in None mode.
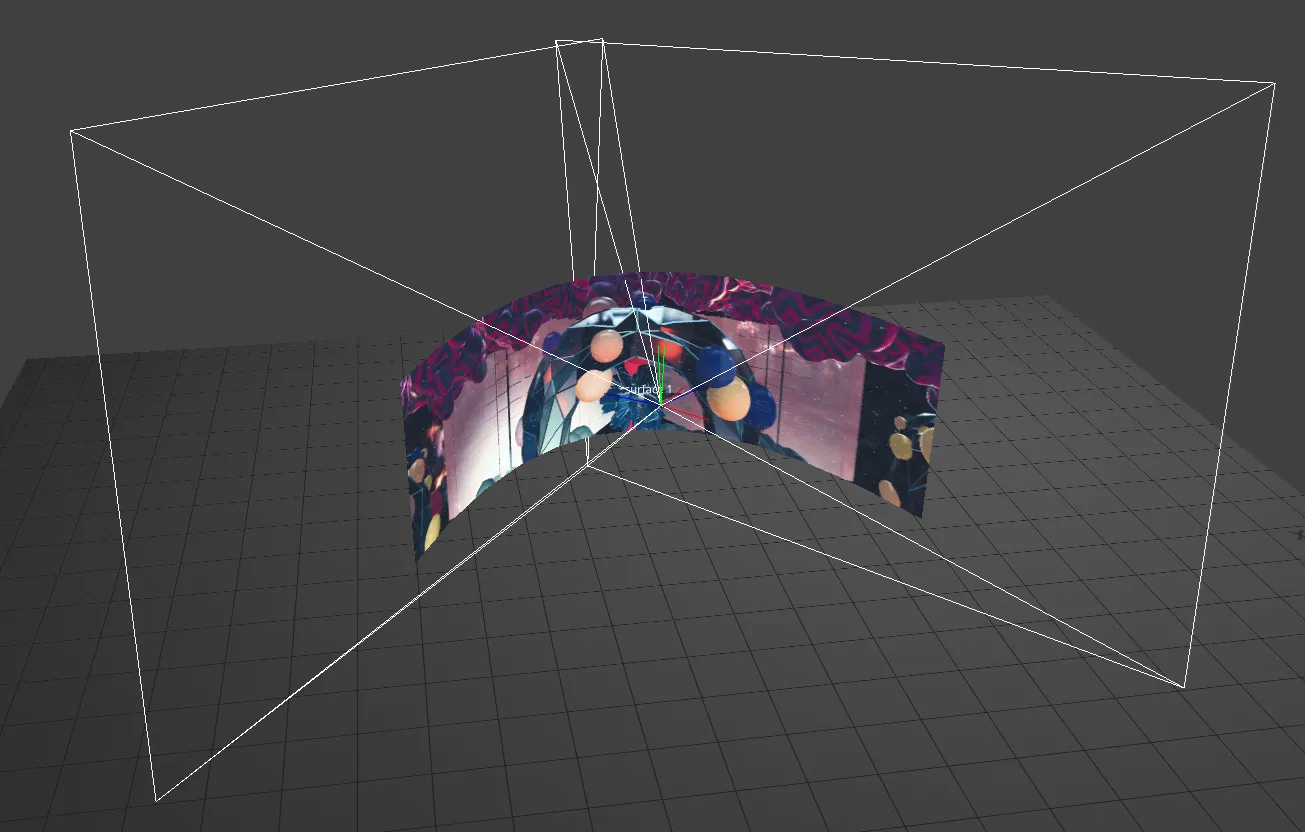
Frustum Visualisation
Section titled “Frustum Visualisation”When the mesh mapping editor is open, the viewpoint frustum(s) are drawn in the stage, which can be helpful for understanding how the content is projected.

RenderStream Workflows
Section titled “RenderStream Workflows”Mesh mapping can be very helpful for 3D content workflows using RenderStream. As described above, mesh mapping projects content onto screens on the render node side, avoiding sending pixels over the network, which will subsequently be discarded. It also automatically creates a viewpoint frustum which tightly bounds the screen, maximising the efficiency of each rendered pixel.
RenderStream allows rendering of large canvases to be clustered across multiple render nodes (see RenderStream overview). Mesh mapping supports this workflow, generating a separate viewpoint frustum for each screen fragment, and combining the resulting renders together to give a single continuous view of the 3D scene. Padding and overlap can be used as normal to blend between the fragments.
Clustered rendering also allows mesh mapping to be used for screens which wrap around the eyepoint with a field of view over 180 degrees. Since a separate viewpoint is generated for each fragment, the mapping will look correct as long as each individual viewpoint has a field of view less than 180 degrees.
RenderStream clustering can also be used to render in-frustum and out-of-frustum content simultaneously.
Cluster rendering workflow
Section titled “Cluster rendering workflow”To use a mesh mapping within a Cluster Workload for an in-frustum and out-frustum setup:
- Set up a single channel within your Cluster Workload that is targeting MR set (backplate)
- Create another channel that targets a mesh mapping. For a pool size of 2, this will generate 2 streams for the mesh when it is started.
- Be sure to use the same scene origin object in both so that they have the same reference point.
- Start the workload. You will see 3 total streams across the network as it receives the renders for both in-frustum and out-frustum.
Following a camera
Section titled “Following a camera”It is possible to set up a mesh mapping so that the eyepoint follows the position of a camera. This gives a mapping which adapts to the perspective of the camera like a Spatial or Camera Plate backplate mapping, but fills the whole screen rather than just the camera frustum.
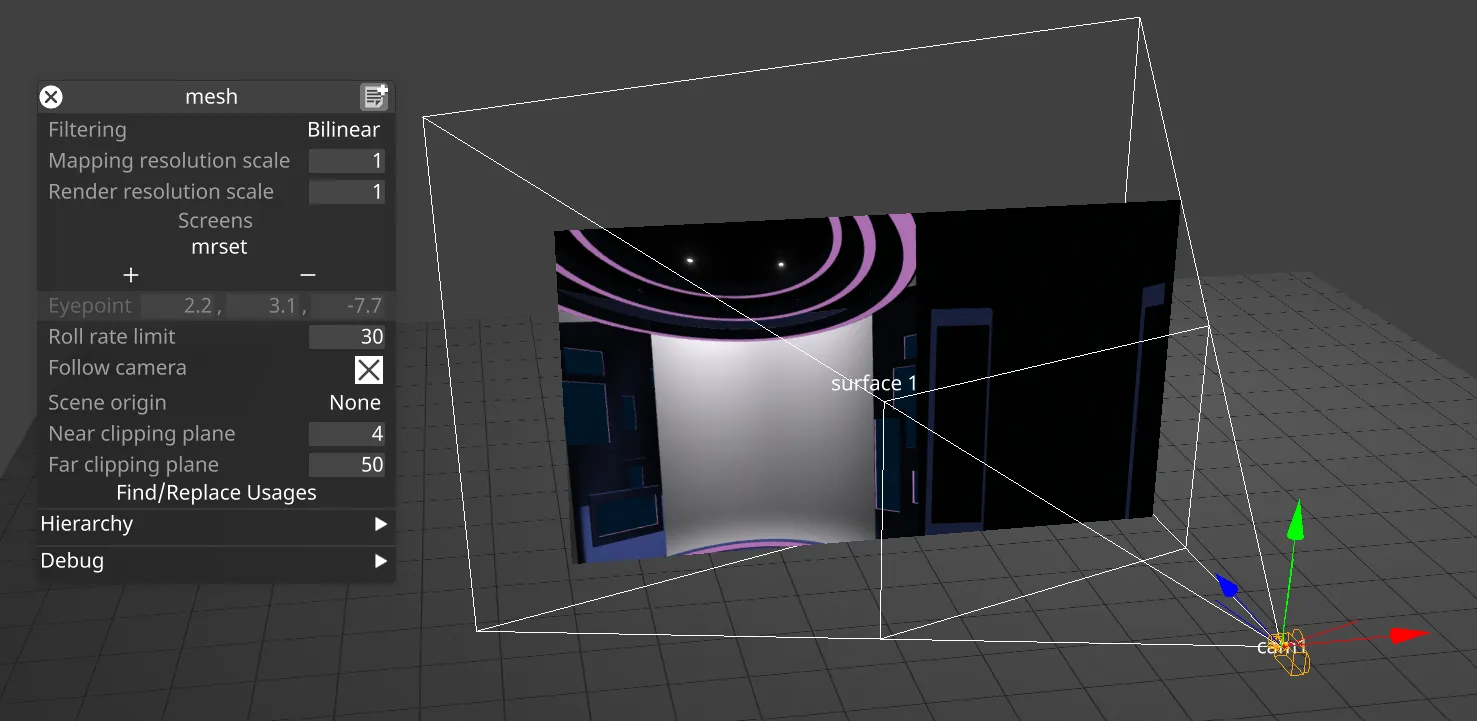
To set up a mesh mapping to follow a camera in an MR set:
- Create an MR set, and add screens and a camera.
- Create a mesh mapping and add the MR set to the list of screens. The mesh mapping will then automatically target the screens in the MR set.
- The Follow camera field will appear in the mesh mapping editor. Tick this to make the eyepoint follow the camera position.
- Alternatively, similar behaviour can be achieved by adding a camera to the list of screens in the mesh mapping, or by parenting the mesh mapping to any other object.
Troubleshooting
Section titled “Troubleshooting”As the eyepoint moves around, the mesh mapping frustum can suddenly jump as it finds a more efficient way to bound the screen. This can cause blurriness or other artefacts in the rendered content. To compensate for this, set the Roll rate limit to reduce the speed at which the frustum is allowed to roll.
Moving the mesh mapping eyepoint can also result in sudden changes in focal length, which can cause blurriness if depth of field effects are enabled in the render engine (e.g. Unreal). Depth of field should not be enabled on cameras when using them for mesh mapping. Click here for instructions on how to do this in Unreal Engine.