Device Recording
Device Recording is a tool to record the incoming data streams of different Devices (DMX, Automation and MIDI) for later playback without needing the device attached.
Once a device recording is deleted, it cannot be retrieved. This is because Designer treats recording files as content.
This is useful for recording specific automation control data so a programmer can play it back into the system without the operator needing to be on hand.
Using device recording
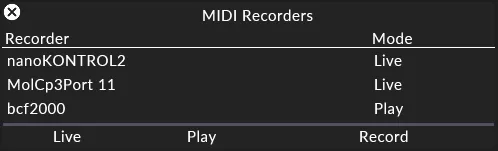
Section titled “Using device recording”There are three modes for Device Recording; Live, Play and Record.
- Live: Only the incoming ‘Live’ data will be actively allowed into Designer.
- Play: Only the recorded data will be actively played back into Designer.
- Record: That device is primed to record the incoming data into Designer.
To set it up:
- Add either a MIDI, DMX, or Automation Device to your device list and set it up appropriately.
- Observe the change to the GUI:

- If you right-click on the heading of the device you would like to set up for recording, a new window appears.
- A right-click on the mode for each device will bring up another window where you can change the mode of the device.
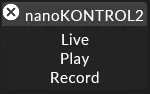
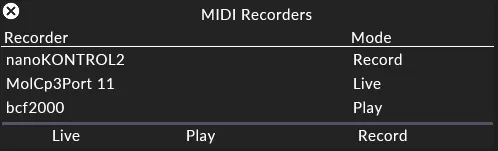
- If we take the nanoKONTROL2 for example, it is currently set to Live and we want to record this device’s input. To do this, right-click on the mode for the device and set it to record. This will tell Designer we want to record this device’s input.
- If you look to the transport controls on the timeline, you will notice an addition to the UI. A Small circle has been added next to the track change controls, this is the record button for Device Recording. With the device set up as above, this can be selected to prime the recording fully. If no device has been set to record, a pop up will appear alerting that this cannot be used as no devices are ready for recording. When it is primed successfully, it will turn red to show the change.

- Now the track is ready to record the input so simply hitting play will start the recording and you will notice a new layer being created as the input stream is being received. This will grow as the recording grows with it. When you have captured all the data you want to record, hitting stop will cease the recording. All device recordings are saved under this tab and individual tabs are created for each device that has made a recording. The recordings that have been made cannot output yet as they need to be set to ‘Play’ in the mode of the recorder.

- Each recording that is made has 3 settings when right-clicked on;
- Disable — stops outputting the recording.
- Reset — puts the recording back to where it originated if it has been moved or edited.
- Delete — removes the recording.
Delete removes the recording entirely — this cannot be undone.
Recordings are saved as .rec files and stored in the object folder under recordingfiles. These are treated like any other asset, but they are highly reliant on project-specific settings such as sections, cues, notes, and so on — so they may not work in other projects. As with any asset, they will need copying over to other machines in the same network environment (for example, an Actor) for them to function correctly.