Fixture Drivers
The final property of a fixture, driver, specifies how colour and orientation information are sent to the actual physical fixture. Please scroll down to the section ‘Fixture properties in the Creating a fixture sub-chapter for information on the other fixture properties.
This is sometimes referred to as the personality of the fixture. It is a list of functions that are supported by the fixture and the channels used to control those functions. This information is usually found in the product manual for the fixture, which is downloadable from the manufacturers website.
You can sequence a complete show in the visualiser without creating fixture drivers. However, a fixture must have a valid driver in order to be assigned a DMX address (channel/universe) using the addressing system and in order to send DMX to the outside world.
Types of fixture drivers
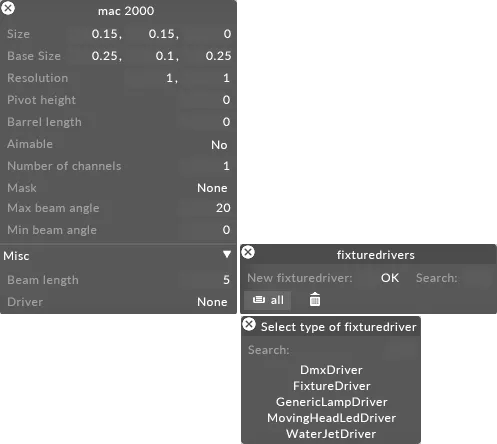
Section titled “Types of fixture drivers”There are four types of fixture drivers available, each suitable for a different class of fixtures.
DmxDriver
Section titled “DmxDriver”This is the easiest type. Use this for DMXcontrolled pixelgrid fixtures that have no moving head or CMY colour mixing hardw
FixtureDriver
Section titled “FixtureDriver”Please ignore this type of fixture driver.
GenericLampDriver
Section titled “GenericLampDriver”This driver is suitable for traditional moving head lights containing (optionally) a pan and tilt base and (also optionally) a CMY (cyan/magenta/yellow) colour mixing system. It supports programming commands such as lamp on/off, shutter on/off, etc.
MovingHeadLEDDriver
Section titled “MovingHeadLEDDriver”This driver combines elements of DmxDriver and GenericLampDriver and is suitable for moving head fixtures that have multiple LED pixels mounted on the moving head.
Creating a fixture driver
Section titled “Creating a fixture driver”To create a fixture driver:
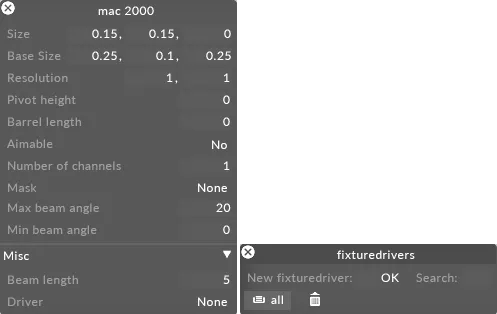
- Open the Fixture editor by right-clicking fixture, in this example mac 2000 , from the DmxLights editor.
- Open the Fixturedrivers manager by left-clicking driver from the Fixture editor.
- Type in the name of the new fixture driver, in this example bb4 driver, in the new fixturedriver text field.
- Hit Enter to create the new fixture driver.
- Select a fixture driver type from the list of driver types.
DmxDriver
Section titled “DmxDriver”The DmxDriver is a fixture driver type that routes RGB pixel information to a regular rectangular grid of LED pixels.
DmxDriver Properties
Section titled “DmxDriver Properties”This describes the pixel type of the LED fixture. There are two monochrome modes: mono [weighted sum] gives a more natural result for photographic/gradient images, whereas mono [max signal] ensures that peak brightness is maintained. Sending a redonly image with all levels at 255 will result in an output level of 255, whereas the weighted result will be less than 255.
The options are:
rgb : traditional threecomponent RGB LED , with eight bits per signal (red, green and blue).
rgb + amber : RGB + an extra amber component, all at eight bits per signal.
rgb + white : RGB + an extra white component, all at eight bits per signal.
rgb + amber + white : RGB + amber and white components, all at eight bits per signal.
cmy : cyan, magenta and yellow components.
mono [weighted sum] : monochrome (8 bits); the value sent is a weighted sum of red, green and blue.
mono [max signal] : monochrome (8 bits); the value sent is the maximum of red, green and blue.
Horizontal
Section titled “Horizontal”This property allows the data sent to the tile to be mirrored in the horizontal axis.
Vertical
Section titled “Vertical”This property allows the data sent to the tile to be mirrored in the vertical axis.
Rotation
Section titled “Rotation”This property allows image data being sent to be rotated by 90 degrees clockwise or 90 degrees counterclockwise . This only has an effect if the grid is a square grid.
Amber Level, White Level
Section titled “Amber Level, White Level”These properties allow you to directly control the amber and white signals sent to all pixels. They only have an effect if the mode property is set to RGB+amber or RGB+amber+white . In RGB+white mode, the signal sent to the white LED is computed from the RGB signals.
GenericLampDrivers
Section titled “GenericLampDrivers”To set up a GenericLampDriver object, you need to start with the DMX channel specification of the fixture, usually downloadable as a PDF from the manufacturer. You then read down the channel list, filling in channel numbers into the GenericLampDriver as you go.
Most properties specify either a DMX channel number (which is always taken as an index from the first channel in the fixture, 1 being the first valid channel). If a property is set to 0, no data is sent for that property. For instance, if a light is a CMY fixture (cyan, magenta, yellow), but the cyan channel is set to 0, then information will only be sent to the magenta and yellow channels.
The properties are divided into three major sections: lamp , which controls how information is sent to the lamp; pan/tilt, which controls how rotation commands are sent to moving head fixtures; and commands , which allows for setting default parameters.
This specifies the colour mixing mode for the lamp. This is initialised to cmy.
Since GenericLampDrivers are only meant for singlelamp/pixel fixtures, the mirror/rotate properties from the DmxDrivers are unnecessary and are therefore removed. You can, however, change this to another value if you wish; this allows the GenericLampDriver to be used for singlepixel movinghead RGB LED fixture
Lamp controls
Section titled “Lamp controls”This set of properties controls how information is sent to the lamp.
Lamp properties for a GenericLampDriver
Dimmer channel : standard CMY lights allow you to vary the output brightness using a dimmer. This is a mechanical shutter that blocks more or less light as you change the dimmer setting. This property sets the channel number assigned to the dimmer; if set to 0 (as it should be for RGB LED fixtures), no information is sent.
Dimmer flipMode : some fixtures use the value ‘0 to signify dimmer closed (i.e. minimum light output); others use this value to signify dimmer open (i.e. maximum light output). This switch allows you to change the fixtures behaviour as appropriate.
Min brightness : dimmers, being mechanical, do not always produce a linear response. In particular, some dimmers appear to block all light until the value rises to a non0 value and then open up from there. If the fixtures dimmer exhibits this feature, set min brightness to the value at which output brightness reaches 0 as you dim the light. From then on, Designer will scale the output brightness appropriately to give you a clean, linear response.
Cyan, magenta, yellow channels : these properties apply to lights that use CMY colour generators. They are the channel numbers within the fixture of the cyan, magenta and yellow channels, respectively. These should be set to 0 for RGB fixtures.
CMYK flipMode : if it turns out that your lighting fixture views the world backwards, flip this switch and the CMYK values sent will be inverted, i.e. 0 will be most colour, 255 will be least colour.
Red, green, blue channels : these properties apply to lights for which the mode property (above) is set to rgb . They are the channel numbers of the red, green and blue components respectively. These should be set to 0 for CMY fixtures.
Zoom channel : if the light has the ability to zoom its beam (make it narrower and wider), enter the channel number of the zoom control here; otherwise, leave it at 0.
Focus channel : if the light has the ability to focus its spot so it appears hard edged at different distances, enter the channel number of the focus control here; otherwise, leave it at 0.
Gobo channel : if the light has the ability to change its gobo dynamically, enter the number of the gobo control channel here; otherwise, leave it at zero.
Lamp on, lamp off these are DMX commands (see section ’ DMX commands below) to switch the fixtures lamp on or off. Fixtures often require you to send a DMX value continuously for a number of seconds to fire the command. The DMX commands gives you the ability to do this.
Open shutter, close shutter : many fixtures have a shutter that has two states: open (all light passes through) or closed (no light passes through). Shutter response is usually much faster than dimmer response, so Designer will use the shutter whenever a fast cuttoblack is required. The open/close shutter DMX commands (see next section) allow you to represent this.
DMX commands
Section titled “DMX commands”Many lamp or fixture commands require you to send a particular value on a particular channel for some number of seconds. For example, the Martin Mac2000 will switch off its lamp if you send the value 250 on channel 1 for 5 seconds.
To create a DMX command:
- Open the DmxCommands manager by left-clicking the lamp on, lamp off, open shutter or close shutter properties.
- Type in the name of your DMX command, in this example frost, in the new dmxcommand text field.
- Hit Enter. A DmxCommand editor will open.
Channel : the channel number to send the command on. As with all other channel numbers, this is local to the fixture, with the lowest valid channel being 1. If channel is 0, no data will be sent. You can read the channel number directly from the fixtures DMX chart.
Value : this is the value to be sent on the channel in order to actuate the command. Permissible values are 0 to 255 inclusive. Some commands work with a range of numbers, eg. 248255. It is usually best to pick a value near the middle of the range, i.e. 250 in this case.
Time : this is the duration that the value should be sent to actuate the command, in seconds. Once the command is actuated, Disguise will continue to send the value on the channel for this number of seconds; a command cant be cancelled once it has been actuated. It is possible for this number to be set to 0. If this is the case, Designer will send the value once only.
Min/max value : allows the value to be scaled to any range. min specifies the lower value in the range, ‘max specifies the upper number in the range.
Pan/tilt controls
Section titled “Pan/tilt controls”This set of properties specifies the pan/tilt behaviour of the fixture. If the fixture does not have a moving head base, just leave these values at 0.
Pan/pan fine : most moving head fixtures allow the control of angles via a 16bit number, split into two parts and sent on two separate channels. These two properties specify those channels. As with all other channels, the lowest permissible value is 1. You can read the values directly off the fixture DMX chart.
Pan range : this specifies the range of travel in the pan axis (rotation around the vertical axis), in degrees. The range can be found in the fixtures manual. If, for example, the manual states a range of 270 to +270, the pan range should be set to 270*2 = 540 (you can always use Disguises built in calculator rather than working it out yourself). You can also set this property to a negative number; this will cause the fixture to flip its rotation direction.
Tilt/tilt fine : this specifies the channel numbers for the tilt control and the fine tilt control respectively. As with pan and pan fine , you can read these directly from the manual.
Tilt min/max : while pan range is usually symmetrical around the central axis, the tilt range may differ from front (positive values of tilt) to back (negative values). Therefore, Disguise allows you to specify the minimum and maximum tilt values in degrees. It is permissible for tilt min to be higher than tilt max ; if this is the case, the tilt direction response is reversed.
Commands
Section titled “Commands”This set of properties allows for setting default parameters.
Commands properties for a GenericLampDriver
Reset : this is a DMX command that is issued to reset the fixture.
To reset all stage fixtures:
- Open the Program Settings menu by right-clicking d3 from the dashboard (bar at the top of the screen).
- Select reset all DMX fixtures.
Default : tthis is an array of DMX commands that are sent every frame, regardless of what other data is being sent. This is because fixtures often have a number of extra controls that Designer does not drive directly, such as pan/tilt speed, gobo speed, strobing, secondary gobo or colour wheel controls, etc. If these are left unset, they can end up with values that interfere with normal operation. For this reason, it is advised that you create a DMX command for each extra fixture parameter, name it appropriately, set the default value to an appropriate value, and add it to the default array. This will ensure smooth operation of the fixture as a pixel.
Testing
Section titled “Testing”Testing property used to test a fixture driver with a real example of a fixture
Tester : the final property of the driver is LampTester. This is a helper designed to help you test the fixture driver with a real example of a fixture, without going to the trouble of addressing the complete grid of fixtures.
- Right-click tester to open the LampTester editor.
To use the LampTester property, plug a single fixture into Designer and then modify the properties contained in the LampTester editor. While the LampTester editor is open, all other DMX signals (from the grid of fixtures, or from other DmxScreens) are suppressed.
Test channel : this is the base channel number of the fixture (1 is the lowest valid number). Ensure that this number is the same channel number as you have assigned to the fixture.
Test universe : this is the universe number you have assigned to the fixture (1 is the lowest valid universe).
Lamp : this property allows you to test that you have the right lamp on/off commands. At the start, the state is set to unknown , as the tester has not sent any on/off commands and therefore does not know whether the lamp is on or off. When you set the property to on or off, the lamp on/off command is sent to the fixture. IIf you have the command filled in correctly, the lamp should turn on and off. If not, you need to check the command against the fixture manual.
Shutter : this property lets you test the shutter open/close command. Set the option switch to open or closed ; the lamp shutter should immediately respond.
Test intensity : this property lets you test the dimmer command. Change this number to a value between 0 (dark) and 255 (bright). The value you specify is sent directly to the dimmer, without mediation by the dimmer min brightness value (although the dimmer flipMode is taken into account).
Test colour : this property lets you send a test colour to the fixture. The colour you select is converted to RGB or CMY (depending on the fixture type), the dimmer flipMode mode is taken into account, and the data is sent to the fixture. If you have the channel numbers correct, the fixture should reproduce the colour you specify.
Colour Picker window is used to specify a test colour to the fixture, opened by left-clicking the Test Colour property
Pan : his property lets you directly send a pan angle to the fixture (in normal operation, pan and tilt are computer based on target points). 0 degrees should point the fixture towards the front of the fixture base, with negative values turning to the left and positive values to the right. The front of the fixture is defined (by convention) to be the side to the right of the small LED control panel. The procedure is to send an angle (eg. 90 degrees) and check that the fixture does indeed turn to that angle. If it does not, you may have to adjust either the pan channel numbers (if there is no movement) or the pan range.
Tilt : this property lets you directly send a tilt angle to the fixture. When pan is set to 0, positive tilt values should tilt the fixture lamp towards the front of the fixture; negative values should tilt it towards the back. Setting tilt to 0 should point the fixture directly upwards. If the fixture fails to move when you change the tilt value, you have incorrect tilt channel number settings; if the fixture angle does not match the angle you enter, you will need to edit the tilt min and max values in the driver.
MovingHeadLedDrivers
Section titled “MovingHeadLedDrivers”The MovingHeadLedDriver controls fixtures consisting of a moving head base and a grid of LED pixels. It therefore combines the standard DmxDriver controls with the pan/tilt and commands properties from the GenericLampDriver. The only extra property of note is first pixel channel.
MovingHeadLedDriver properties
Section titled “MovingHeadLedDriver properties”First pixel channel
Section titled “First pixel channel”This sets the channel (relative to the start of the fixtures channel; 1 is the lowest valid number) of the first pixel in the array.
First Pixel Channel property sets the channel of the first pixel in the array.