RenderStream - Unity Integration
RenderStream is the proprietary Disguise protocol for controlling third party render engines from Designer. This topic covers the steps to configure Unity with RenderStream.
For cluster rendering, we recommend the use of render nodes from the same media server product range, e.g. all rx series machines. Mixing of machines from different product ranges is untested and unsupported.
Unity is a third-party game engine that can be used to create 3D scenes. Unity projects can be adapted such that they create RenderStream output streams using Disguise’s Unity plugin. This plugin supports both camera and non-camera based mappings.
A Unity Pro license is required. Please visit the Unity website for more information on purchasing licenses and training on the software.
Plugins
Section titled “Plugins”-
In order to communicate with Designer, Unity requires the installation of a plugin on the render node.
-
The RenderStream pre-packaged plugins for Unity are available in the Disguise RenderStream-Unity GitHub. For the most up to date Unity plugin, you can compile the plugin from the source code under releases.
-
Place the plugin into this folder :
PROJECT_ROOT/Assets/DisguiseUnityRenderStream -
When adding a plugin to a Unity project, it is important that it is placed in the correct location and that the folder containing the plugin files is named correctly otherwise unexpected errors may occur.
-
The available plugin uses DX11,
Direct3D11. Unity has developed the integration further for DX12,Direct3D12which they are making available.
Unity project setup
Section titled “Unity project setup”- Launch Unity, navigate to Projects and select New.
- Create a new 3D project.
- Name the project, set the location to:
C:\Users\USERNAME\Documents\Renderstream ProjectsorD:\Renderstream Projectsif using a system with a media drive (e.g. RX) and select Create. - Open the project folder and place the plugin inside the ‘Assets’ folder.
- Select File followed by Build Settings:
- Set Architecture to Intel 64-bit.
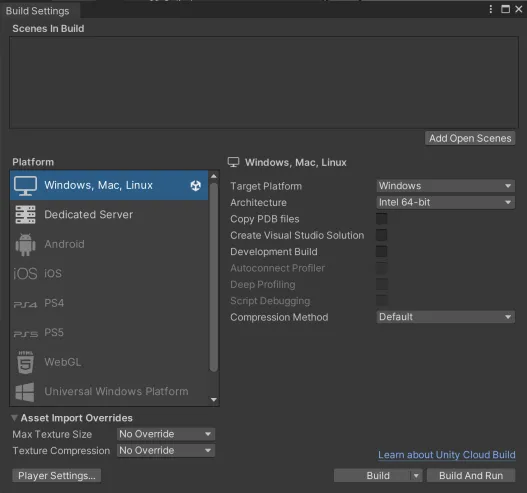
- Set Architecture to Intel 64-bit.
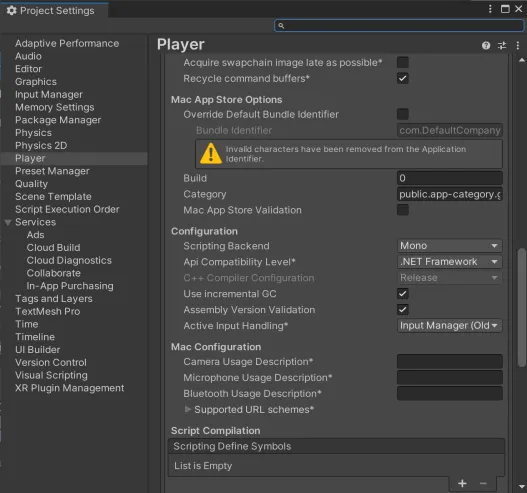
- Navigate to Player Settings… and Configuration:
- Set Api Compatibility Level to .NET Framework
Options
Section titled “Options”Set GameObject Channel visibility
Section titled “Set GameObject Channel visibility”- In Project Settings > Tags and Layers and Layers.
- Name an empty User Layer.
- Select any object from the scene.
- In the Inspector panel, add your new layer in the Layer parameter.
- Select your Camera(s)
- Select whether or not you want the Camera(s) to see the objects in your newly defined Layer by opening the Culling Mask dropdown from the Inspector panel.
Building the Unity project
Section titled “Building the Unity project”RenderStream integrates with Unity builds rather than the Unity editor/game mode.
- If you have multiple scenes in your project, ensure that the scene you wish to build appears in File > Build Settings.
- Build the project.
- Save the project and then close Unity.
- Ensure that the build folder is copied to your RenderStream Projects folder.
Ensure the correct version of Designer is installed on all machines in network, including render nodes.
RenderStream Layer configuration in Designer
Section titled “RenderStream Layer configuration in Designer”- Create a new RenderStream Layer in your Designer project.
- Select Asset and choose your executable.
- Right-click the Asset to open its editor and set Source Machine to the machine with the asset (used for syncing content).
- Select Cluster pool and create a new cluster.
- Within the Cluster Pool, add the desired machines.
- Select Cluster assigner and create a new Cluster Assigner.
- Within the Cluster Assigner:, select the Asset.
- Select New Channel Mapping.
- Within each Channel’s row, select the relevant mapping type, assigner and load weight.
- If the machines in the cluster pool do not have the content or the project has changed, press Sync.
- Ensure all Sync Tasks are marked completed.
- Press Start.
- Wait for Workload status to switch to Running.
Firewall settings can interfere with transport streams and/or cluster communication. You may see a Windows security dialog pop-up the first time you run the asset.Click Enable / Allow on this Windows pop-up to allow RenderStream communication to/from designer.
If the firewall is the problem check your outbound firewall rules on the Unity machine, and the inbound firewall rules on the Disguise machine for either software being specifically blocked.
Unity assets can only be split across multiple nodes when using 3D Mappings (i.e. Camera Plate or Spatial). Attempting to split using a 2D Mapping will not work; all nodes will render the entire frame.
Exposed parameters
Section titled “Exposed parameters”The Unity plugin allows you to expose certain options for each component of an object available within the scene. These options will be presented as parameters within the RenderStream Layer in Designer. Modifying the value of a parameter in turn changes the value of the corresponding option in Unity thus altering the options of the selected object within the scene.
Exposing a parameter in Unity
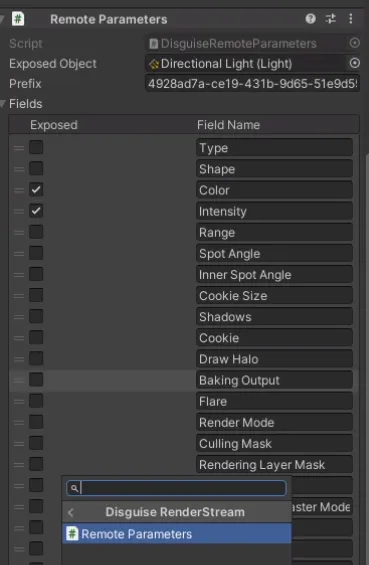
Section titled “Exposing a parameter in Unity”- Select an object from within the scene (e.g. any light source).
- Select ‘Add Component’ at the bottom of the Inspector panel.
- Add the ‘Remote Parameters’ component.
- Drag and drop the component you wish to expose (e.g. Light) into the ‘Exposed Object’ field.
- Expand the ‘Fields’ separator.
- Select all options you wish to expose (e.g. Colour and Intensity).
- Save all changes.
- Build the project.
- Save and close Unity.
- Ensure that the build folder is copied to your RenderStream Projects folder.
- Open the RenderStream layer in and start the workload.
- Modify parameter value(s).
Remote Texture Parameters
Section titled “Remote Texture Parameters”The Unity plugins offers support for sharing textures remotely through the use of exposed parameters. This allows a two-way flow of video content between Designer and the Unity engin
- [Optional] Add a Plane (or any other 3D game object) to the scene.
- Create a new Render Texture: Select ‘Assets’ in the Project panel. Right-click inside and select Create > Render Texture.
- Drag and drop the new Render Texture onto your Plane (or 3D game object of your choice) in the scene. Confirm that the new Render Texture has been added as a ‘Material’ component to your game object. Confirm that the new Render Texture has been set as a material element in the ‘Mesh Renderer’ component of your game object.
- Expose the Render Texture as a remote parameter: Add a ‘Remote Parameters’ component to the Plane (or 3D game object of your choice). Drag and drop the new Render Texture (Material) component into ‘Exposed Object’. Open the ‘Fields’ separator and ensure that “Main Texture” is enabled (no need to enable any other fields).
- Build the Unity project.
- Save and close Unity.
- Open the RenderStream layer in Designer and start the workload.
- Create a new layer (e.g. Video) and assign media (e.g. Ada).
- Move the new layer underneath the RenderStream Layer with Ctrl+Alt+down arrow.
- Alt+drag to arrow the newly created layer into the RenderStream Layer.
- Confirm arrowed input appears in the RenderStream content.
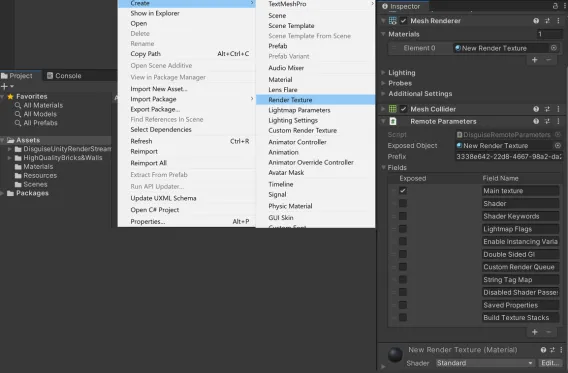
Screenshot showing how to create a Render Texture and expose it on an object.
Remote Parameters-3D Object Transforms
Section titled “Remote Parameters-3D Object Transforms”You can also expose a Unity GameObject’s transform parameters; this will allow you to control the object’s movements in two ways which is defined by the field you expose. When exposing a GameObject’s Transform, you will have the options to expose the following fields:
-
Transform: This allows you to control the full 3D transform (translation, rotation, scale) of the GameObject using a null object in Designer. This workflow is known as 3D Object Transform. The null object acts as a ‘proxy’, allowing you to move objects in 3D via the on-screen transform handles, or by linking it to a dynamic transform data source, e.g. a tracking device.
-
Local Rotation, Local Position, Local Scale: If you expose the local options these will give you the ability to keyframe the rotation, positions and scale in Designer allow for quick and easy manipulation of a Unity object on the Disguise timeline.
Note: If you expose all of the fields, the Local Rotation, Local Position and Local Scale will override the Transform in Designer. This will result in the null object not controlling the Unity GameObject.
Remote Parameters-Text Parameters
Section titled “Remote Parameters-Text Parameters”The Exposed Parameter workflow can also be used to expose live text parameters using a “3D text” actor in the Unity engine. You can use the Remote Parameters workflows to expose the text input field in Designer allowing you to edit the text in real time.
Scenes
Section titled “Scenes”Scenes in Unity can be composed of any number of game objects which are unique to that scene (by default). The Unity plugin offers two forms of multi-scene support:
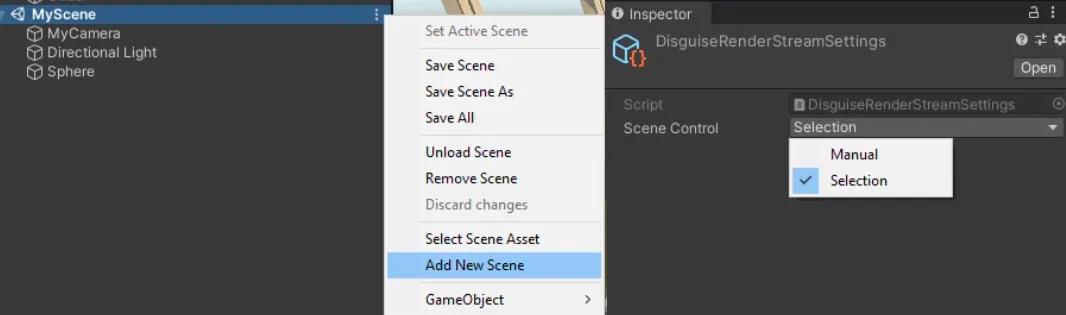
Manual - this option restricts Designer’s control of scenes and instead merges all Channels and remote parameters into a single scene.
Selection - this option allows scenes to be controlled from inside Designer; Channels are merged into a single list (duplicates removed) and remote parameters are per-scene.
- Create a new scene, or open an existing scene.
- Select Resources then DisguiseRenderStreamSettings from the Project panel.
- Set Scene Control option accordingly.
- Ensure all required scenes are selected in the Build settings.
- Build the Unity project.
- Save and close Unity.
- Ensure that the build folder is copied to your RenderStream Projects folder.
- Open the in and Start the workload.
- Modify the Scene parameter as part of your normal sequencing.
Time control
Section titled “Time control”The Unity plugin offers Timecode support. This means that if any game object has a ‘Playable Director’ component and is animated using timeline functionality, it will be reflected in Designer timeline.
Adding time control to an object in Unity
Section titled “Adding time control to an object in Unity”- Select Windowfollowed by Sequencing followed by Timeline.
- Optionally, move the Timeline Window from the main panel to the bottom panel (i.e. drag and drop Timeline Window next to Console Window).
- Select an object from within the scene (e.g. any user placed prop).
- Click the Create button within the Timeline Window.
- Save the new Timeline.
- Hit the Record button on the newly created Animator for the chosen object within the Timeline.
- Add an initial keyframe by right-clicking on any animatable property of the object (e.g. Position) and select Add Key.
- Move the playhead along the Timeline.
- Modify your chosen property either by using the 3D controls within the Scene or by updating the value directly from within the Inspector panel (a keyframe will be added automatically when a value is changed).
- Hit the Record button again to stop recording.
- Return the playhead to the beginning of the Timeline and play the sequence to confirm your animation is correct.
- With the object still selected, select Add Component at the bottom of the Inspector panel.
- Add the Time Control component.
Build and test time control
Section titled “Build and test time control”- Build the project.
- Ensure that the build folder is copied to your RenderStream Projects folder.
- Save and close Unity.
- Open the in and Start the workload.
- Play your timeline in Designer.
Useful Unity information
Section titled “Useful Unity information”-
There is no need to attach the Disguise RenderStream script to the cameras in Unity. Cameras will auto-configure on asset launch.
-
When using the ‘Manual’ scene selection option in Unity, game objects from all built scenes will not appear in the “Default” scene. In order to merge scenes and/or dynamically load/unload them, a custom script must be used.
-
The “Default” scene will be the first indexed scene from within the ‘Scenes In Build’ table in Unity’s build options.
-
The exposed parameters from all scenes will still show within Designer, even if game objects from all built scenes are not merged into the “Default” scene.
-
When using the ‘Selection’ option in Unity, game objects and exposed parameters are unique to each scene. There is no shared object scene similar to the “Persistent” level in Unreal Engine.
-
When launching a Unity executable for the first time, a Windows Firewall popup will appear. If the executable is not allowed through the firewall, Designer will not be able to receive the RemoteStream Game objects included as part of a Unity template may not be be able to be controlled via Timecode. This is a Unity issue rather than one with the Disguise script.
-
When using the Unity High Definition Render Pipeline (HDRP), an alternative to the Universal Render Pipeline (URP):
-
Both the ‘Windows 10 SDK’ and ‘Game Development with C++’ modules must be installed as part of your Visual Studio installation.
-
The ‘Scripting Backend’ must be set to “Mono” when building the executable.
-
-
Since Unity Assets are built executables, Disguise will not recognise the ‘Engine’ of them; they will simply be reported as “Custom”. Disguise will not be able to report the Unity plugin version used within built executables. If an incompatible Disguise-Unity plugin combination is used, no explicit notification will be shown.