MultiTransport Controller
What is a MultiTransport?
Section titled “What is a MultiTransport?”Multitransports allow for the control of multiple tracks within a project simultaneously, instead of sequentially.
A Multitransport is comprised of multiple Transport Managers. More information on Transport controls can be found here.
Common uses of MultiTransports include dividing shows by main content tracks and live content elements, or in a multi-programmer scenario, where one programmer sequences control commands in one track, and the other sequences content in a new track. Then, at show time, both tracks can be controlled independently from each other, but still interact.
In the Workflow and Example tabs on this page, example uses of MultiTransports in broadcast, theater, and touring situations are outlined, but there are many creative uses of MultiTransports beyond those outlined here.
Example Workflows
Section titled “Example Workflows”Broadcast
Section titled “Broadcast”Below we will compare the same broadcast scenario, with one project set up in a singular track setup, and the other with the use of a MultiTransport.
The project is of a TV Studio that requires the following elements: test patterns, studio graphic overlays, backgrounds, a live video feed, and Picture in Picture video elements for each different news segment (PiPs).
In this first example of a singular track setup, the project has multiple video layers, all stacked up on top of each other to determine hierarchy. The majority of these are backgrounds and studio graphics, all running beneath every other layer in the timeline (Video layers 8-13), with the live feed as its own section in the timeline. It is then up to the operator to navigate to the correct PiP for each news segment.
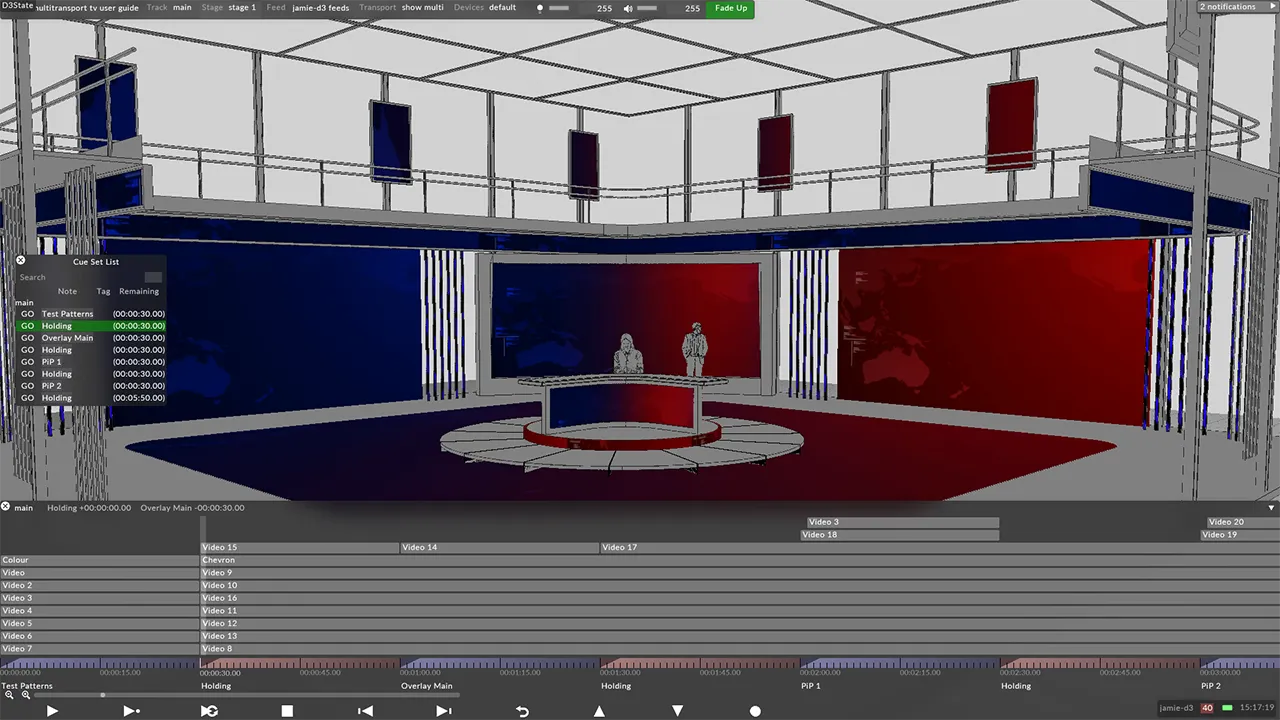 Image 1: Stacked layers
This creates a very rigid and manual timeline structure, in an environment that is needs to have a fluid and dynamic structure (for example, in the event of breaking news.) This is a reason a single Transport and Timeline structure will not be effective for this production.
In this second project, the production utilizes a MultiTransport to organize all their separate elements and allow for more flexible control.
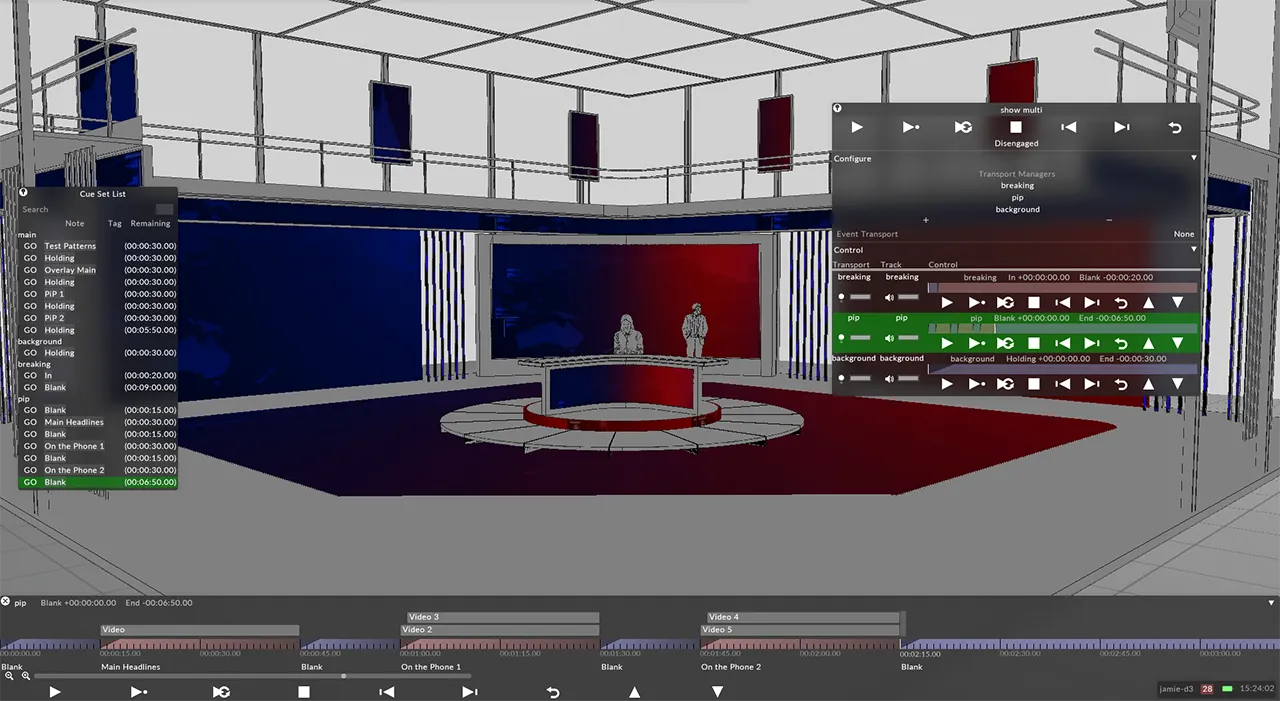 Image 2: MultiTransport
There are three separate tracks in the MultiTransport editor. The first is titled ‘breaking” and covers the breaking news issue from earlier. This track contains a graphic saying “Breaking News” and a live video feed of the reporter on the scene.
It can be made live at any point during the show by hitting the Play command for that track on the MultiTransport editor, and because it is above all other tracks in the editor, it will show on top of whatever other content is playing back on the assigned screens.
Because there is a universal crossfade option enabled on the track, the feed will always fade in and out at the assigned duration, so the operator does not need to worry about a hard cut when activating the live feed.
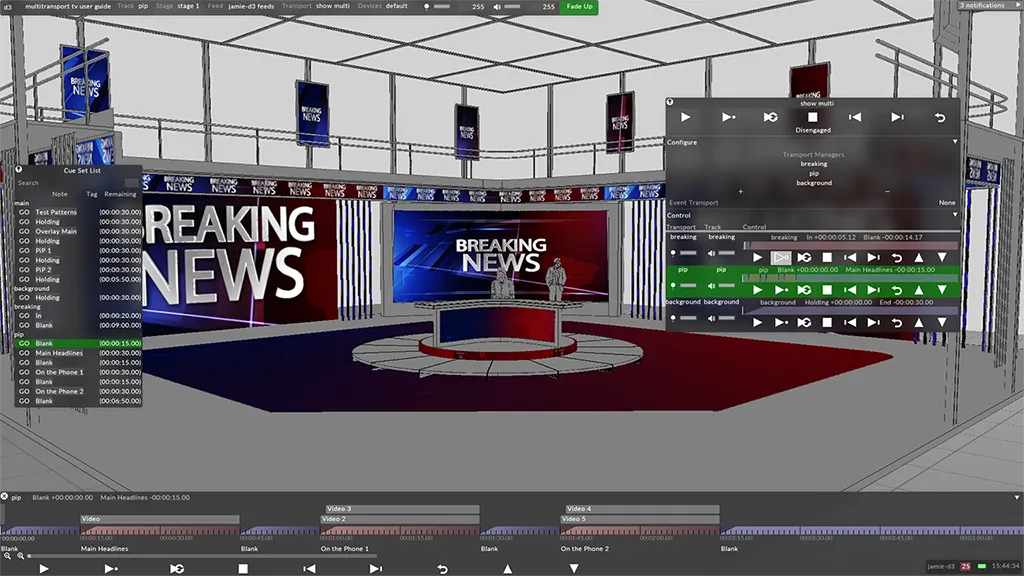 Image 3: Breaking News
The second track is titled PiP and contains sequentially cued news segments. Because each PiP is contained in its own section, they can be played back one by one by the operator until the anchor has completed discussion for each segment. Because the PiP track is beneath the breaking track, the breaking news live video feed will always take precedence over the PiP when it is activated.
The third and final track is titled background, because that is all it contains. It the lowest track, so all elements will appear on top of it. Because there is only one section, the operator can continually loop this background video for however long the broadcast is and does not have to worry about accidentally overriding it by cueing up a new piece of content in another track.
Finally, note that the cue list pinned to the left hand side of the GUI reflects all cues in all three of the tracks. This allows for great flexibility of the operator to control all separate graphic and video elements from one UI element. More information on the cue list can be found here.
Theatre
Section titled “Theatre”This example project is a theatrical show where the MultiTransport divides the Control Layers for the projector shutters from the content sequencing.
This can be useful in a tech rehearsal situation for any holds where the projectors need to be quickly shuttered and the commands have not been built into every cue, or a show where the timing of the projector control changes every night.
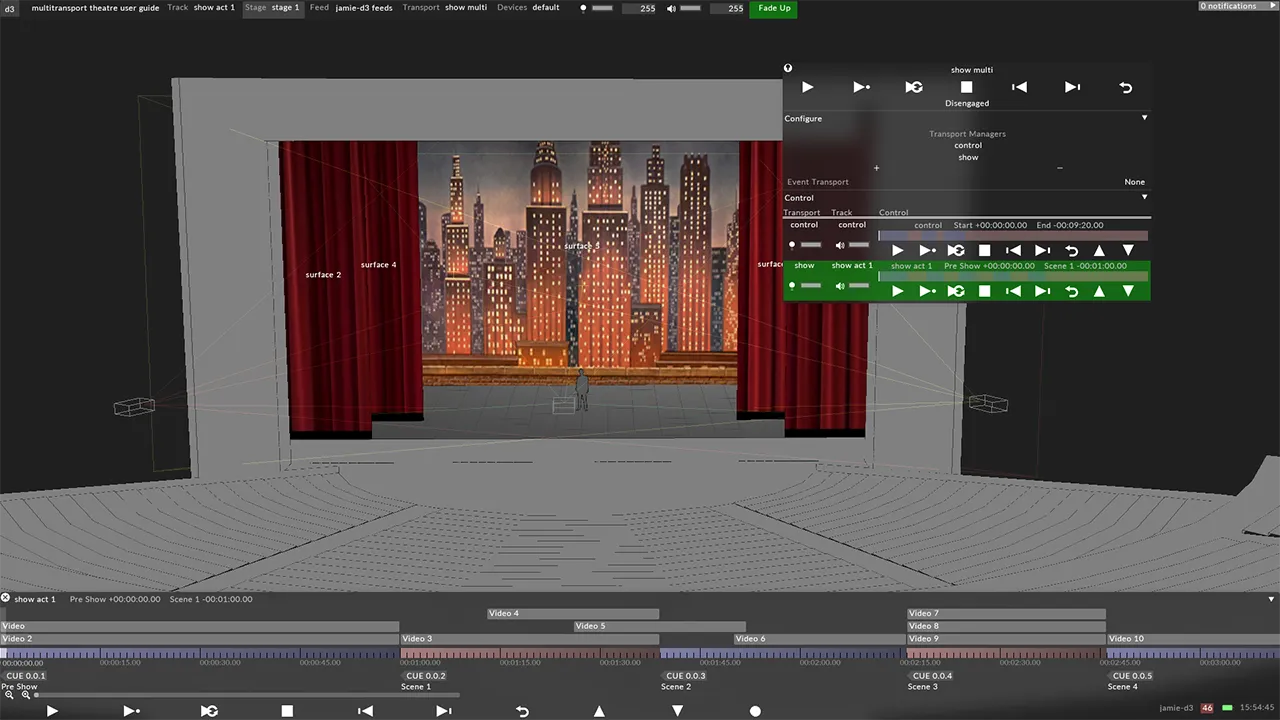 Image 4: Theatre
Concert Touring
Section titled “Concert Touring”In this example project file, the live video feed IMAG is one track, and all the song’s video content is in the track called song 1 beneath it. This will allow the operator control of the IMAG live feed without having to cue it into every song’s track, and is especially helpful when IMAG cues are being called by a camera director or stage manager. This is a similar concept to the broadcast studio, as it allows greater flexibility for a live show environment for unexpected cues.
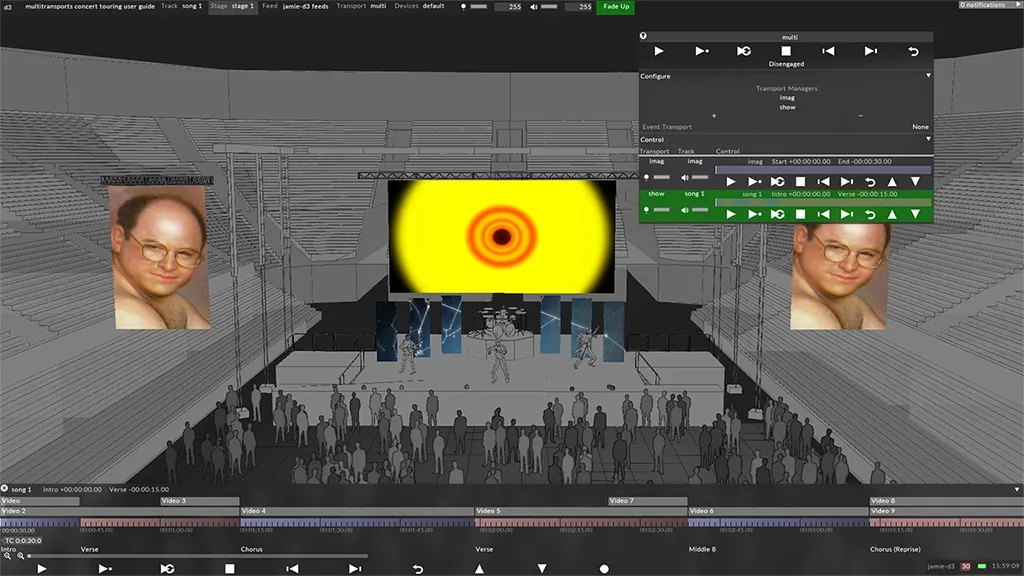 Image 5: Concert Touring
Breaking up every song into individual tracks also allows for the flexibility to create different multitransports based on individual set lists. For a concert touring example, a common practice is creating a set list for each new stop on the tour, where the song list and order is different in each stop. More information on creating set lists can be found here.
Workflow
Section titled “Workflow”Creating a Multitransport Manager
Section titled “Creating a Multitransport Manager”- Create a TransportManager. For more information on TransportManager properties, see Transport Manager.
- Create a Set List by left clicking on the tracks editor in the top toolbar, and click on the Active Set List option. You can either create different set lists, or use the automatic one populated, containing all tracks created in the project. For this example, we will be making three set lists: one for all songs video content (which would contain all individual song tracks), one for the IMAG live video feed track, and one for projector control commands track.
- Left-click to open the Transport Manager and assign the set list containing the tracks you wish to control.
- Repeat Step 3 for all other set lists you with to have active in the MultiTransport. For this example, we will create three separate Transport Managers for each of our set lists: titled song content, IMAG, and control.
- Create a new transport from the Transport editor like in Step 1, but choose MultiTransportManager as the type.
- Under the Configure tab, click the + icon and the names of the Transport Managers you wish to control. This will then create a menu with the tracks editor for the active track in each set list. For our example, we will add all three Transports we created earlier.
- To reorder these Transport Managers, left click on one of the names in the Configure tab, and drag it above or below the others. This editor will still respect the top/bottom hierarchy of disguise, similar to layers in the Timeline, so the topmost tracks will always appear on top of those beneath it.
- If you will be controlling this MultiTransport externally, for example through Midi or OSC, assign the proper transport under the Control tab.
- Left-click Disengaged at the top of the MultiTransport editor to engage. Select a playback option in the top Global Transport Control.
- Click on the individual playback controls for each individual track to control them separately. Use the Global playback controls at the top of the Multitransport editor to control all tracks at once.
Properties
Section titled “Properties”-
Global Transport- Controls of all Transports in the list -
Global Engage/ Disengage -
Transport Managers List- These are where individual Transport Managers are added to then be controlled by a MultiTransportManager -
Event Transport- Gives the ability to control the MultiTransportManager through Telnet (JSON Strings). -
Control- Contains the list of TransportManagers to then configure and control.
Telnet commands
Section titled “Telnet commands”Disguise provides a way to gather key information on the status of a Disguise session whilst also providing some basic timeline control.
All commands are formatted in JSON and sent over the telnet protocol.
- Create a new Multitransport Manager.
- Assign transport(s) to Multitransport Manager.
- Assign tracks to transports or use the automatic setlist.
- In the Multitransport Manager add an event transport and set its listening port.
Queries
Section titled “Queries”Queries is the method used to extract information out of Disguise. They are formatted in JSON using the following structure.
{"request":<request_number>,"query":{"q":"<Query>"}}\n
All Queries return data as JSON. It de-serialises into a dictionary that has three entries.
-
Request number: Same number that has been given to Disguise in the initial request, can be used to synchronize requests / replies in a multithreaded environment. If no number has been supplied it defaults to 0. If an error has occurred the number is -1.
-
Status - Defaults to “OK” but will provide context for an error if it occurs.
-
Results - A list of dictionaries that contains the requested information. This is always a list, even if one element is returned back.
Available Queries
Section titled “Available Queries”Machine list: {"query":{"q":"machineList"}}
Returns a list of dictionaries containing information about the machine: d3 name, hostname role and machine type.
Example return : {"request":0,"status":"OK","results":
[{"machine":"4x4-demo","hostname":"4X4-DEMO","role":"Pure master","type":"4x4pro"}]}
Machine status: {"query":{"q":"machineStatus"}}
Returns extra information about a machine: session status, failover status and current FPS.
Example return: {"request":0,"status":"OK","results":[{"active":true,"Failed":false, "fps":32.345558166503909}]}
Player list: {"query":{"q":"playerList"}}
Returns a list of all transports that have been assigned to the multi-event transport
Example return: {"request":0,"status":"OK","results"[{"player":"transport 1"},{"player":"transport2"},{"player":"transport 3"},{"player":"transport 4"}]}
Track list: {"query":{"q":"trackList"}}
Returns a list of all the tracks that have been assigned to players
Example return: {"request":0,"status":"OK","results":[{"track":"track 4", "Length":560.0}, {"track":"track 3","length":560.0}, {"track":"track 2","length":560.0},{"track":"track","length":560.0}]}
Cue list: {"query":{"q":"cueList <Track name>"}}
Returns a list of all the Sections breaks in a given track
Example Return: {"request":0,"status":"OK","results":[{"location":"","startTime":0.0,"length":15.0},{"location":"a","startTime":15.0,"length":15.0},{"location":"b","startTime":30.0,"length":15.0},{"location":"c","startTime":45.0,"length":515.0}]
Commands
Section titled “Commands”You can control the timeline using the following command format
{"track_command":{"command":"<Playmode>","track":"<Track>", "location":”<location>”, "player":"<player name>", "transition":"<transition time>"}}
<Playmode>
Section titled “<Playmode>”-
play - normal play mode, will ignore section breaks on the timeline
-
playSection - play section mode - will hold at section breaks
-
Loop - loop section mode - Will loop around section breaks
-
Stop - stops the playhead
<Track>
Section titled “<Track>”Any track that is in the setlist for the player that you select
<Location>
Section titled “<Location>”Any valid timecode - “00:00:15:00”
Any valid Cues that are present on the timeline - “CUE 35”
<player name>
Section titled “<player name>”Any transport that is present inside the multi transport manager
<transition time>
Section titled “<transition time>”Seconds - crossfades from current playhead position to the new requested position - e.g. “10”
<transition track> & <transition section>
Section titled “<transition track> & <transition section>”Introduced in r17.1 you can assign actions to crossfades using track snippets. You can achieve something similar using the transitionTrack & transitionSection entries.
This is an example command
Section titled “This is an example command”{ "track_command": { "player": "toptransport", "command": "playSection", "track": "toptrack", "location": "00:00:00:00", "transitionTrack": "transitions", "transitionSection": "woosh" }}
transitionTrack is the (string) name of a track, and must be paired with transitionSection which is the (string) note set at the section break.