Libraries
Scene Library
Section titled “Scene Library”This is where you’ll manage all your Scenes. You need to be already inside any Scene to access it:
TOP MENU > File > Open
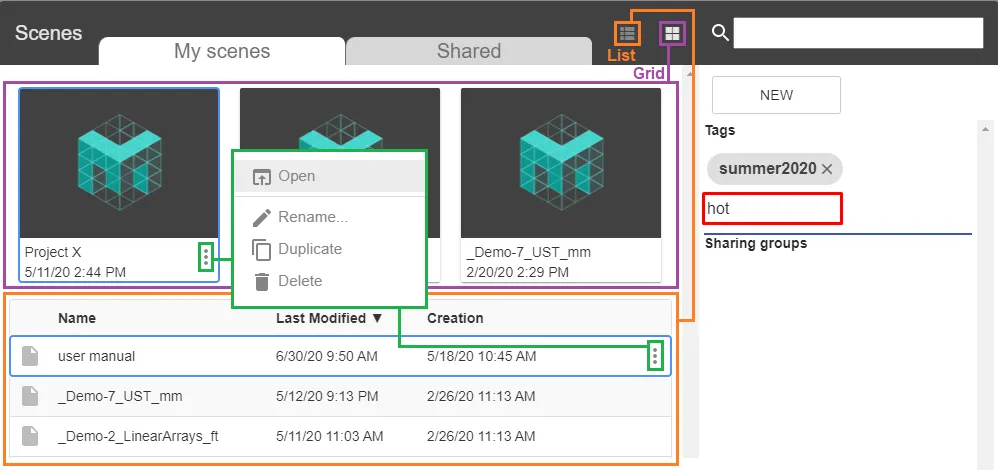
Here you can create / open / rename / duplicate / delete any Scene.
You can change the display of all Scenes from Grid to List.
You can sort them alphabetically / most recently used / by creation date.
Here’s how to Share a Scene.
Click once only on any Scene to select it. Write any Tag and press Enter to save it.
Use Tags not Folders
Section titled “Use Tags not Folders”There are no sub-folders. But you can use Tags to easily organize your Scenes and later find them using the integrated Search engine.
3D Asset Library
Section titled “3D Asset Library”This is where you’ll manage all the 3D Assets to import into your Scene.
TOP MENU > File > Import 3D mesh Objects
Select and Import a 3D Asset
Section titled “Select and Import a 3D Asset”To find an asset in the Library, use the Scroll bar or the Search engine.
![]()
To import a new file, click on IMPORT NEW.
Supported Formats = the best is .FBX(binary), .OBJ and .DAE work fine.
Meshes = a single asset may contain many meshes. They will be accessible as sub-Objects in the Scene Objects panel.
Max individual asset size = 100MB. You can load a bigger asset but only locally : it won’t be saved online, and will need to be re-imported each time you open your Scene. To do so, hold Alt while clicking on Import 3D Mesh Objects.
Storage = all imported files will be stored in the My Assets Library.
Organize your 3D Assets
Section titled “Organize your 3D Assets”Display Modes: try switching it from Grid to List by clicking there.

Here’s what the Grid Mode looks :
And here’s what the List Mode looks like :

Rename / Delete any asset by clicking here.
In the Grid Mode :

Or in the List Mode :
![]()
Favorites: click on an asset’s Heart symbol to tag it as Favorite.
In the Grid Mode :
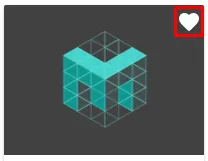
Or in the List Mode :
![]()
And activate Favorite Only to show all tagged assets:
![]()
Sort your files.
In the Grid Mode, by most recently used, or alphabetical order.
Click on the Filter icon.
![]()
In the List Mode : by date of creation, last used, or alphabetically.
Click on the category title.
![]()
3D Asset Optimization
Section titled “3D Asset Optimization”Mapping Matter is not primarily designed for performance. If you work with heavy / complex 3D Assets, we strongly recommend to optimize your files before import. Otherwise, the Browser may crash (especially for computers with small GPU).
Here are a few tips. We’ll use Blender, but this is easily transposable to any advanced 3D modeling software.
Delete all unnecessary meshes
In Blender, switch to Edit Mode to delete.
Delete all unnecessary vertices
In Blender, go to Edit Mode > Mesh > Clean Up > Delete Loose. Or select & delete them manually.
Merge some ( or all) your meshes
Select them, holding Shift. Press Ctrl + J to get them joint.
Export in .FBX(binary) from your 3D software to Mapping Matter
.FBX(binary) will load much faster in Mapping Matter, and often be lighter. .OBJ / .DAE will also work fine.
File Size : max 100mb. Learn here how to upload bigger files (locally only).
Projector Library
Section titled “Projector Library”Mapping Matter is not a Projector Database. However, we provide you with a few demo Projectors.
Here you’ll learn how to create and manage your own Projector Library.
Manage all pre-existing Projectors
Section titled “Manage all pre-existing Projectors”TOP MENU : Projectors > Projector
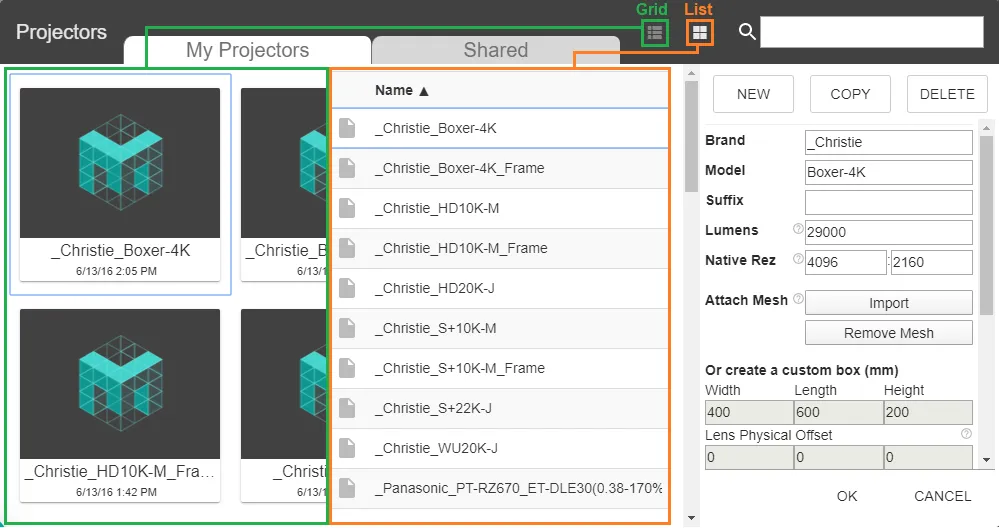
- You can display all Projectors in two modes: Grid or List.
- Sort them by Name or Creation Date, only in the List Display mode.
- Use the Search engine to find Projectors quicker.
- Use Tags to find them quicker in the Search engine.
Add a custom Projector to your Library
Section titled “Add a custom Projector to your Library”TOP MENU : Projectors > Projector
Click on New. And define its Specs in the section below.
For the Projector’s body, you can either Attach Mesh or Create a custom box.
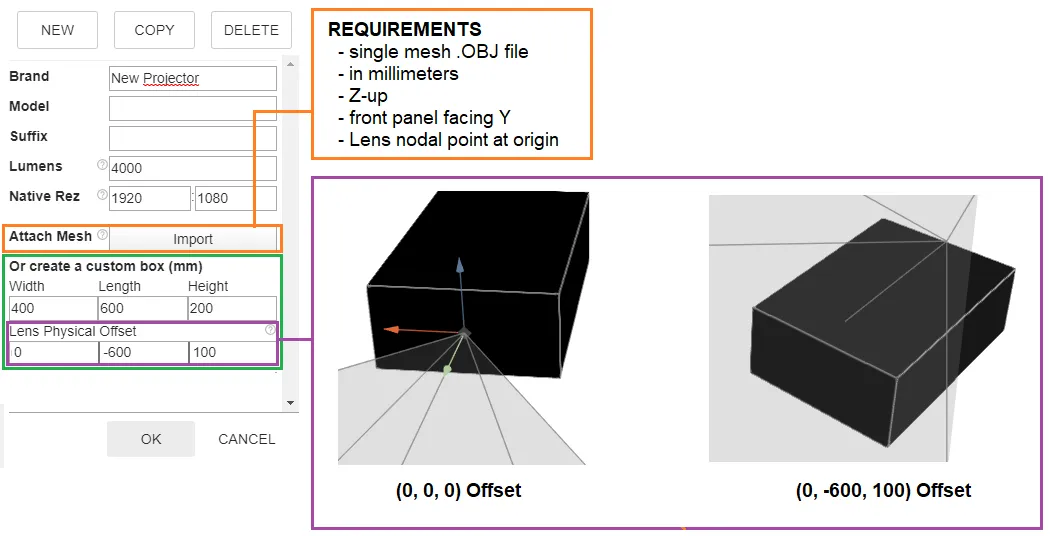
After importing your file, try refreshing your browser and/or clearing your cache.
Finally, click on OK to create your Projector in the Scene.
Your new Projector and its Specs will be saved in your Projector Library.
Texture Library
Section titled “Texture Library”The Texture Library contains your collection of Image and Video files.
This will be used to map an Object’s Material, define a Projector Image, or do Projective Texturing.
Select and Import an Image / Video
Section titled “Select and Import an Image / Video”To find a file in the Library, use the Scroll bar or the Search engine.
![]()
To import a new file, click on Import New
Supported Formats = JPEG / WEBP / GIF / PNG / BMP / ICO / MP4 / WEBM / OGG
Maximum file size = 50MB
All imported files will be stored in your Texture Library.
Organize your Texture Library
Section titled “Organize your Texture Library”You can use different tools to organize your Texture Library.
Display Modes: try switching it from Grid to List by clicking on the corresponding icons.

Here’s what the Grid Mode looks :
And here’s what the List Mode looks like :

Rename / Delete
In the Grid Mode:
Or in the List Mode :
![]()
Favorites
In the Grid Mode:
Or in the List Mode :
And activate Favorite Only to show all tagged files :
![]()
Sort your files.
In the Grid Mode, by most recently used, or alphabetical order.
Click on the Filter icon.
![]()
In the List Mode : by date of creation, last used, or alphabetically.
Click on the category title.
![]()