Advanced RAID Controller Information
MegaRaid LSI Controller
Section titled “MegaRaid LSI Controller”The MegaRAID Storage Manager software enables you to configure, monitor, and maintain storage configurations on LSI SAS controllers such as those installed in your system.
The MegaRAID Storage Manager software enables you to easily configure the controllers, drives, and virtual drives on your server.
The Configuration wizard greatly simplifies the process of creating drive groups and virtual drives. The wizard allows you to easily create new storage configurations and modify configurations.
You must have administrative privileges to use the MegaRAID Storage Manager software in either full-access or in view-only mode.
To start the MegaRAID Storage Manager software double-click on the desktop icon.
This will open the following window:
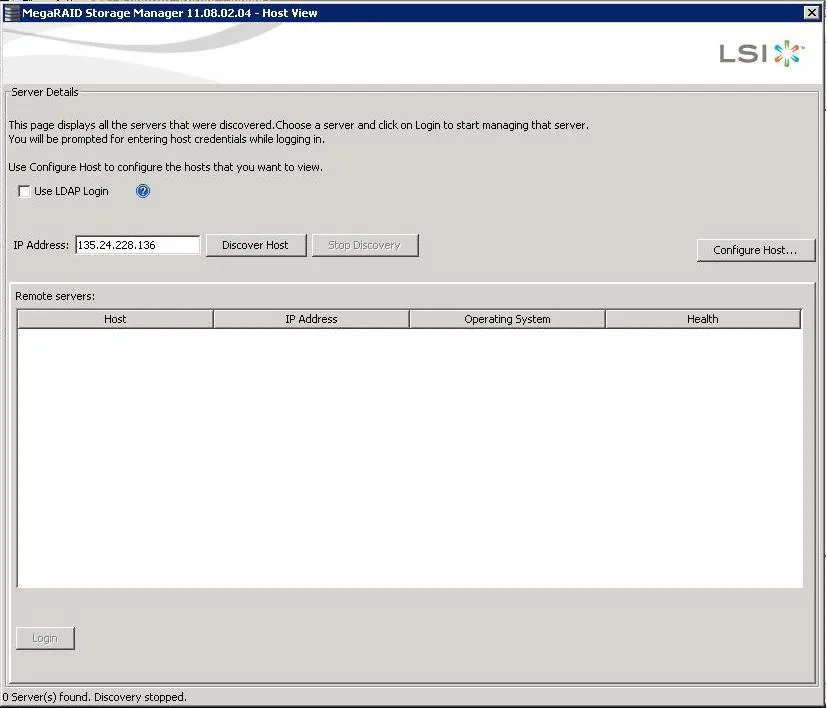
The Host View dialog shows an icon for each server on which the MegaRAID Storage Manager software is installed.
The servers are colour-coded with the following definitions:
Green : The server is operating properly
Yellow : The server is running in a partially degraded state (possibly because a drive in a virtual drive has failed)
Orange : The server is running in a degraded state
Red : The server storage configuration has failed
Next you will see a login screen:
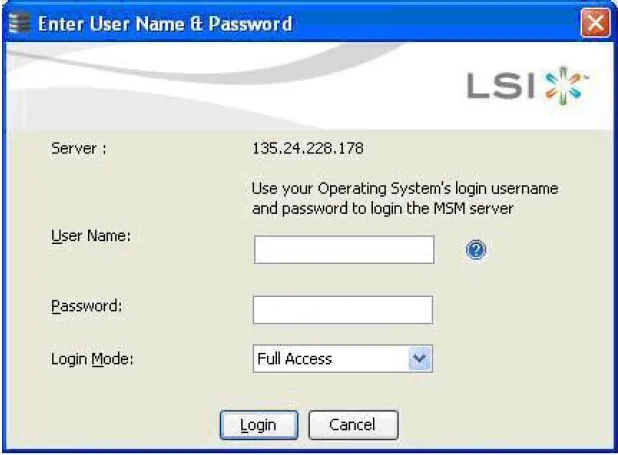
Enter d3 as the User Name and click Login.
This will open MegaRAID storage Manager - Host View window, as follows:

Clicking on Configure Host will open the main Dashboard View:

Physical View
Section titled “Physical View”The Physical view shows the hierarchy of physical devices in the system. At the top of the hierarchy is the system itself, followed by the controller and the backplane. The controller label identifies the MegaRAID controller, such as the MegaRAID SAS 9260-8i controller, so that you can easily differentiate between multiple controllers. Each controller has one or more ports. Drives and other devices are attached to the ports. The properties for each item appear in the right panel of the screen.

Logical View
Section titled “Logical View”The Logical view shows the hierarchy of controllers, virtual drives, and the drives and drive groups that make up the virtual drives. The properties for these components appear in the right panel
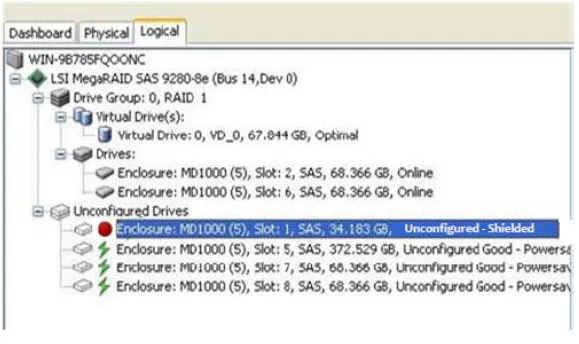
The following figure shows the Logical view:

You can view the properties for individual drives from the drop down menus, as follows:
Shield State
Section titled “Shield State”Physical devices in MegaRAID firmware transit between different states. If firmware detects a problem or a communication loss for a physical drive, it transitions the physical drive to a bad (FAILED/UNCONF BAD) state. To avoid transient failures, an interim state called the Shield state appears before marking the physical drive as bad state. The results of the diagnostic tests determine if the physical drive is good or bad. If any of the diagnostics tests fail, the physical drive will transition to BAD state (FAILED or UNCONF BAD). The three possible Shield states are Unconfigured - Shielded, Configured - Shielded, and Hotspare - Shielded (which is not used in the d3 application).
Shield State Physical View
Section titled “Shield State Physical View”Follow these steps to view the Shield state under the Physical view tab:
-
Click the Physical tab in the device tree
-
The red dot icon () indicates a Shield state
-
The Physical View shield state is shown in the following fig

Logical View Shield State
Section titled “Logical View Shield State”Follow these steps to view the Shield state under the Logical tab:
-
Click the Logical tab in the device tree
-
The red dot icon () indicates a Shield state
-
The Logical view Shield state is shown in the following fig
Viewing the Physical Drive Properties
Section titled “Viewing the Physical Drive Properties”Follow these steps to view the physical properties of the drive in the Shield state:
-
Click the Physical tab or Logical tab in the device tree
-
The red dot icon () indicates a Shield state
-
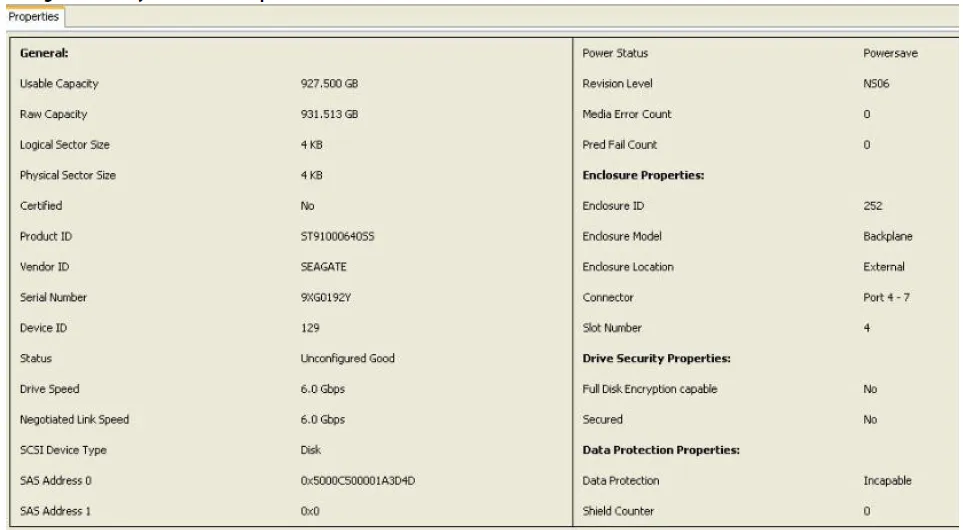
Click the physical drive in Shield state on Physical view or Logical view of the device tree to view the properties
-
The device properties are displayed as shown in the following fig
Device Icons
Section titled “Device Icons”The following icons in the left panel represent the controllers, drives, and other devices.
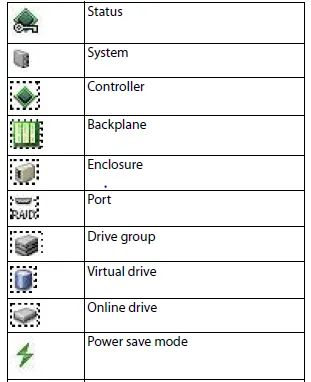
A red circle to the right of an icon indicates that the device has failed. For example, this icon indicates that a drive has failed:
A yellow circle to the right of an icon indicates that a device is running in a partially degraded state. For example, this icon indicates that a virtual drive is running in a degraded state because a controller has failed. An orange circle to the right of an icon indicates that a device is running in a degraded state.
Configuration
Section titled “Configuration”This section explains how to use MegaRAID Storage Manager software to create and modify storage configurations on LSI SAS controllers.
The LSI SAS controllers should only be configured fo RAID 0 for the d3 application to work correctly.
The Configuration wizard allows you to easily create new storage configurations and modify the configurations.
Creating a New Configuration
Section titled “Creating a New Configuration”You can use the MegaRAID Storage Manager software to create new storage configurations on systems with LSI SAS controllers. You can create the following types of configurations:
-
Simple configuration specifies a limited number of settings and has the system select drives for you. This option is the easiest way to create a virtual drive.
-
Advanced configuration lets you choose additional settings and customize virtual drive creation. This option provides greater flexibility when creating virtual drives for your specific requirements.
Selecting Virtual Drive Settings
Section titled “Selecting Virtual Drive Settings”This section describes the virtual drive settings that you can select when you use the advanced configuration procedure to create virtual drives. You should change these parameters only if you have a specific reason for doing so.
It is usually best to leave them at their default settings.
- Initialization state: Initialization prepares the storage medium for use. Specify the initialization status
- No Initialization: (the default) The new configuration is not initialized, and the existing data on the drives is not overwritten
- Fast Initialization: The firmware quickly writes 0s to the first and last 8-MB regions of the new virtual drive and then completes the initialization in the background. This allows you to start writing data to the virtual drive immediately
Full Initialization: A complete initialization is done on the new configuration. You cannot write data to the new virtual drive until the initialization is complete. This process can take a long time if the drives are large.
Read policy: Specify the read policy for this virtual drive
Section titled “Read policy: Specify the read policy for this virtual drive”-
Always read ahead: Read ahead capability allows the controller to read sequentially ahead of requested data and to store the additional data in cache memory, anticipating that the data will be needed soon. This process speeds up reads for sequential data, but little improvement occurs when accessing random data.
-
No read ahead: (the default) Disables the read ahead capability.
Write policy: Specify the write policy for this virtual drive
Section titled “Write policy: Specify the write policy for this virtual drive”-
Write Through: In this mode, the controller sends a data transfer completion signal to the host when the drive subsystem has received all of the data in a transaction. This option eliminates the risk of losing cached data in case of a power failure.
-
Always Write Back: In this mode, the controller sends a data transfer completion signal to the host when the controller cache has received all of the data in a transaction.
I/O policy: The I/O policy applies to reads on a specific virtual drive. It does not affect the read ahead cache.
Section titled “I/O policy: The I/O policy applies to reads on a specific virtual drive. It does not affect the read ahead cache.”- Cached IO: In this mode, all reads are buffered in cache memory.
- Direct IO: (the default) In this mode, reads are not buffered in cache memory. Data is transferred to the cache and the host concurrently. If the same data block is read again, it comes from cache memory. Cached IO provides faster processing, and Direct IO ensures that the cache and the host contain the same data.
Access policy: Select the type of data access that is allowed for this virtual drive
Section titled “Access policy: Select the type of data access that is allowed for this virtual drive”- Read/Write: (the default) Allow read/write access. This setting is the default value.
- Read Only: Allow read-only access.
- Blocked: Do not allow access.
- Disk cache policy: Select a cache setting for this drive:
- Enabled: Enable the disk cache.
- Disabled: (the default) Disable the disk cache.
- Unchanged: Leave the current disk cache policy unchanged.
Creating a Virtual Drive Using Simple Configuration
Section titled “Creating a Virtual Drive Using Simple Configuration”Simple configuration is the quickest and easiest way to create a new storage configuration. When you select simple configuration mode, the system creates the best configuration possible using the available drives.
Follow these steps to create a new storage configuration in simple configuration mode
Section titled “Follow these steps to create a new storage configuration in simple configuration mode”- Perform either of the following steps:
- Right-click the controller node in the device tree in the left frame of the MegaRAID Storage Manager window, and select Create Virtual Drive.
Or
Select the controller node, and select Go To > Controller > Create Virtual Drive in the menu bar, as shown in this image.

The dialog for the configuration mode (simple or advanced) appears, as shown in the following figure:-
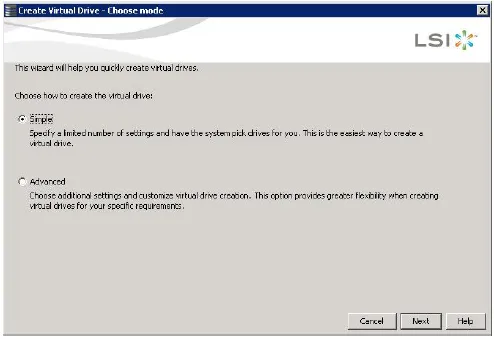
Select the Simple radio button, and click Next.
The Create Virtual Drive - Allocate capacity dialog appears, as shown in the following figure. If unconfigured drives are available, you have the option to use those unconfigured drives. If unconfigured drives are available, the Create Drive Group Settings window appears, and you can go to the next step.
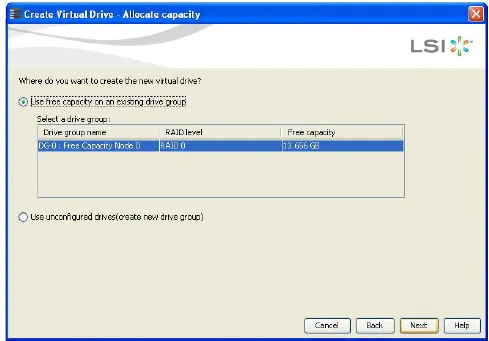
- Perform either of the two options: If a drive group exists, select the Use free capacity on an existing drive group radio button and click Next. Continue with the next step. The Create Virtual Drive window appears, as shown in the following figure. If unconfigured drives are available, select the radio button to use the unconfigured drives, and click Next. Continue with next step. The Summary window appears as shown:-

Please note: For best results, do not use drive type mixing.
- Select RAID 0 for the virtual drive.
When you use simple configuration, the RAID controller supports RAID levels 1, 5, and 6. In addition, it supports independent drive (configured as RAID 0).
- Use the drop-down list in the Virtual drives field to choose how many virtual drives you want to create. Select the capacity of the virtual drives. Each virtual drive has the same capacity. Click Next.
The Create Virtual Drive - Summary window appears, as shown in the following figure. This window shows the selections you made for simple configuration:-
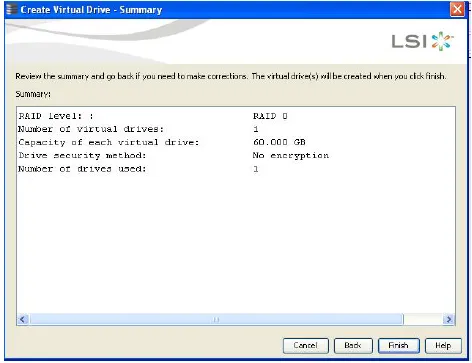
Either click Back to return to the previous window to change any selections, or click Finish to accept and complete the configuration. The new virtual drive is created after you click Finish. After the configuration is completed, a dialog box notifies you that the virtual drives were created successfully.
Creating a Virtual Drive Using Advanced Configuration
Section titled “Creating a Virtual Drive Using Advanced Configuration”The advanced configuration procedure provides an easy way to create a new storage configuration. Advanced configuration gives you greater flexibility than simple configuration because you can select the drives and the virtual drive parameters when you create a virtual drive. In addition, you can use the advanced configuration procedure to create spanned drive groups.
- Follow these steps to create a new storage configuration in the advanced configuration mode. This example shows the configuration of a spanned drive group. Perform either of the following steps to bring up the Configuration wizard: Right-click the controller node in the device tree in the left frame of the MegaRAID Storage Manager window, and select Create Virtual Drive. Select the controller node, and select Go To > Controller > Create Virtual Drive in the menu bar. The dialog for the choosing the configuration mode (simple or advanced) appears, as shown in the following figure:-

Select the Advanced radio button, and click Next.
The Create Drive Group Settings window appears, as shown in the
following figure:-

Select the following items on the Create Drive Group - Drive Group
Settings window:
Select the RAID level 0.
Independent drives configured as RAID 0 are supported.
DO NOT set a drive security method.
Select unconfigured drives from the list of drives, and click
Add> to add them to the drive group.
The selected drives appear under Span 0 below Drive Group 0, as shown in
the following figure:-
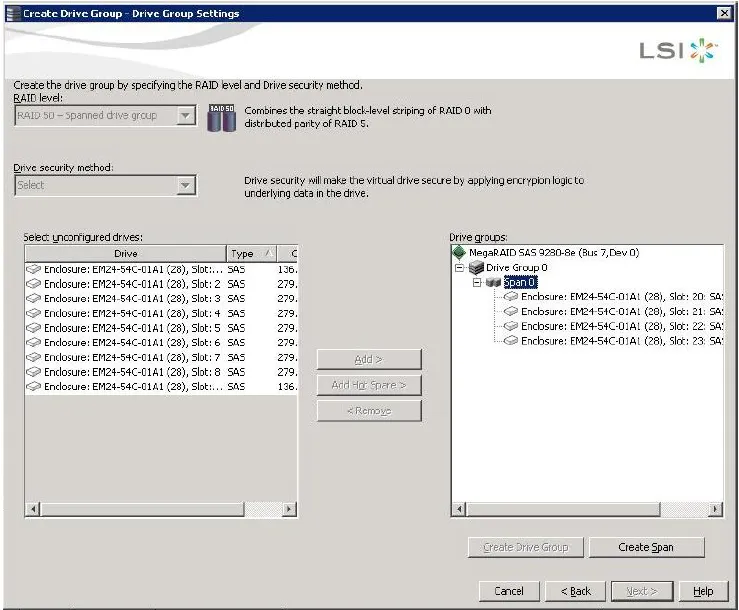
Click Create Span to create a second span in the drive group.
Select unconfigured drives from the list of drives, and click Add> toadd them to the second drive group.
The selected drives appear under Span 1 below Drive Group 0, as shown in the following figure:-

Click Create Drive Group to make a drive group with the spans.
Click Next to complete this step.
The Create Virtual Drive - Virtual drive settings window appears, as shown in the following figure. The drive group and the default virtual drive settings appear. The options to update the virtual drive or remove the virtual drive are grayed out until you create the virtual drive:
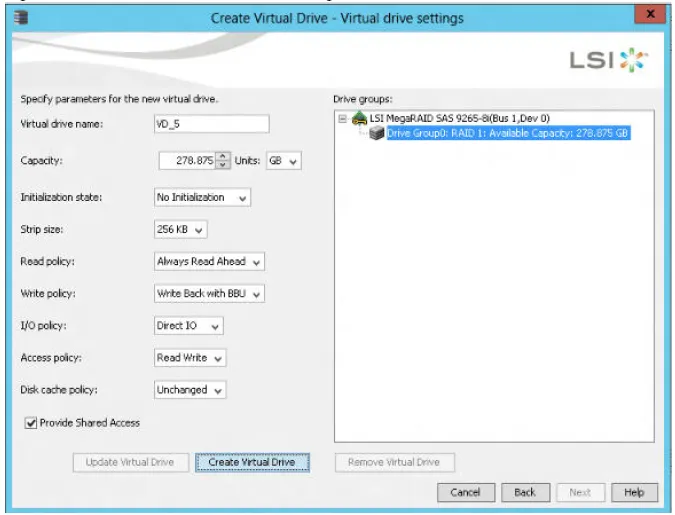
Change any virtual drive settings, if desired.
Click Create Virtual Drive.
The new virtual drive appears under the drive group. The options Update Virtual Drive and Remove Virtual Drive are available. Update Virtual Drive allows you to change the virtual drive settings, and Remove Virtual Drive allows you to delete the virtual drive.
Click Next.
The Create Virtual Drive - Summary window appears, as shown in the following figure. This window shows the selections you made for advanced configuration:-

Click Back to return to the previous window to change any selections, or click Finish to accept and complete the configuration. After you click Finish, the new storage configuration is created and initialized according to the selected options. After the configuration is completed, a dialog notifies you that the virtual drives were created successfully.
Click OK.
The Enable SSD Caching on New Virtual Drives dialog appears.
The newly created virtual drive is enabled for SSD caching by default. Click OK to confirm SSD caching on the virtual drive. Click No if you want to disable SSD caching on the virtual drive. The All check box is selected by default. To disable SSD caching on the virtual drives, deselect the All check box. If more drive capacity exists, the dialog asks whether you want to create more virtual drives. If no more drive capacity exists, you are prompted to close the configuration session.
Select either Yes or No to indicate whether you want to create additional virtual drives. If you select Yes, the system takes you to the Create Virtual Drive - Drive group and Virtual drive settings Dialog. If you select No, the utility asks whether you want to close the wizard. If you selected No in the previous step, select either Yes or No to indicate whether you want to close the wizard. If you select Yes, the Configuration wizard closes. If you select No, the dialog closes, and you remain on the same page.
Adding a Drive or Drives to a Configuration
Section titled “Adding a Drive or Drives to a Configuration”Follow these steps to add a drive or drives to a configuration with the Modify Drive Group wizard. Click the Logical tab in the left panel of
the MegaRAID Storage Manager window. Select a drive group in the left panel of the window. Either select Go To > Drive Group > Modify
Drive Group on the menu bar, or right-click the virtual drive icon to access the Modify Drive Group wizard. The Modify Drive Group wizard
window appears:-

- Select RAID 0 as the level to which you want to change (“migrate”) the drive group, and click Next.
- The following window appears. It lists the drives you can add, and it states whether you have to add a minimum number of drives:-

Click the check box next to any unconfigured drives that you want to add, and then click Next.
The Modify Drive Group - Summary window appears. This window shows the current settings and what the settings will be after the drives are
added:-
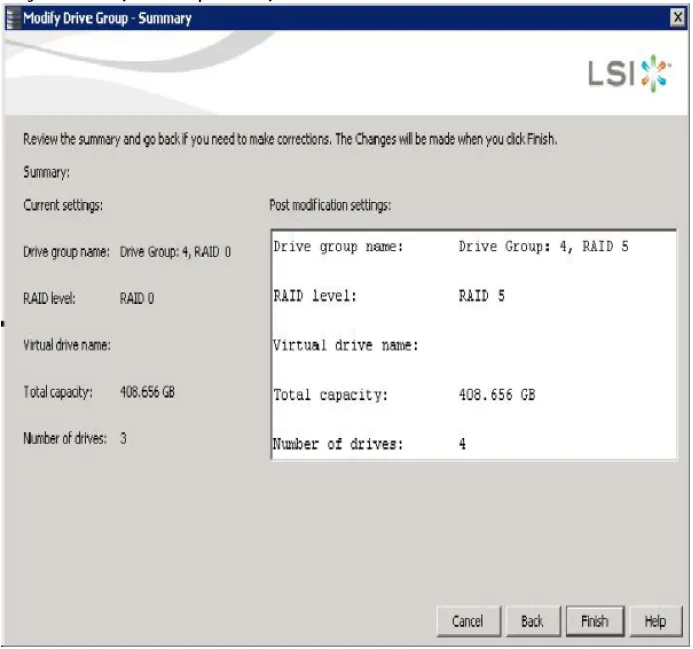
- Review the configuration information. You can click Back if you need to change any selections.
- Click Finish to accept the changes. A confirmation message appears. The message states that this operation cannot be aborted and asks whether you want to continue.
- Click Yes to accept and complete the addition of the drives to the drive group.
Removing a Drive from a Configuration
Section titled “Removing a Drive from a Configuration”- Click the Logical tab in the left panel of the MegaRAID Storage Manager window.
- Click a drive icon in the left panel of the window.
- Either select Go To > Physical Drive > Make Drive Offline on the menu bar, or right-click the drive, and select Make Drive Offline from the menu.
- A confirmation message appears. The message states that this operation cannot be aborted and asks whether you want to continue.
- Click Yes to accept and complete the removal of the drive from the drive group.
Replacing a Drive
Section titled “Replacing a Drive”Follow these steps to add a replacement drive and copy the data from the drive that was removed to the replacement drive.
- Click the Logical tab in the left panel of the MegaRAID Storage Manager window.
- Select a drive in the left panel of the window.
- Either select Go To > Physical Drive > Replace Physical Drive on the menu bar, or right-click the virtual drive icon to access the Modify Drive Group wizard. The dialog with the replacement drive appears, as shown in the following figure:-

- Select a replacement drive.
- A confirmation message appears. Click Yes. This step replaces a drive and copies the data to the selected component.
Maintaining and Managing Storage Configurations
Section titled “Maintaining and Managing Storage Configurations”This section explains how to use the MegaRAID Storage Manager software to maintain and manage storage configurations. Log on to the server in Full Access mode to perform the maintenance and management tasks.
Initializing a Virtual Drive
Section titled “Initializing a Virtual Drive”When you create a new virtual drive with the Configuration Wizard, you can select the Fast Initialization or Full Initialization option to initialize the disk immediately. However, you can select No Initialization if you want to initialize the virtual drive later. To initialize a virtual drive after completing the configuration process, perform these steps: Select the Logical tab in the left panel of the MegaRAID Storage Manager window, and click the icon of the virtual drive that you want to initialize. Select Go To > Virtual Drive > Start Initialization. The Initialize dialog appears. Select the virtual drives to initialize.
Select the Fast Initialization check box if you want to use this option. If you leave the box unselected, the MegaRAID Storage Manager software runs a Full Initialization on the virtual drive. Click Start to begin the initialization. You can monitor the progress of the initialization.
Running a Group Initialization
Section titled “Running a Group Initialization”Initialization prepares the storage medium for use. You can run initialization on multiple drives at one time. Follow these steps to run a group consistency check. Select Manage > Initialize. The Group Initialization dialog appears:-

Either check the virtual drives on which to run the initialization, or click Select All to select all of the virtual drives. Click Start. You can monitor the progress of the group initialization.
Scanning for New Drives
Section titled “Scanning for New Drives”You can use the Scan for Foreign Configuration option to find drives with foreign configurations. A foreign configuration is a RAID configuration that already exists on a replacement set of physical disks that you install in a server. In addition, if one or more drives are removed from a configuration, by a cable pull or drive removal, for example, the configuration on those drives is considered a foreign configuration by the RAID controller. Drives that are foreign are listed on the physical drives list with a special symbol in the MegaRAID Storage Manager software. The utility allows you to import the existing configuration to the RAID controller or clear the configuration so you can create a new configuration using these drives. You can preview the foreign configuration before you decide whether to import it.
The MegaRAID Storage Manager software usually detects newly installed drives and displays icons for them in the MegaRAID Storage Manager window. If for some reason the MegaRAID Storage Manager software does not detect a new drive (or drives), you can use the Scan for Foreign Configuration command to find it.
Follow these steps to scan for a foreign configuration
Section titled “Follow these steps to scan for a foreign configuration”- Select a controller icon in the left panel of the MegaRAID Storage Manager window.
- Select Go To > Controller > Scan Foreign Configuration.
- If the MegaRAID Storage Manager software detects any new drives, it displays a list of them on the window. If not, it notifies you that no foreign configuration is found. Follow the instructions on the window to complete the drive detection.
Upgrading Firmware
Section titled “Upgrading Firmware”The MegaRAID Storage Manager software enables you to easily upgrade the controller firmware. To avoid data loss because of dirty cache on the controller, the utility forces the virtual disks into Write Through mode after a firmware upgrade. It is in this mode until the server reboots. In Write Through mode, the controller sends a data transfer completion signal to the host when the disk subsystem has received all of the data in a transaction. This way, in case of a power outage, the controller does not discard the dirty cache.
Follow these steps to upgrade the firmware
Section titled “Follow these steps to upgrade the firmware”In the left panel of the MegaRAID Storage Manager window, click the icon of the controller you want to upgrade. In the MegaRAID Storage Manager window, select Go To > Controller > Update Controller Firmware. Click Browse to locate the .rom update file, as shown in the following figure:-
After you locate the file, click Open.
The MegaRAID Storage Manager software displays the version of the existing firmware. When you are prompted to indicate whether you want to upgrade the firmware, click Yes. A progress bar appears along with messages that indicate when an image opens and when an image downloads.
After an image has been downloaded and if Online Firmware Update is supported on the controller, a confirmation message box appears that asks for your confirmation.
If Online Firmware Update is not supported on the controller, the confirmation message box does not appear.
Instead, after an image is downloaded, a message appears that indicates an image is being flashed. The controller is updated with the new firmware code contained in the.rom file. Reboot the system after the new firmware is flashed. The new firmware does not take effect until reboot. If you click Yes in the confirmation message box, the progress bar continues with a message that indicates that an image is being flashed. After the progress bar disappears, either of the following two messages appear in a message box.
New Firmware Version is flashed successfully. Online Firmware Update is not possible in this case. System reboot is required for the new firmware > version number > to take effect.
New Firmware Version is flashed successfully. Controller Reset will start now.
If the first message appears, reboot your system. If the second message appears, the MegaRAID Storage Manager main menu window reappears. A Restart Started event appears in the log (at the bottom of the MegaRAID Storage Manager main menu window) and a progress bar appears that states Controller reset is in progress. After the controller reset process is completed, the controller is updated with the new firmware code contained in the .rom file.