Mapping Matter
Projectors/Cameras
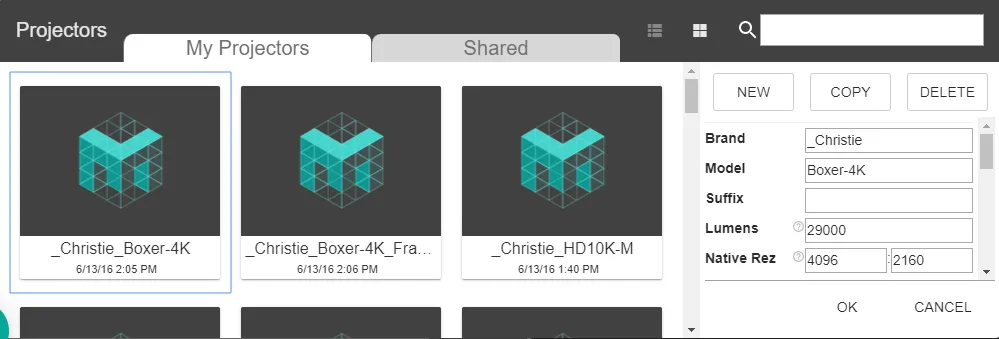
Section titled “Projectors/Cameras”Create (or Swap) a Projector
Section titled “Create (or Swap) a Projector”Create a Project in your Scene
Section titled “Create a Project in your Scene”TOP MENU : Projectors > Projector
Click to display Specs. Double-click to create it in your Scene.
To learn how to manage your Library and add new Projectors, click here.
Swap a Projector from your Scene
Section titled “Swap a Projector from your Scene”You can test different Projectors, while the Scene Projector’s settings (position, rotation, etc) remain unchanged.
Select a Projector. Go to its Properties and click on Projector Library.

Projector Orientation
Section titled “Projector Orientation”Use Rotation
Section titled “Use Rotation”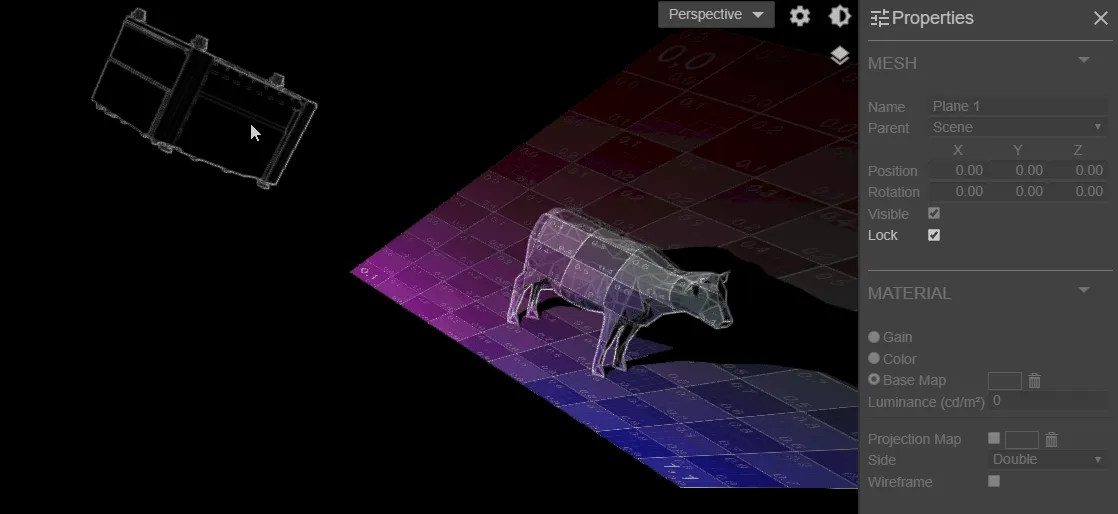
The Orientation of a Projector is determined by the axis between its Lens and its Target Point (the Yellow Dot).
- With your keyboard’s Arrows.
Press once on any Arrow for a 0.1° increment.
Hold Shift while pressing on any Arrow for a 1° increment.
- Through the Properties panel, with the Rotation input boxes.

Type-in a value.
Or left-click on any value, and drag to adjust. (Hold Shift to drag faster.)
- With the Rotation Gizmo. Press R on your keyboard to show the Rotation Gizmo.
Then hold-click on any curve to drag and adjust.
Or click once on any curve, and type-in a value.

User the Target Point
Section titled “User the Target Point”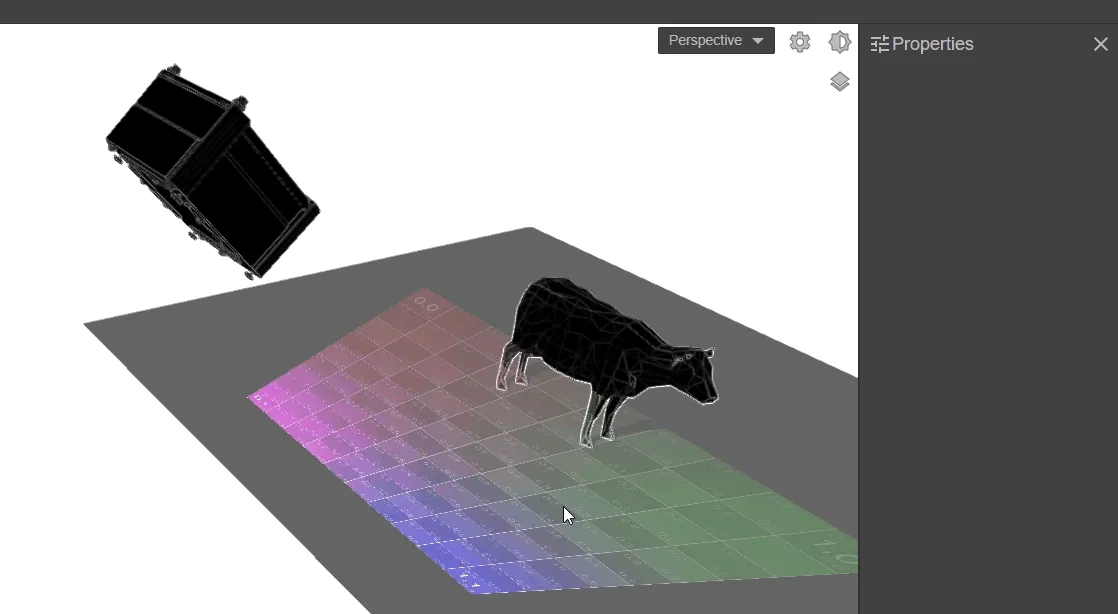
- By dragging around the Target Point (the Yellow Dot) of the Projector.
Hold click on the Target Point of the Projector, and drag it around with your cursor.
- By aiming towards a Pin Point anywhere in the Scene.
Click on the Projector’s Target Point. Then on the Pin Point icon. And anywhere in the Viewport.
- Locking the Target Point
Select your Projector’s Target Point and position it. Click on the Target Point, and enable the Lock icon. Now play with the Position and Rotation of your Projector.
Projector Beam
Section titled “Projector Beam”Here you’ll learn how to adjust the Throw Ratio / Throw Distance, calculate the Illuminance and Pixel Size at the Target Point, and also adjust the Brightness Factor.

Adjust the Width / Height / Throw Ratio
Section titled “Adjust the Width / Height / Throw Ratio”First, go to Viewport Settings, and make sure that Show Projector Infos is enabled.

Adjust the Width / Height / Throw Ratio directly in the Viewport.

You can also adjust the Throw Ratio in the Properties panel. Just type-in a value, or hold-click on the input box and drag your cursor to adjust.
![]()
Lens Shift
Section titled “Lens Shift”Lens Shift allows to deviate the optical axis of the Beam. Select your Projector. Go to its Properties, and to Lens Shift. H = Horizontal, V = Vertical.

Throw Distance, Illuminance & Pixel Size
Section titled “Throw Distance, Illuminance & Pixel Size”
If the Beam’s Depth axis hits no surface, Illuminance & Pixel Size will be calculated at its default Target Point.
But if it hits a surface, a new Target Point will be set at the intersection between the Beam’s Depth axis and the given surface. Illuminance & Pixel Size will be automatically re-calculated.
Illuminance = value in Lux at Target Point.
Pixel Size = unit² at Target Point. Learn how to measure individual pixels using a Checkerboard, here.
Illuminance (Stretch) = the angle will make it x% dimmer (on matt surfaces).
Pixel Size (Stretch) = the angle will make it x% bigger (Keystone effect).
Adjust the Brightness Factor
Section titled “Adjust the Brightness Factor”This ratio is adjusting the total Lumens Output of the Projector.
Go to its Properties, and to the PROJECTOR menu.
![]()
Projector Image
Section titled “Projector Image”The Projector Image refers to the visual content projected through the Beam.
Here you’ll learn how to customize it with Images / Videos / Borders / Grid / Checkerboard.
Select your Projector. Go to Properties > Projector > Projector Image
Use / Remove an Image (or Video)
Change the color of the Beam’s borders
Add a parametric Grid
Use / Remove an Image (or Video)
Section titled “Use / Remove an Image (or Video)”Click on the Projector Image button. You will have access to the Texture Library. It contains a collection of files that you may use for your Projector Image. You can also import your own files from your computer. Check how to use the Texture Libraryhere.
To remove a Projector Image, select your Projector and click on the Trash icon command.

There will be no sound.
Use / Remove an Image (or Video)
Section titled “Use / Remove an Image (or Video)”Tick the Border box.
Click on the Color Bar and select a color.
To adjust the borders’ thickness, type a value in the % input box.
Add a parametric Grid
Section titled “Add a parametric Grid”Tick the appropriate box : Grid or Checkerboard.

Adjust the input values for the desired amount of (Left) vertical and (Right) horizontal blocks.
Use the Checkerboard to measure down to 1 pixel.
Projector Stack
Section titled “Projector Stack”
Select your Projector. Go to Properties > Projector > Projector Stack
Add any amount of dummy Projectors in the input box.
This will only create a dummy mesh and multiply the brightness.
Tick the “Automatic Lumens Multiplication” box (if you want to activate / de-activate the stacking effect on your Projector’s Beam).
If activated, the Lumens output of your Beam will be automatically multiplied.
The Total Stack Lumens value will be displayed in the Properties panel.
You may change the position sequencing of all additional dummy Projector by changing the Offset values in the input boxes below.
![]()
Reverse Mapping
Section titled “Reverse Mapping”Reverse Mapping allows you to reveal the projected Texture onto an Object’s surface.
The projected Texture may be applied as an Object’s MATERIAL (Projection Map), or it may come from a Camera Projector.
Reverse Mapping is a powerful tool to quickly set perfectly mapped previews.

In this example, a projected Texture was applied on the wall and revealed by the Projector in Reverse Mapping mode.
Activate Reverse Mapping on a Projector
Section titled “Activate Reverse Mapping on a Projector”Create or select a Projector.
Access its Shortcut Display in the Viewport.
Place your cursor on the Texture icon, and click on Reverse Mapping.
![]()
Now the Projector Beam will only reveal all projected Textures on the surfaces it hits.
Use the Projection Texture tool
Section titled “Use the Projection Texture tool”The Projection Texture tool allows you to simultaneously reveal all projected Textures from the whole Scene. No need for any Projector Beam.
Go to Brightness Settings and ajust the value (in lux).

Cameras
Section titled “Cameras”A Camera is a bodyless Object, no meshes attached.

Create a Camera
Section titled “Create a Camera”There are 2 methods to set a new Camera’s position and orientation.
By default, creating it at the Center Point of your Scene.
TOP MENU > Projectors > Camera
It will be oriented towards the Scene’s Y axis. Because its Target Point’s position is by default (X=0, Y=2, Z=0).
Or from your current POV.
Go to ![]()
Select Camera from View in the dropdown menu.
Set the Target Point of your Camera
Section titled “Set the Target Point of your Camera”A Camera’s Target axis will always be automatically re-oriented towards its Target Point, regardless of your Camera’s position in the Scene.
You can position the Target Point by typing-in its coordinates.
Select your Camera. Go to Properties, and to Camera.
Type-in the Target Point’s (X, Y, Z) coordinates.
![]()
Rotate your Camera’s Field Of Vision (FOV)
Section titled “Rotate your Camera’s Field Of Vision (FOV)”The rotation will occur on the Target axis.
Type-in an angle value in the Roll input box, available in your Camera’s Properties.
![]()
Example
Section titled “Example”Type-in 90 to have a 90° rotation, and get a portrait FOV.
Adjust your Camera’s FOV dimensions (Focal Length, Resolution)
Section titled “Adjust your Camera’s FOV dimensions (Focal Length, Resolution)”The Focal Length simulates a standard camera’s Lens Focal Length (in millimeters). The longer the focal length, the narrower the FOV values.
Adjust your Camera’s Focal Length in its Properties.

The Resolution may also be customized in your Camera’s Focal Length in its Properties.
![]()
The Horizontal (H) and the Vertical (V) will be proportional to your Camera’s FOV, for its Width and Height respectively.
Look from any existing Camera
Section titled “Look from any existing Camera”You can switch your own POV to any of your Cameras’ anytime.
Just go to Scene Objects and click on the Look From icon.
![]()
To exit the Camera’s POV, click on Exit view.
![]()
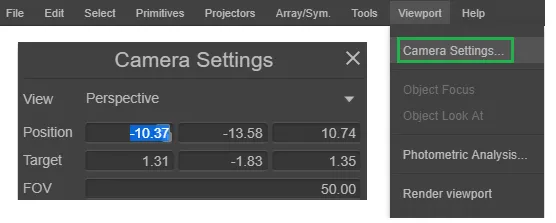
Use an Orthographic Camera
Section titled “Use an Orthographic Camera”Orthographic translates into a flat FOV cone.

Go to ![]()
Select among Top / Bottom / Left / Right / Front / Back
Go to TOP MENU > Viewport > Camera Settings to adjust its Position/ Target / FOV.
Camera Projectors
Section titled “Camera Projectors”A Camera Projector is an hybrid Object, it shares some features of both a Camera and a Projector.
It is also represented in the Scene by a human silhouette 3D mesh (Height= 180cm).
The FOV is represented by a pyramidal cone. The Field Of Vision’s dimensions are defined by the Camera Projector’s Focal Length and Resolution.

Create a Camera Projector
Section titled “Create a Camera Projector”You can only create it at the Center Point of your Scene.
TOP MENU > Projectors > Camera Projector
It will be oriented towards the Scene’s Y axis. Because its Target Point’s position is by default (X=0, Y=2, Z=0).
Adjust your Camera’s FOV dimensions (Focal Length, Resolution)
Section titled “Adjust your Camera’s FOV dimensions (Focal Length, Resolution)”The Focal Length simulates a standard camera’s Lens Focal Length (in millimeters). The longer the focal length, the narrower the FOV. And vice-versa.
Adjust your Camera Projector’s Focal Length in its Properties.
![]()
The Resolution may also be customized in your Camera Projector’s Properties.
![]()
The Horizontal (H) and the Vertical (V) will be proportional to your Camera’s FOV, for its Width and Height respectively
Project a Texture from your Camera Projector (Projective Texturing)
Section titled “Project a Texture from your Camera Projector (Projective Texturing)”Projective Texturing allows you to see how your Objects’ surfaces need to be mapped, in order to produce a certain Image from a given perspective.
This is particularly useful when you don’t have any UVs on your 3D Objects.

By default, the projected Texture won’t be visible in the Viewport. It will have to be “revealed”. Either by a Projector in Reverse Mapping mode, or using the Projection Texture tool.
Select your Camera Projector.
Go to its Properties, and click on Projector Image. (Or use the Texture shortcut icon, as displayed in the GIF.)
You will have access to the Texture Library. It contains a collection of files that you may use for your Camera Projector’s Texture. You can also import your own files from your computer. Check how to use the Texture Library here.