12HD Playback Configuration
For r11, we’ve done a great deal of optimisation on every aspect of video playback performance, all the way from disk through GPU drivers and synchronisation. The prefetch estimation system already improves timing solidity; with a few tweaks of the BIOS to ensure the best possible SSD performance, d3 can now play twice as much video as it could before.
In order to get optimum performance and to be able to run up to 12 layers of HD content, the media drives in your machine need to be in the 2 drive bays that support the fast SATA3 data protocol.
What systems are eligable for 12HD playback?
Section titled “What systems are eligable for 12HD playback?”12HD is only available on 4u v2.5 systems that are running r11 software.
Is 12HD playback already setup on my machine?
Section titled “Is 12HD playback already setup on my machine?”12HD is setup by default on all recently shipped v2.5 machines (post September 2012), however some older machines may have slightly different
configurations set up.
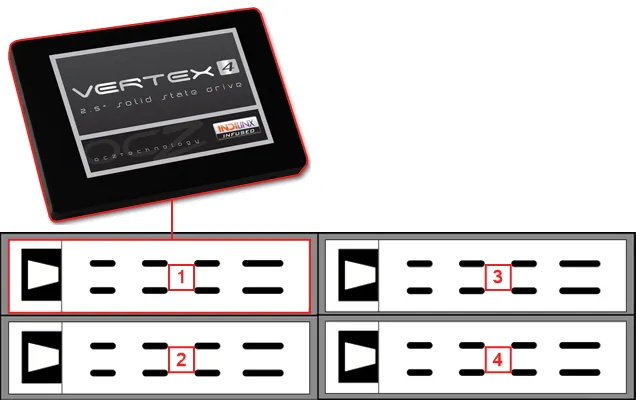
Every Disguise machine contains four bays, and are shipped with a single 512Gb OCZ Vertex 4 Solid State Drive ( SSD ) located in drive bay 1.
On recent machines, out of the four drive bays there are two fast SATA3 drive bays ( bays 1 and 2 ) and two SATA2 drive bays (bays 3 and 4).
To ensure optimal performance always populate bay 1 and 2 first. Your d3 machine ships with a single 512Gb OCZ Vertex 4 Solid State Drive (SSD). The SSD will be located in drive bay 1 and is capable of 461.9 MB/s sequential read and 462.9 MB/s sequential write.
Older 4U v2.5 machines may have a different configuration of fast SATA3 drive bays and SATA2 drive bays.
Setting up 12HD playback
Section titled “Setting up 12HD playback”Before starting the process to setup 12HD please downland install this Windows patch from Microsoft. This patch will change the drive identity within the registry and prevent a BlueScreen error associated with a change of SATA mode change.
Once the patch is installed, ensure there is only one media drive in the machine and it is in drive bay 1 (top left). In our example below we have used an OCZ Vertex 4 drive.
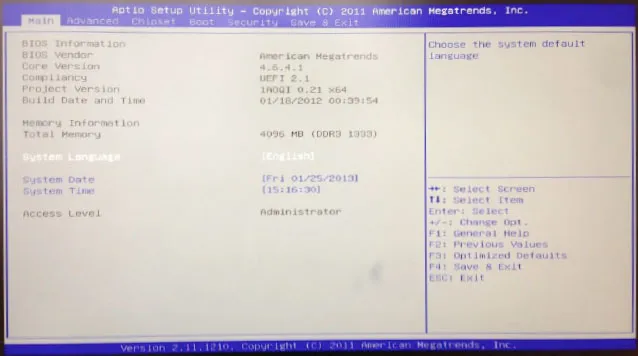
Restart the machine and hold down the ‘del’ key to enter the BIOS.
You will be presented with the following screen.
In the BIOS menu scroll right one tab to the ‘Advanced’ tab and scroll down to the SATA configuration menu item. Press Enter.
In SATA configuration open up the SATA menu item and select AHCI mode (unless this has already been selected.)
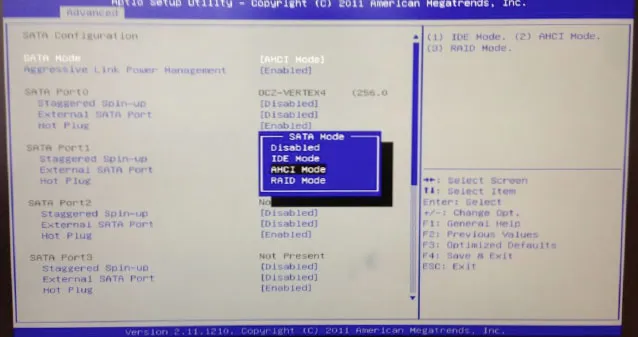
SATA mode menu
The screenshot below shows the OCZ Vertex 4 drive in SATA port 0. The fast SATA3 slots are set as SATA PORT0 and SATA PORT1 in the BIOS. In this example our OCZ Vertex 4 drive would be running at full SATA3 speed and would run at 12HD performance.
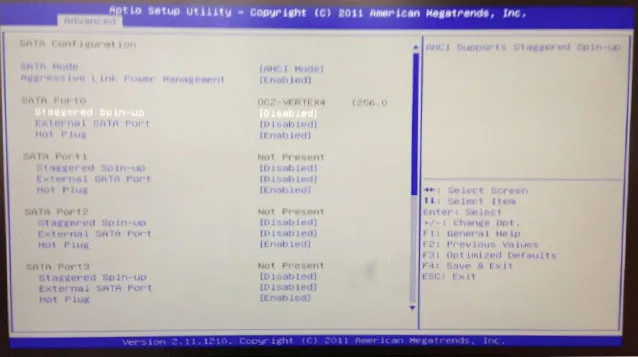
SATA Configuration screen showing a drive in Port 0.
The next step is to establish the location of the other fast SATA3 port. In order to do this, shut the computer down and move the SSD into another drive bay. Then restart the machine holding the ‘del’ key to enter the BIOS and repeat the steps above to establish the drive bay that is connected to SATA PORT1.
It is important to shut down the machine before moving the drive between drive bays as this change will not be reflected in the BIOS and you may damage the drive.
Do not change any other BIOS settings or enable or disable any features as you may stop the d3 machine from working correctly or at all.
Once booted into Windows you can check the read/write speed of the drive by using a drive test utility such as ATTO Bench.
A SATA3 drive should be running at between 450 - 500 MB/s.
If you require any support or advice regarding 12HD please contact support