Restore the Porta On Prem WSL virtual disk
This guide will walk you through restoring the WSL virtual disk for Porta On Prem from a previously created backup.
1. Ensure your backup exists
Section titled “1. Ensure your backup exists”- Check your backup location for an existing and up to date
.tar.- By default, if you followed the backup instructions, this is likely
D:\wsl\backups\docker-desktop-data.tar.
- By default, if you followed the backup instructions, this is likely
- If you do not have an up-to-date backup, return to this step after you have performed the backup instructions to create one.
- If you have an up-to-date backup, proceed to the next section.
2. Confirm that your target drive is formatted as NTFS
Section titled “2. Confirm that your target drive is formatted as NTFS”- In Explorer, navigate to
This PC. - Right-click the drive you want to restore to and select
propertiesfrom the context menu. - In the window that opens, check the
File systemproperty.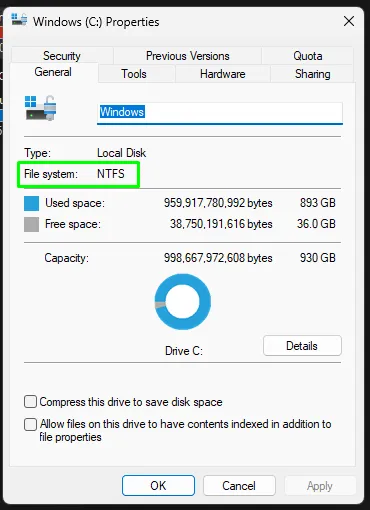
3. Locate your existing virtual disk
Section titled “3. Locate your existing virtual disk”- In Explorer, navigate to
%LOCALAPPDATA%\Docker\wsl\datato find your existing virtual disk file, namedext4.vhdx. - You can also check Docker Desktop’s Settings > Resources > Advanced and check its
Disk image location.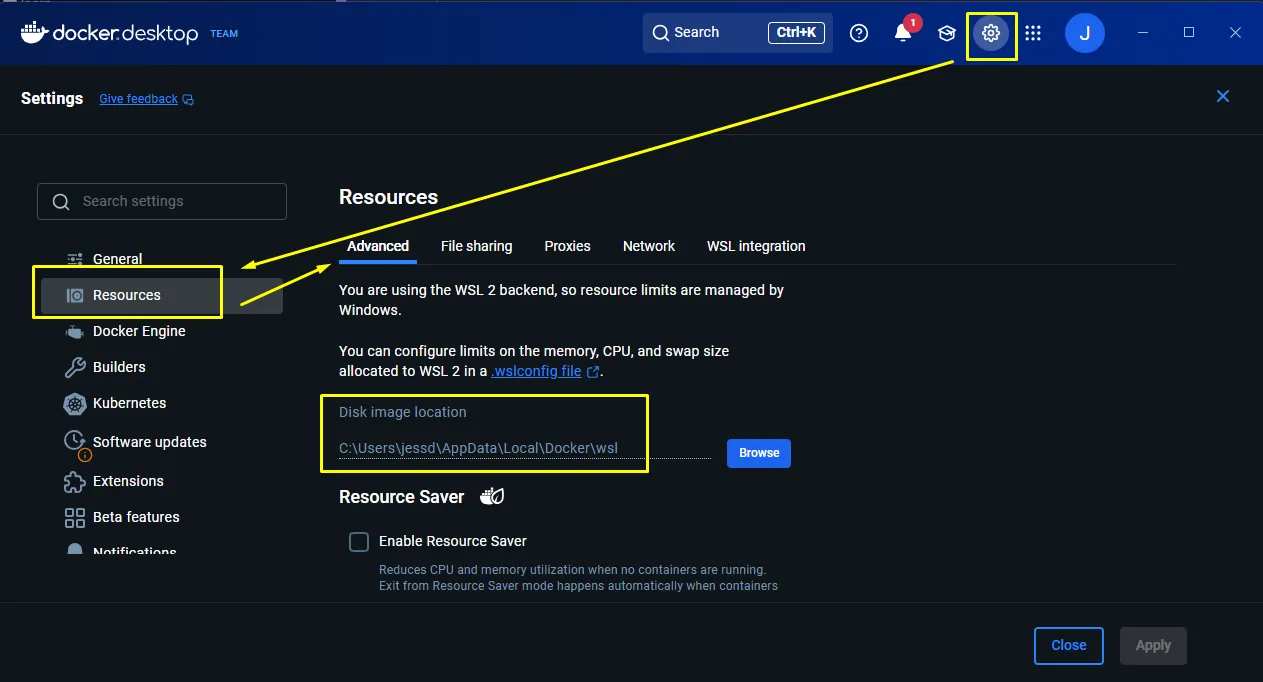
- Note this path so that we can copy it for use later.
4. Shut down Docker Desktop
Section titled “4. Shut down Docker Desktop”- Use the system tray to quit Docker Desktop.
- Open Powershell.
- Run
wsl --shutdownto stop all distributions. - Run
wsl -l -vand ensure the docker distros are stopped. A successful output will look like this:NAME STATE VERSION* Ubuntu-22.04 Stopped 2docker-desktop-data Stopped 2docker-desktop Stopped 2
5. Unregister (delete) the existing docker-desktop-data distribution
Section titled “5. Unregister (delete) the existing docker-desktop-data distribution”-
Open Powershell as an administrator.
-
Confirm that
docker-desktop-dataexists and is stopped by running:Terminal window wsl -l -vA successful output will look like this:
NAME STATE VERSION* Ubuntu-22.04 Stopped 2docker-desktop-data Stopped 2docker-desktop Stopped 2 -
In Powershell, run the following command to unregister (delete) the
docker-desktop-datadistribution:Terminal window wsl --unregister docker-desktop-data -
You will not receive any confirmation message, but you can verify it was removed by running
wsl -l -vagain.- The output should no longer list
docker-desktop-data:
NAME STATE VERSION* Ubuntu-22.04 Stopped 2docker-desktop Stopped 2 - The output should no longer list
-
You can also check the disk location in Windows explorer (likely
%LOCALAPPDATA%\Docker\wsl\data) to ensure that theext4.vhdxfile was removed.
6. Restore the virtual disk
Section titled “6. Restore the virtual disk”-
Ensure that the folder that you will be restoring your data to already exists, e.g.,
%LOCALAPPDATA%\Docker\wsl\data, orD:\wsl\docker-desktop-data. -
Import the data to restore the
docker-desktop-datadistribution from your backup.tarfile.- Open Powershell.
- Run the following command to import the backup.
- Replace
D:\path\to\backupwith the path to your backup file. - Replace
D:\path\to\restore\folderwith the path to your restore destination directory.
Terminal window wsl --import docker-desktop-data "D:\path\to\restore\folder" "D:\path\to\backup\docker-desktop-data.tar" --version 2 - Replace
- You’ll know the import has finished when the
PS C:\Users\username>prompt appears again on the next line.
-
After the import has finished, confirm that the distro is recognized in WSL by opening Powershell and running:
Terminal window wsl -l -vA successful output will look like this:
NAME STATE VERSION* Ubuntu-22.04 Stopped 2docker-desktop-data Stopped 2docker-desktop Stopped 2 -
Start Docker Desktop again. It should find and use the newly imported
docker-desktop-datadistribution. -
After starting Docker, in Powershell, run a quick
docker imagesordocker volume lscommand to confirm your images/volumes are still present. -
Everything should be back to normal now.