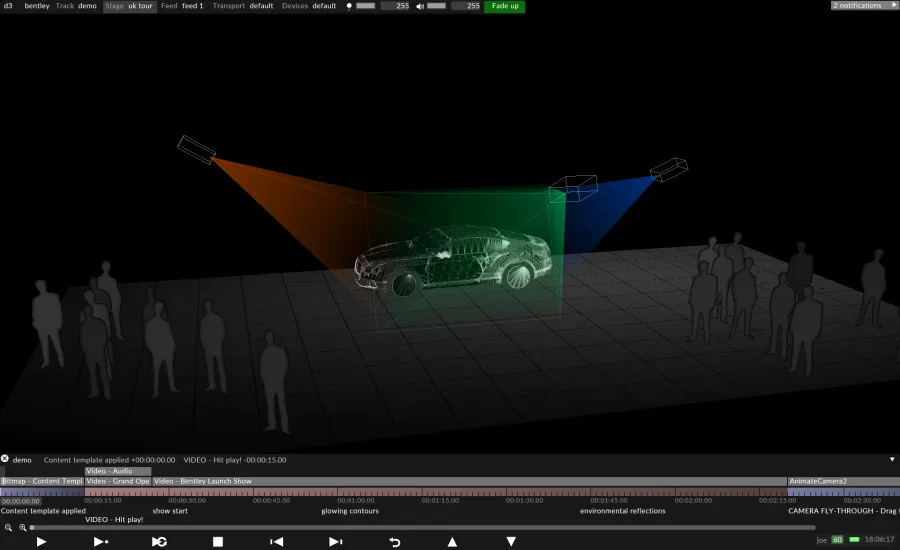
Projector Simulation overview
In Designer, content is created and as a texture applied to the projection surface - the car in the example here. Content can be made without any knowledge of the actual number of projectors that will be used - whether there is one projector or twenty, the content will stay the same.
In Designer, you begin by creating Projector objects and add them to the scene; you set up their position, rotation and lens qualities to precisely match those of the real projectors. The software then renders the projection surface (and its content) from the point of view of each virtual projector, and outputs the resulting image to the real projector. If the projection surface and virtual projectors precisely match their counterparts in the real world, the result is a perfect image.

Designer used to visualise, simulate and calculate how physical projectors should be positioned for the Bentley Continental GT UK Tour.
If the physical projector has to move a couple of meters to the side, there is no need to re-render any content, just move the corresponding virtual projector to match. It will then render a new image from the new point of view. Similarly, if new projectors are added, there’s no need to re-render content; just add a new projector to the scene and set it up.
There are two ways of matching a virtual projector to its physical counterpart: Manual calibration, or the calibration process referred to as QuickCal. For situations where your 3D model does not precisely match the real projection surface, provides a selection of warping tools.

Outputs that the three virtual projectors from the above image see in the Output Feeds level.
Projector Simulation as a decision-making tool
Section titled “Projector Simulation as a decision-making tool”Projector simulation does not only have to be used for output purposes. During the early production stages, Projector Simulation can be used to explore projector positions, aiming points, appropriate lens sizes etc; it is a tool for specifying the correct hardware for a show
3D models preparation
Section titled “3D models preparation”As always when working in Designer, you need to model an exact virtual replica of the real-world screens. If only standard rectangular screens are being used, these can be created directly in Designer. However, for more complex three-dimensional objects, it is required that the screen is built and exported from a 3D software such as 3ds Max, Maya, Cinema4D or similar. It is crucial to not only model and export the 3D models, but to also properly texture-map (UV-map) them and to carefully optimize the polygon count of the model.
The more accurate the 3D model the better. The level of accuracy usually depends on the distance between the audience and the object. For building projections, it is recommended to laser scan the building. A laser scan can generate a highly accurate 3D mesh (+-5mm accuracy) that you can import into a 3D software application from which the optimization, UV-mapping and content template creation process can take place. The mesh is then exported as a texture mapped .obj file into Disguise.
For smaller objects, where the audience stands much closer to the object and the pixel density is higher (for example for car projections), it is even more important that the 3D mesh is as accurate as possible. However, as this usually is not the case, Disguise has a number of 2D-based warping tools allowing you to compensate for the inaccuracies between the virtual and the real-world model. Please see the sub-chapter Warping outputs for more information.
Content creation
Section titled “Content creation”Based on 3D models, animators can create content either in 2D or in 3D, or both. For simple setups, a 2D content template generated from the UV-coordinates of the 3D model can be used as a background image in for example After Effects.
Video files are rendered and imported. In the software, the content is then applied back onto the same 3D models, allowing the content to be pre-visualised in 3D and in real-time, from any point of view. As the output to the physical projectors is handled by the virtual projectors, the animators only need to think about how to create content that looks good on the screen in Designer.
How do I learn about preparing a projection-based 3D model?
Section titled “How do I learn about preparing a projection-based 3D model?”The 3D modelling and UV-mapping processes are currently not covered in detail in this User Guide. To learn more about these processes, register for the Pre-Production Workflows course offered online in our free e-learning system at https://learn.disguise.one.