Unreal OCIO Setup
A key component of virtual production is maintaining consistent colour across the entire rendering pipeline. This page covers the steps required to set up OpenColorIO (OCIO) in Unreal Engine to achieve consistent colour management throughout the production process.
Before proceeding, ensure you have finished setting up the project by following the steps in UE Project Setup.
Requirements
Section titled “Requirements”RenderStream Plugin
Section titled “RenderStream Plugin”- See UE Project Setup | Plugins for details on setting up the RenderStream plugin.
OCIO config file
Section titled “OCIO config file”- Place your chosen OCIO config file into the Content folder of your chosen Unreal Project.
RenderStream Projects/<UEProject>/Content/<OcioConfig>.ocio
- A standard OCIO config file can be downloaded from the OpenColorIO GitHub.
Unreal Engine Colour Validation
Section titled “Unreal Engine Colour Validation”To ensure accurate colour representation in your Unreal Engine project, it is recommended to utilise the Unreal Validation Framework from Netflix. This framework provides tools to validate and maintain colour consistency throughout your project.
OpenColorIO Configuration
Section titled “OpenColorIO Configuration”To use OCIO, Unreal requires an OpenColorIO Configuration to specify which specific file and colour spaces you would like to use.
Adding a new configuration
Section titled “Adding a new configuration”- Open the Content Drawer.
- Click the Add button.
- Navigate to Miscellaneous > OpenColorIO Configuration and select it.
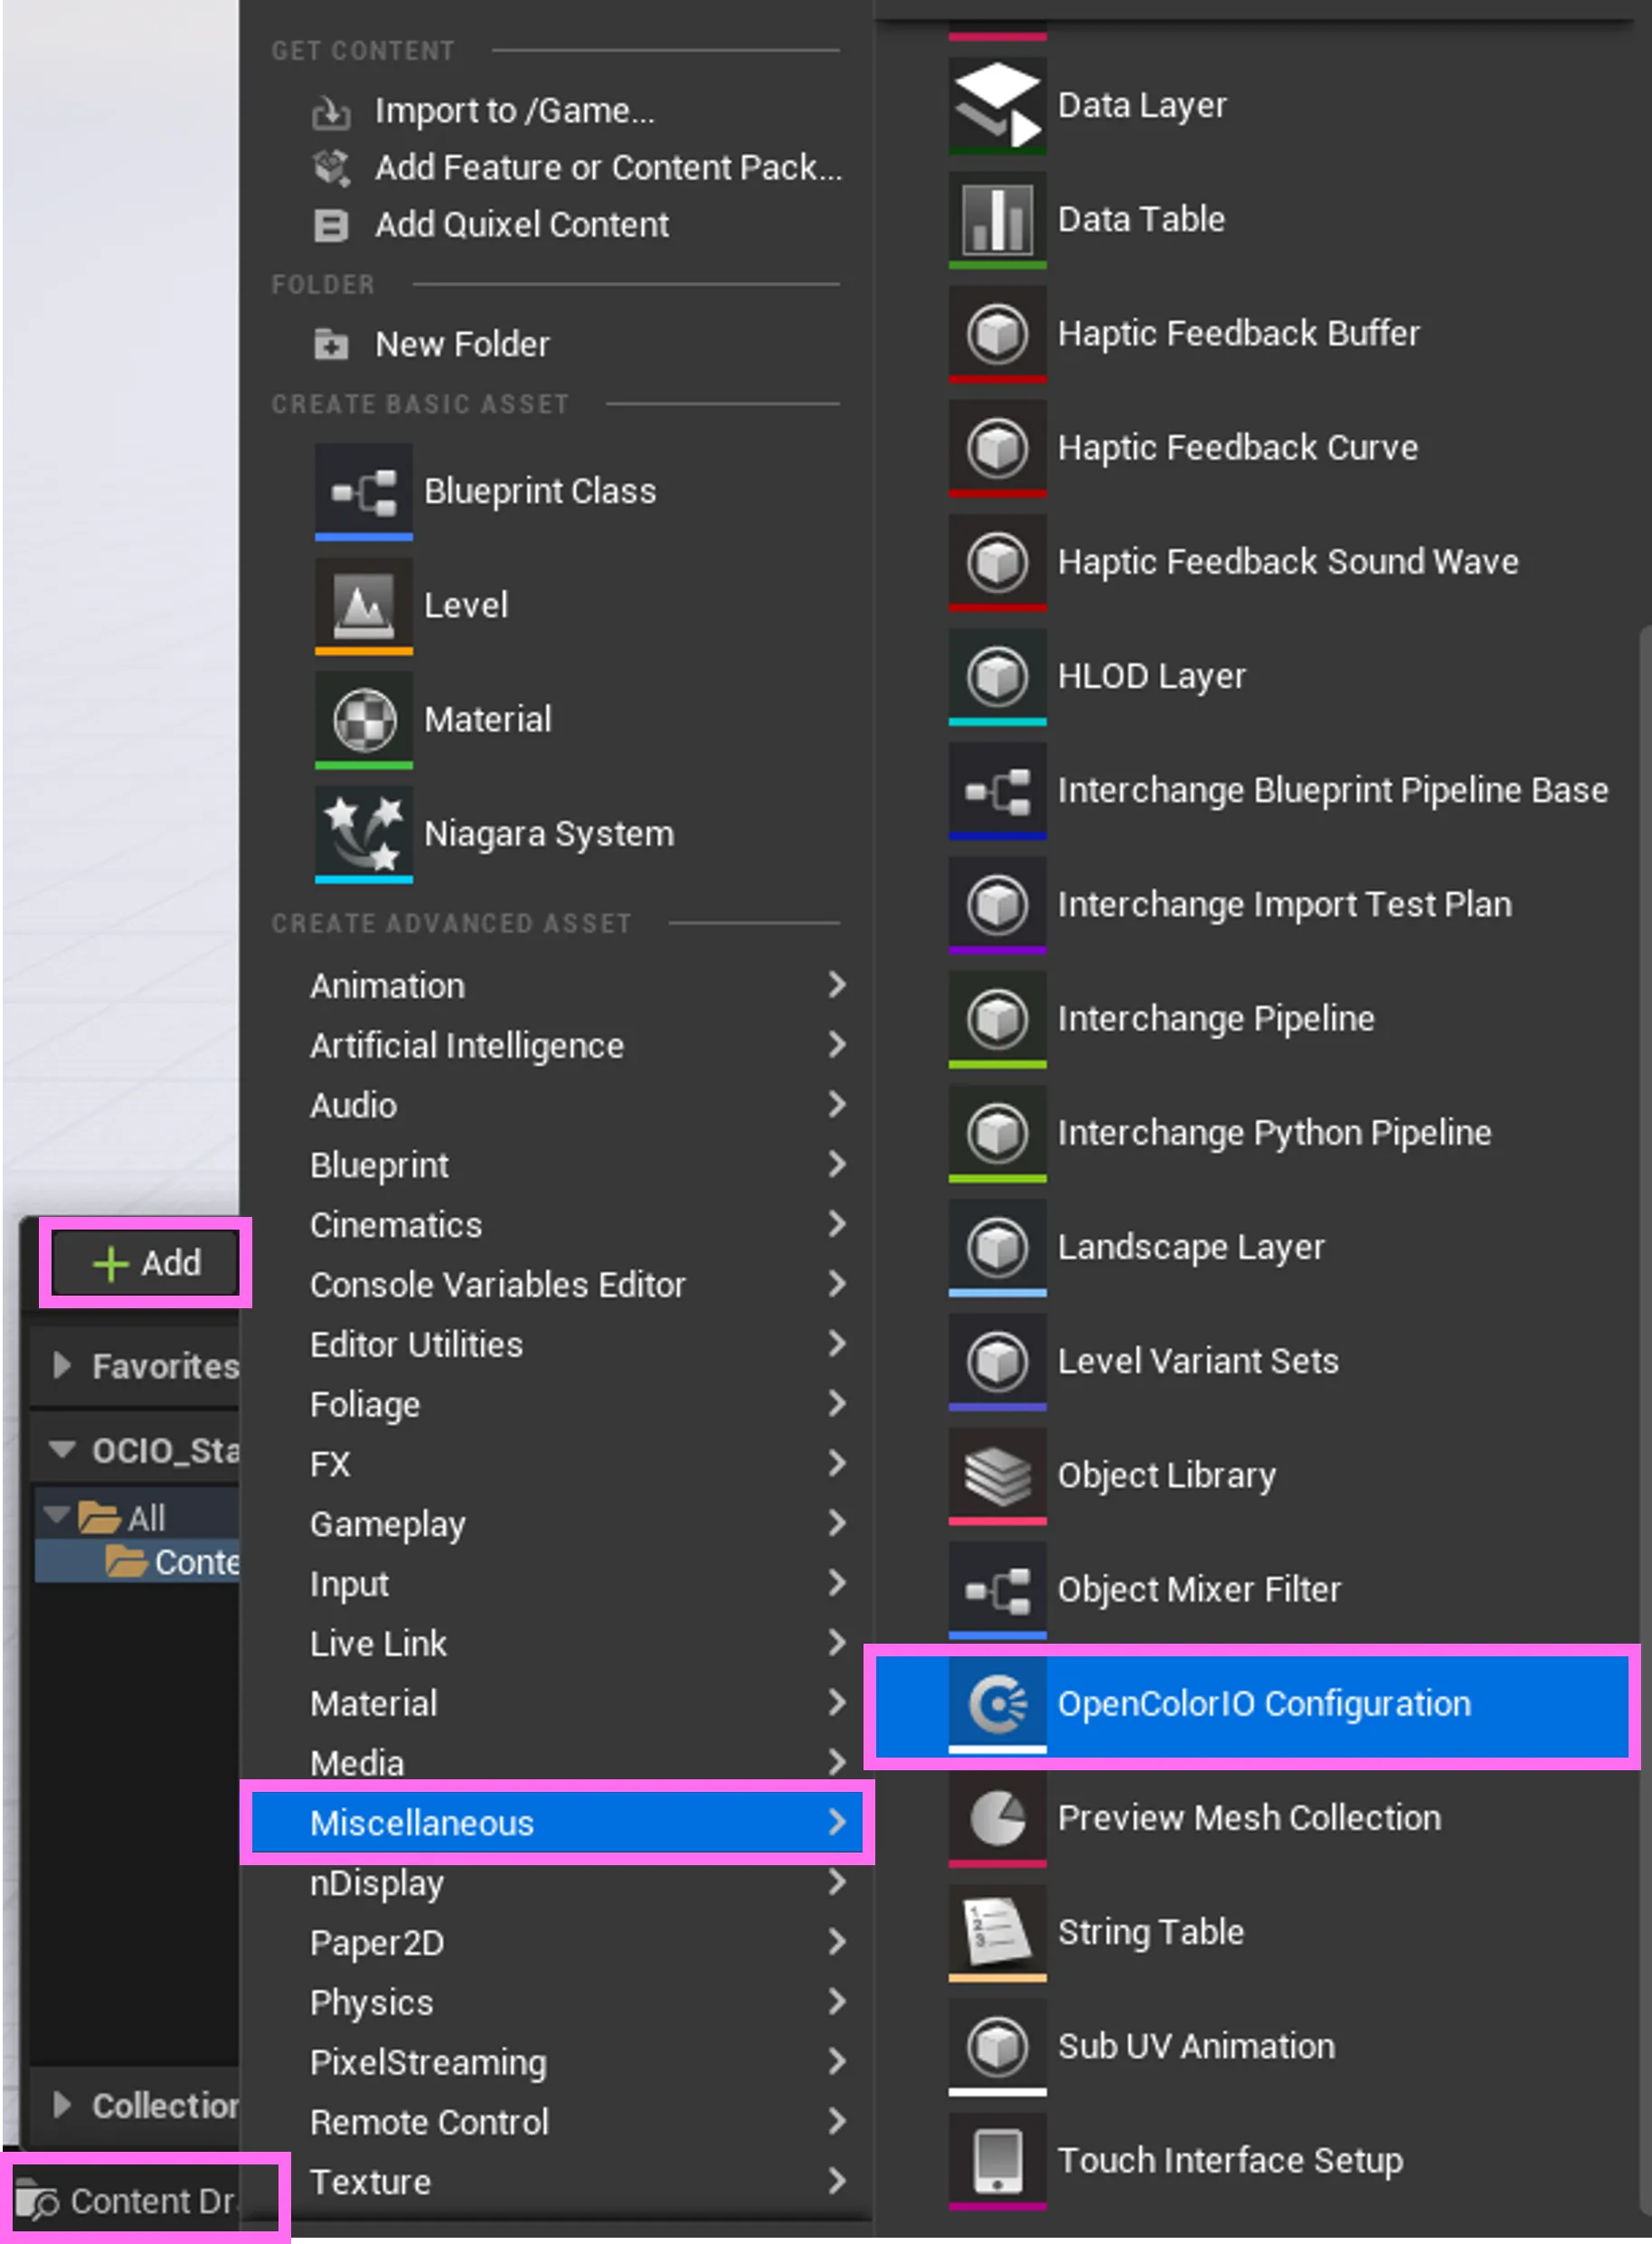 Add OpenColorIO Configuration
Prepare colour spaces
Section titled “Prepare colour spaces”Next we need to expose the relevant colour spaces from the OpenColorIO Configuration to configure the colour spaces in the RenderStream Plugin.
- In the Content Drawer, double-click the OpenColorIO Configuration you just added.
- Under Config, set the Configuration File to the
.ocioconfig file you added from the OCIO Config File section. - Add the Desired Color Spaces and Desired Display-View to expose the colour spaces and display-views for later use.
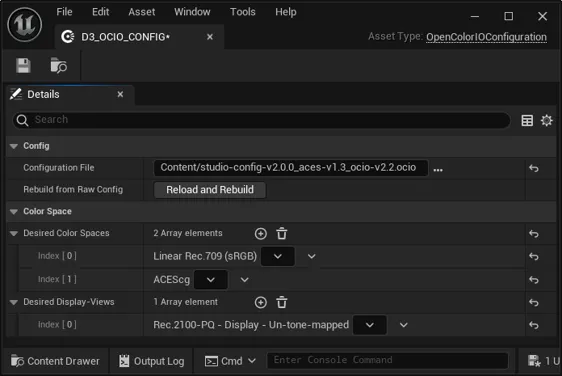 OpenColorIO Configuration Settings
Desired Color Spaces
Section titled “Desired Color Spaces”Exposed Desired Color Spaces are typically used for source colour spaces in RenderStream plugin:
- Unreal Engine uses
sRGB / Rec709by default as the Working Color Space in Project Settings.- The corresponding colour space in the OCIO config is
Linear Rec.709 (sRGB).
- The corresponding colour space in the OCIO config is
- Another typical Working Color Space is
ACES AP1 / ACEScg.- The corresponding colour space in the OCIO config is
ACEScg.
- The corresponding colour space in the OCIO config is
Desired Display-View
Section titled “Desired Display-View”Exposed Desired Display-View are typically used for destination colour spaces in RenderStream plugin:
Rec.2100-PQ - Display - Un-tone-mappedis recommended for common RenderStream use cases.- The destination colour space refers to the colour space in which content will be sent over RenderStream
Project Settings
Section titled “Project Settings”Once the OpenColorIO Configuration is set up, we must configure the Project Settings to apply the colour transforms properly.
Navigate to Edit > Project Settings.
Engine - Rendering
Section titled “Engine - Rendering”In Project Settings, under Engine > Rendering, you can define the Working Color Space of Unreal Engine. All textures in Unreal Engine must match the colour space set as the Working Color Space.
For example, if the Working Color Space is ACES AP1 / ACEScg, then all textures must be in ACES AP1 / ACEScg. By default, Unreal uses sRGB / Rec709.
We advise sticking with Unreal Engine default colour space unless its strictly necessary to use a different colour space.
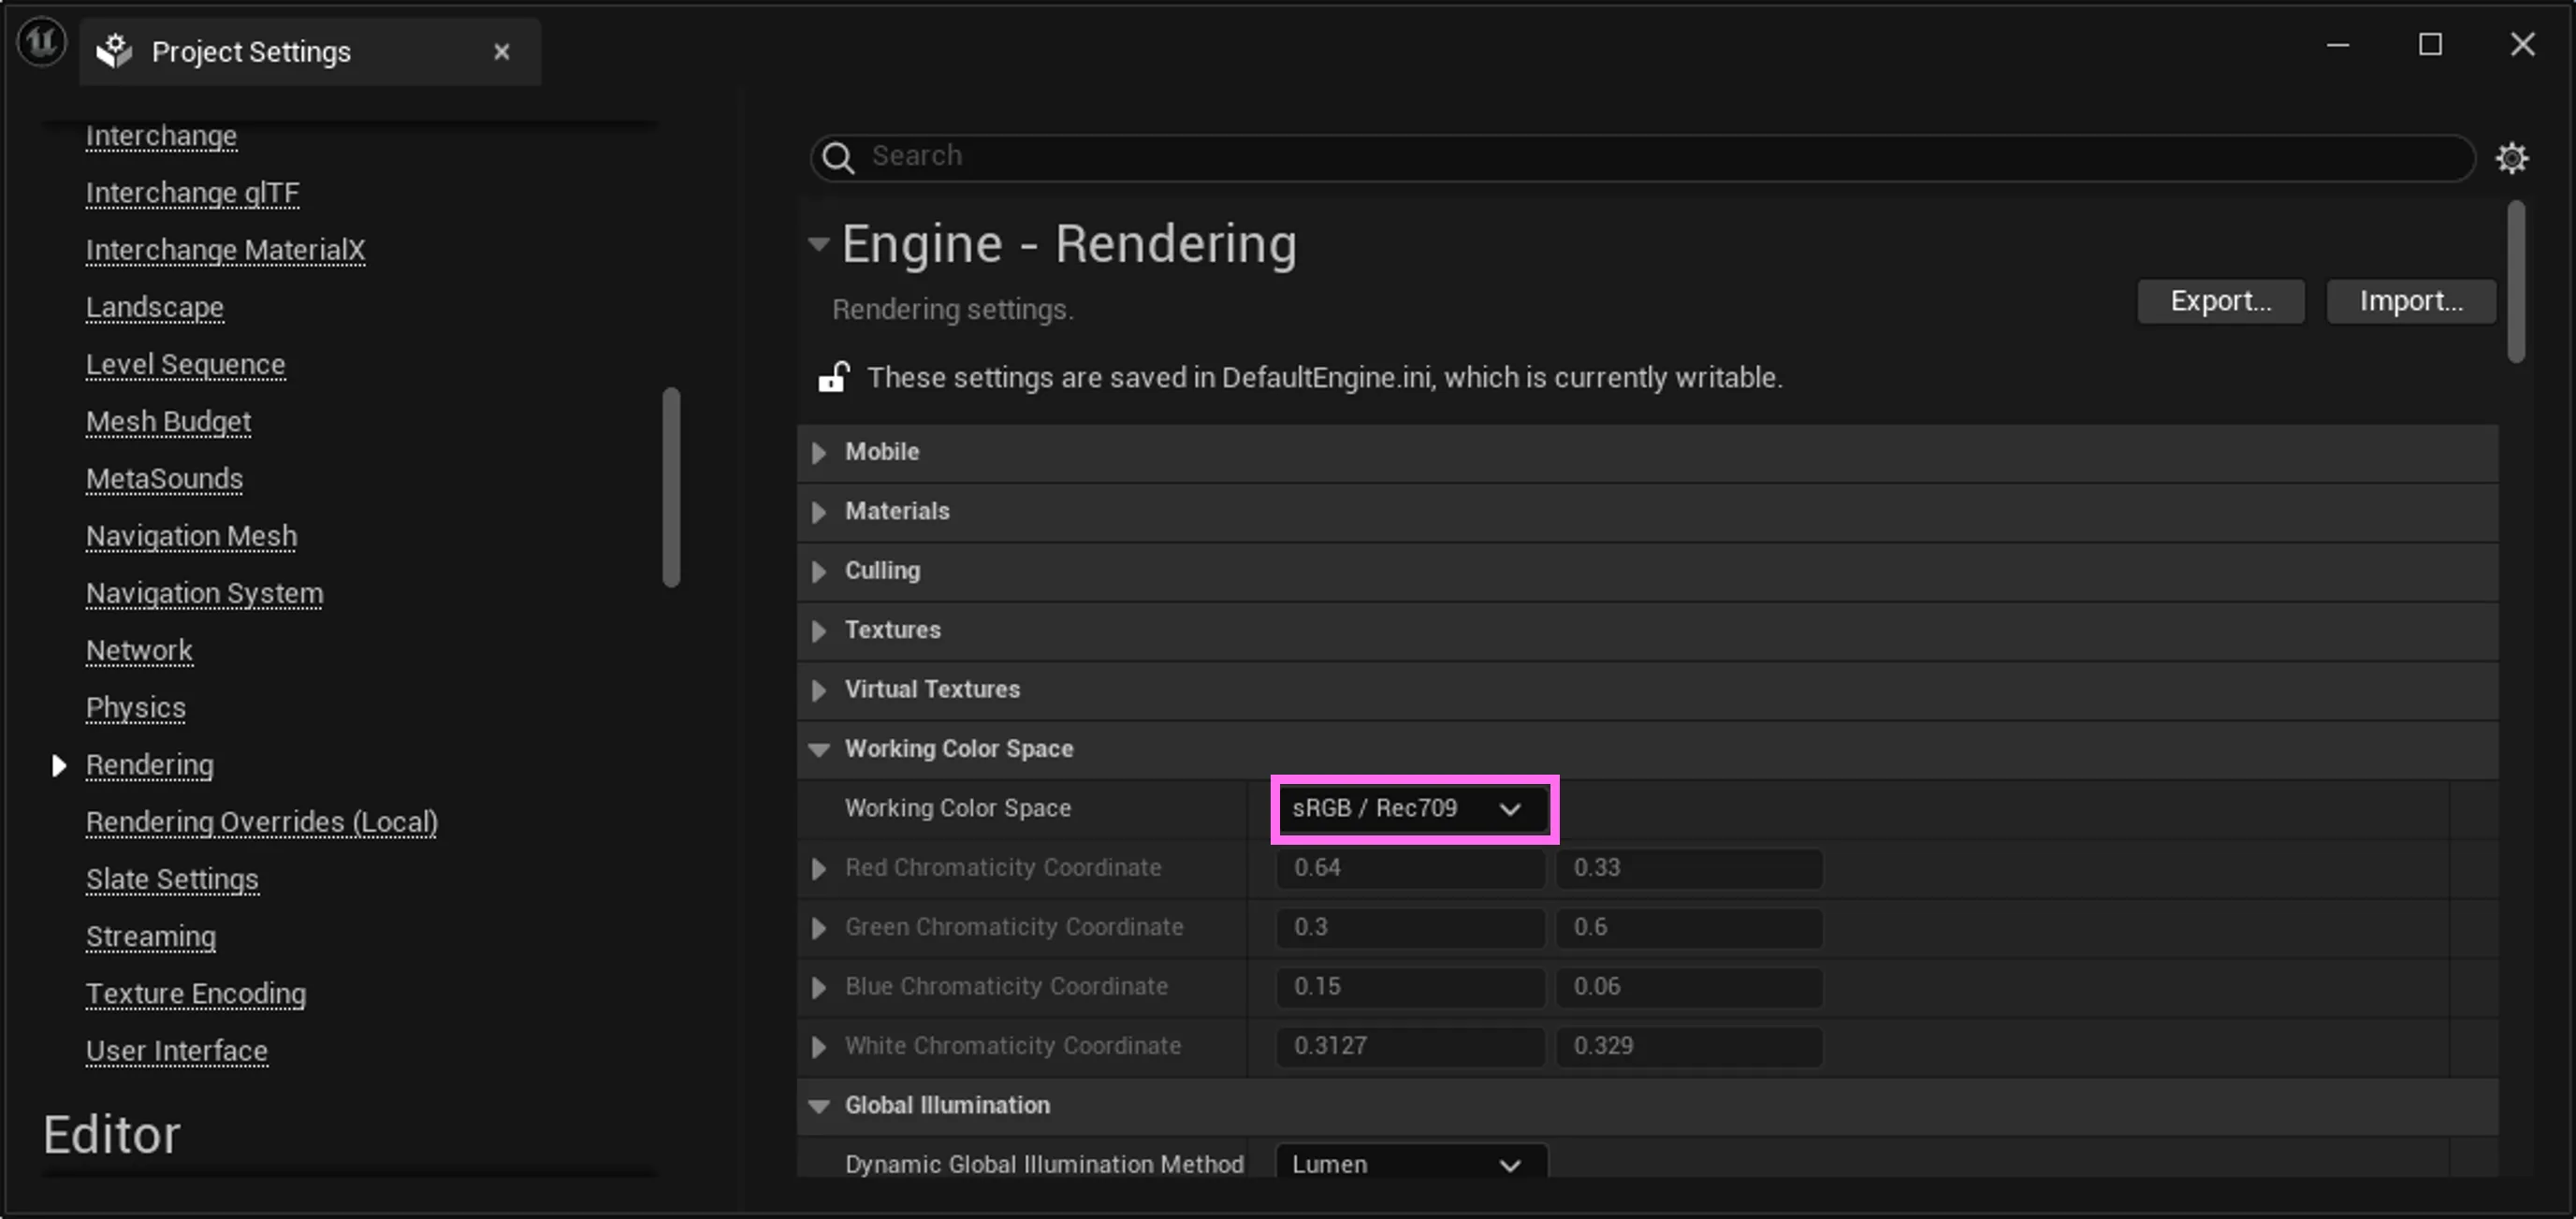 Engine Rendering Settings
Plugins - Disguise RenderStream
Section titled “Plugins - Disguise RenderStream”To avoid unintentional colour transforms, it’s crucial to enable and configure OCIO with the desired colour spaces.
- Navigate to Plugins > Disguise RenderStream.
- Expand the OCIOConfig section.
- Select the Is Enabled checkbox.
- Set the Configuration Source to the OpenColorIO Configuration you created earlier. (See: Adding a New Configuration).
- Set the Transform Source to match the Unreal Engine Working Color Space.
- Ensure the colour space is exposed in OpenColorIO Configuration (See: Prepare colour spaces).
- Refer to Transform Source for matching colour space between Unreal Engine and OCIO.
- Set the Transform Destination to match the Input transform of the RenderStream asset in Designer.
- The colour space must be between 0 and 1.
Rec.2100-PQ - Display - Un-tone-mappedis recommended for normal use cases.- See: Set Input Transform on RenderStream Layer.
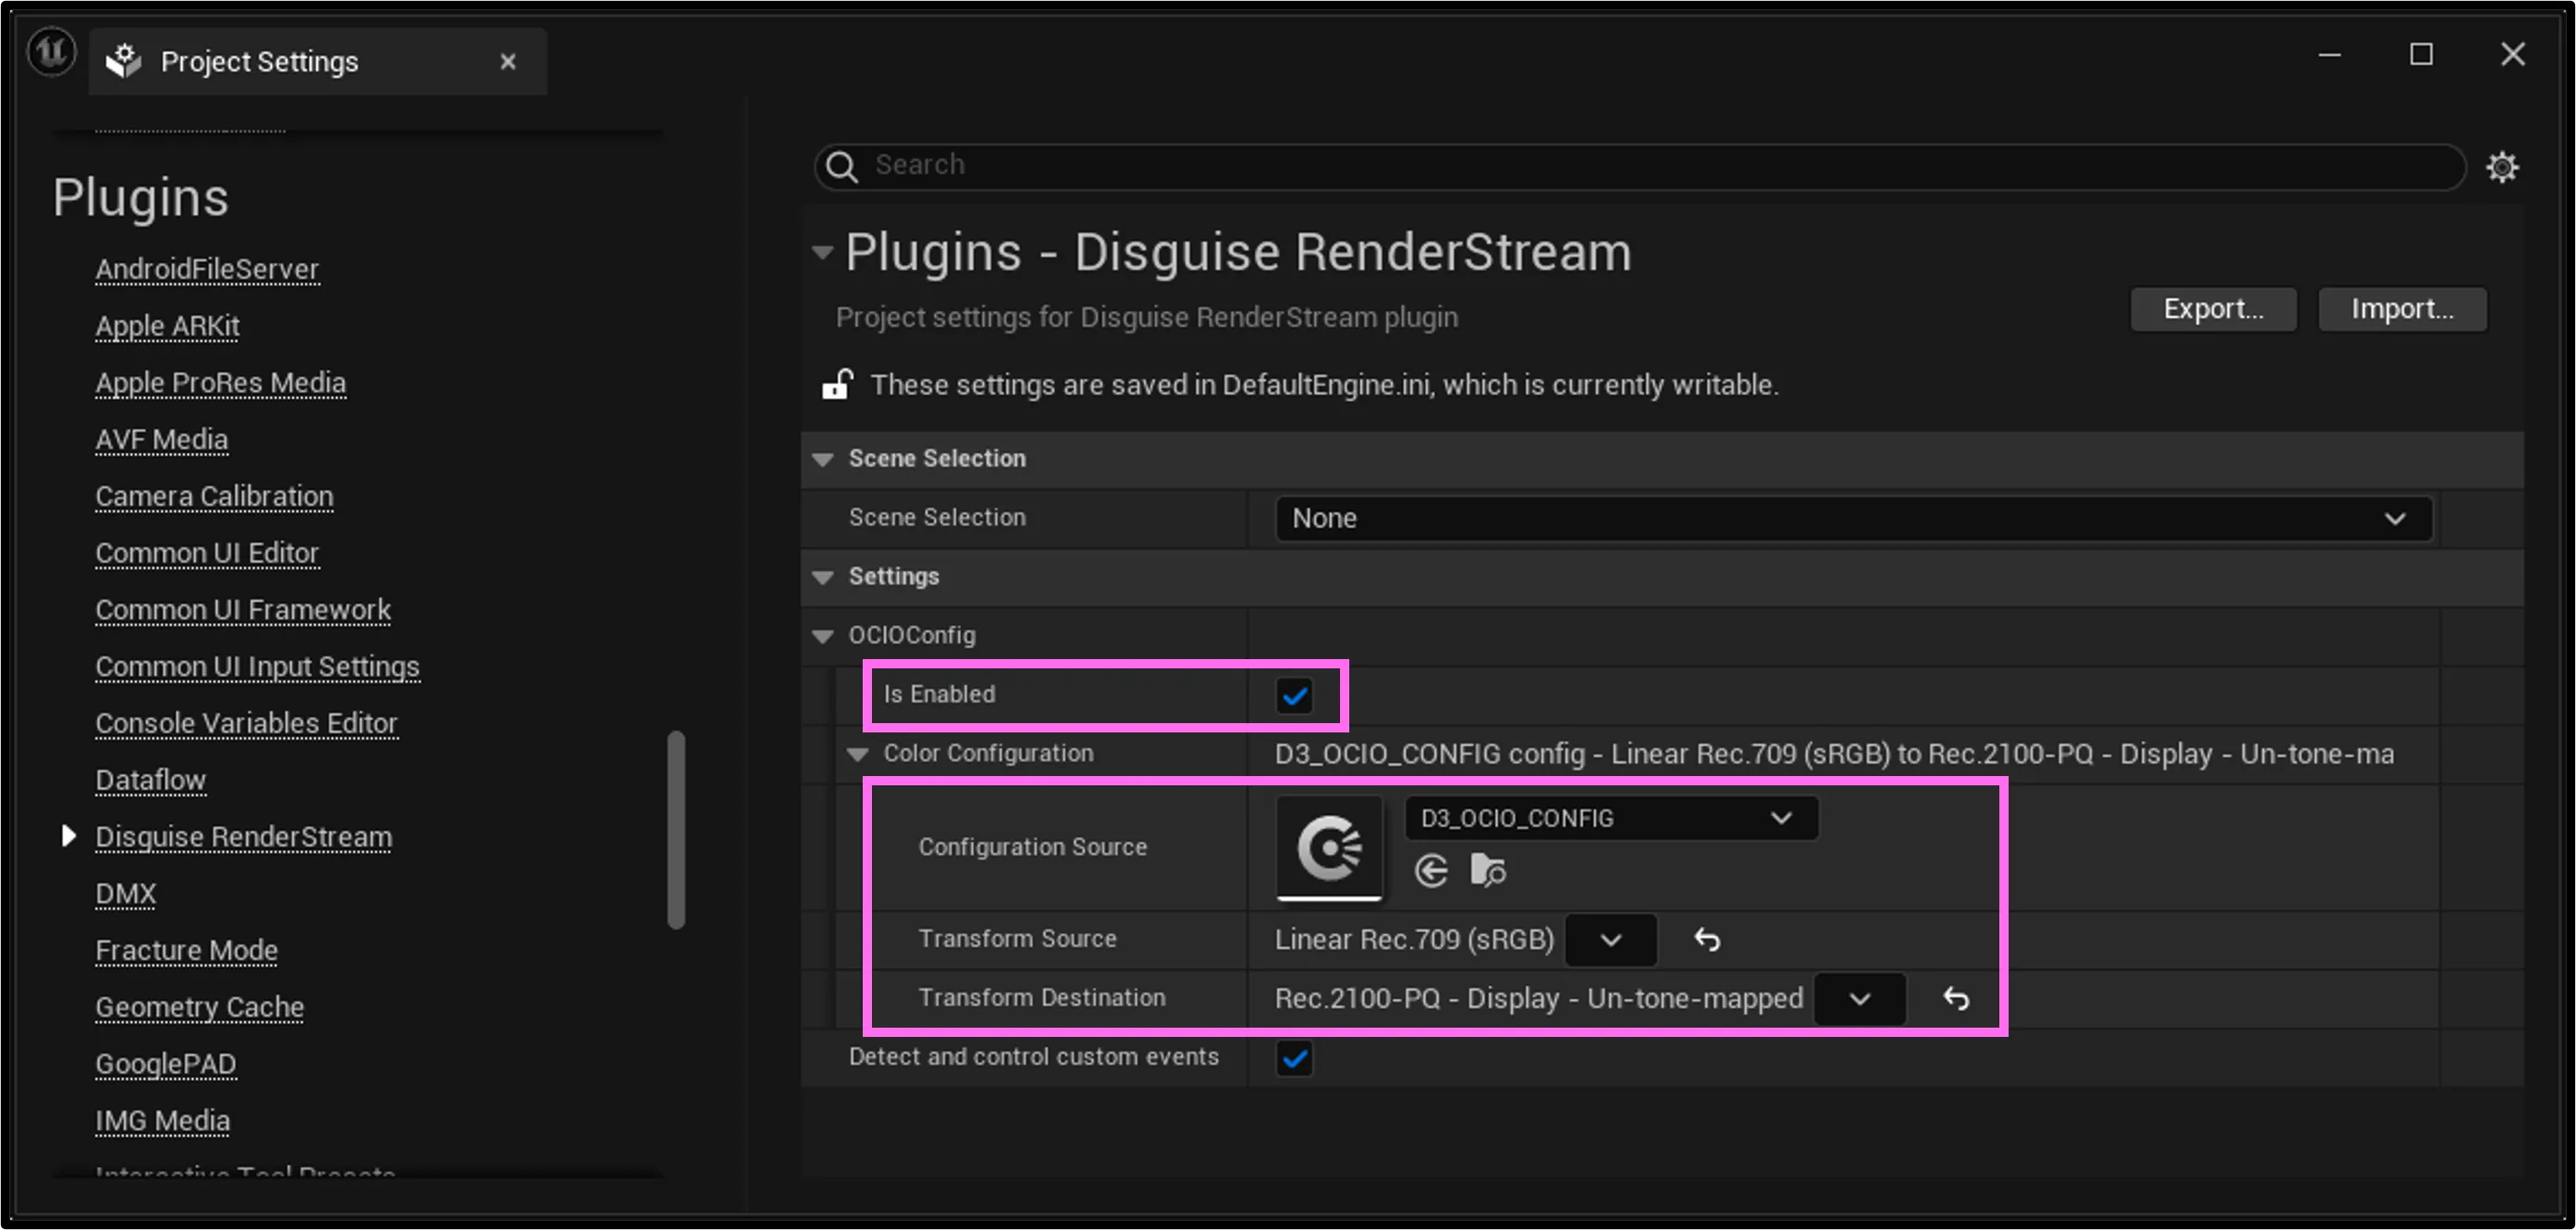 Plugins - Disguise RenderStream Settings
Transform Source
Section titled “Transform Source”| UE Working Colour Space | Matching OCIO Config Colour Space |
|---|---|
| sRGB / Rec709 | Linear Rec.709 (sRGB) |
| ACES AP1 / ACEScg | ACEScg |
Transform Destination
Section titled “Transform Destination”We recommend using Rec.2100-PQ - Display - Un-tone-mapped as the Transform Destination for the following reasons:
- Rec.2100 closely aligns with the achievable gamut of the display.
- PQ (Perceptual Quantizer) provides a gamma encoding that preserves details across the range. In contrast, a standard linear encoding would lose detail in the darker regions of the image. This is important because RenderStream send frames in a 10-bit signal format, rather than a 16-bit floating-point format.
- The colour space shared between Unreal Engine and Designer is an intermediate composite stage; therefore, tone mapping is unnecessary.
Likewise, we recommend using a colour space that fits within the 0 to 1 range and with gamma curve encoding. This ensures that frames can preserve as much data as possible within the RenderStream 10-bit signal format. Note that colors outside the 0 to 1 range will be clamped.
Camera Actor Settings
Section titled “Camera Actor Settings”Unreal Engine applies several post-processing effects which change colour grading. To maintain consistent colour through the rendering pipeline, it’s important to disable any unnecessary settings affecting colour.
- Open the Details section of your CameraActor or CineCameraActor.
- Navigate to Post Process > Lens > Bloom
- Set Intensity to
0.0.
- Set Intensity to
- Navigate to Post Process > Lens > Exposure
- Set Metering Mode to
Manual. - Set Exposure Compensation to
0.0. - Set Apply Physical Camera Exposure to
Untick. - Set Min EV100 and Max EV100 to
1.0- This will disable auto exposure of lens.
- Set Metering Mode to
- Navigate to Post Process > Lens > Image Effects
- Set Vignette Intensity to
0.0.
- Set Vignette Intensity to
- Navigate to Post Process > Color Grading > Misc
- Set Blue Correction to
0.0. - Set Expand Gamut to
0.0. - Set Tone Curve Amount to
0.0.
- Set Blue Correction to
OCIO settings in Designer
Section titled “OCIO settings in Designer”After configuring Unreal Engine, you must set up the colour settings in Designer accordingly to produce a consistent colour.
Follow the OCIO page to configure Designer, but with specific focus on matching the OCIO config file and the Input transform of the RenderStream.
Importing OCIO Config file into Project
Section titled “Importing OCIO Config file into Project”It is recommended to use the same OCIO config file for both Unreal Engine and Designer.
Alternatively, ensure that the OCIO config file contains the same colour space used in the Transform Destination in Unreal (See: Plugins - Disguise RenderStream).
- Copy the OCIO config file from
RenderStream Projects/<UEProject>/Content/<OcioConfig>.ocio.- See: OCIO Config file.
- Place the copied config file into the following directory:
d3_projects/<PROJECT_DIR>/objects/ocio/.
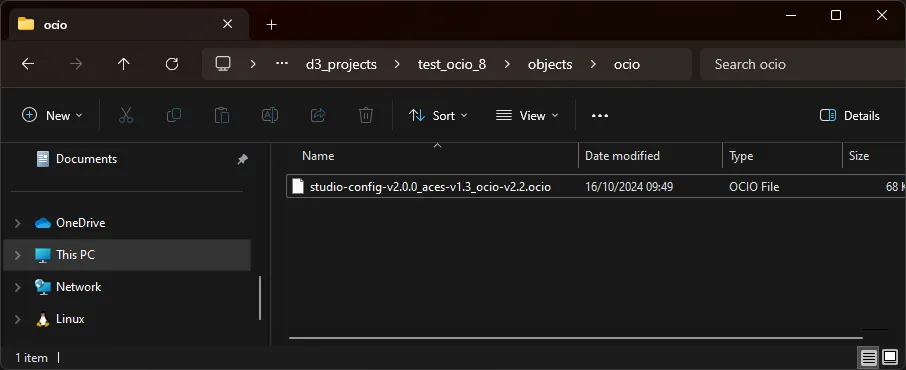 Copied OCIO Config File
Apply OCIO settings in Designer
Section titled “Apply OCIO settings in Designer”- Open Project Settings….
- Set Colour management to
OCIO. - Set OCIO config using the OCIO config file used for the Unreal Engine project.
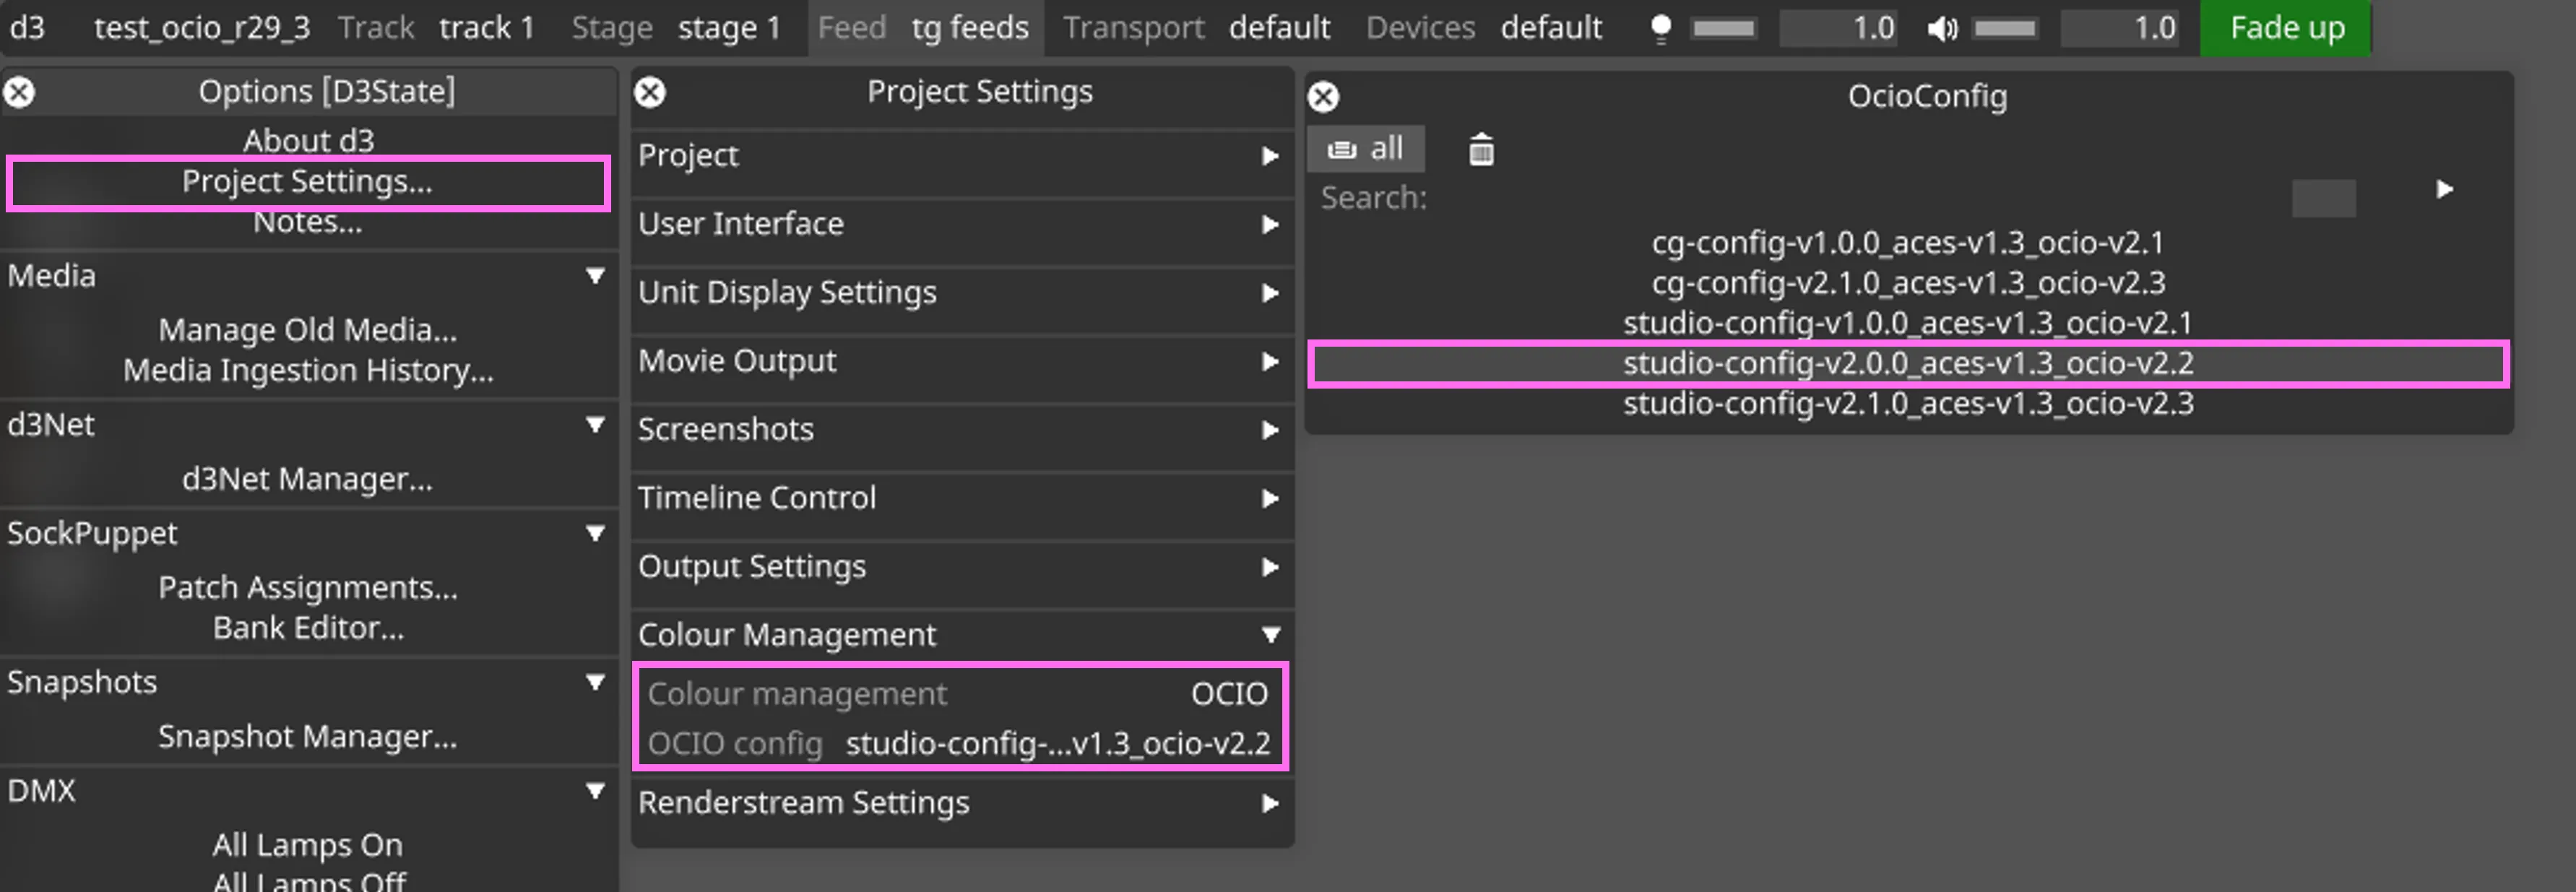 Selecting OCIO Config File
Set Input Transform on RenderStream Layer
Section titled “Set Input Transform on RenderStream Layer”Ensure the Input transform of the RenderStream layer matches the Transform Destination of Unreal Engine Plugins | Disguise RenderStream.
- Open the RenderStream layer widget.
- Right-click the Asset.
- Set the Input transform to match the Transform Destination from Unreal.
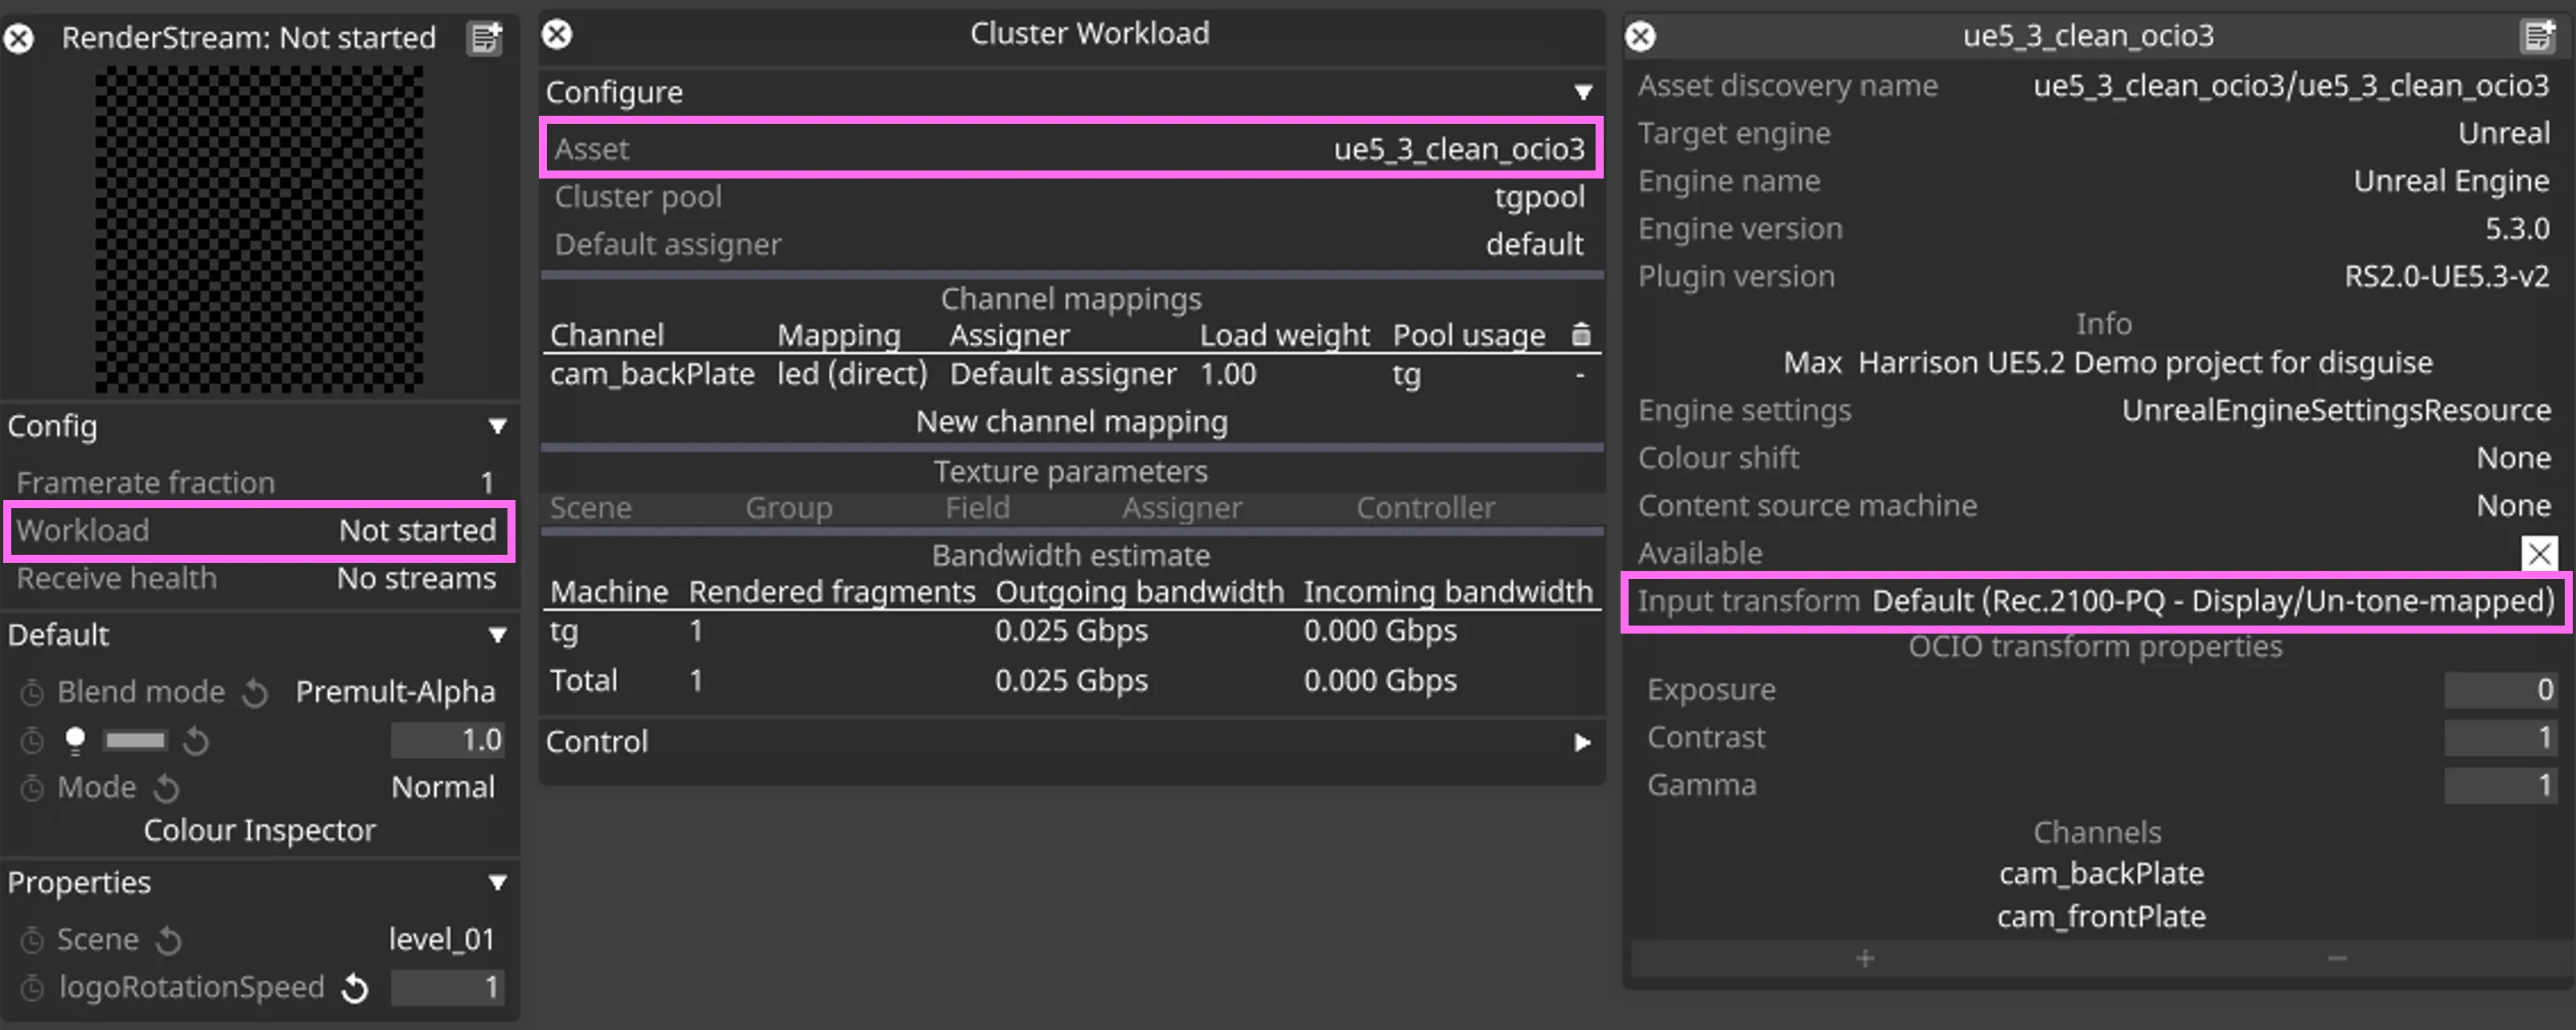 Input Transform of RenderStream Layer
Verifying Colour with a Colour Checker
Section titled “Verifying Colour with a Colour Checker”It’s a good idea to scientifically validate the colour pipeline using a colour checker. This section will guide you through setting up the pipeline to validate the colour accuracy of your rendering using a colour checker.
Designer provides a Colour Inspector tool to inspect the pixel values of the final output, ensuring colour accuracy.
Colour Checker Setup
Section titled “Colour Checker Setup”We’ll use a colour checker from Color-Nuke GitHub. Select the .exr file based on your Working Color Space of Unreal Engine.
| Working Color Space | Link |
|---|---|
| Rec.709 | sRGB_ColorChecker2005.exr - Color-Nuke GitHub |
| ACES AP1 / ACEScg | ACEScg_ColorChecker2005.exr - Color-Nuke GitHub |
Place the downloaded file in the Unreal Engine Content folder:
RenderStream Projects/<UEProject>/Content
 Color Nuke - sRGB Colour Checker
 sRGB Colour Checker in Content Folder
Creating a Material in Unreal Engine
Section titled “Creating a Material in Unreal Engine”Once the colour checker is added as a texture, follow these steps to create a material:
- Right-click the texture in the Content Drawer.
- Select Create Material.
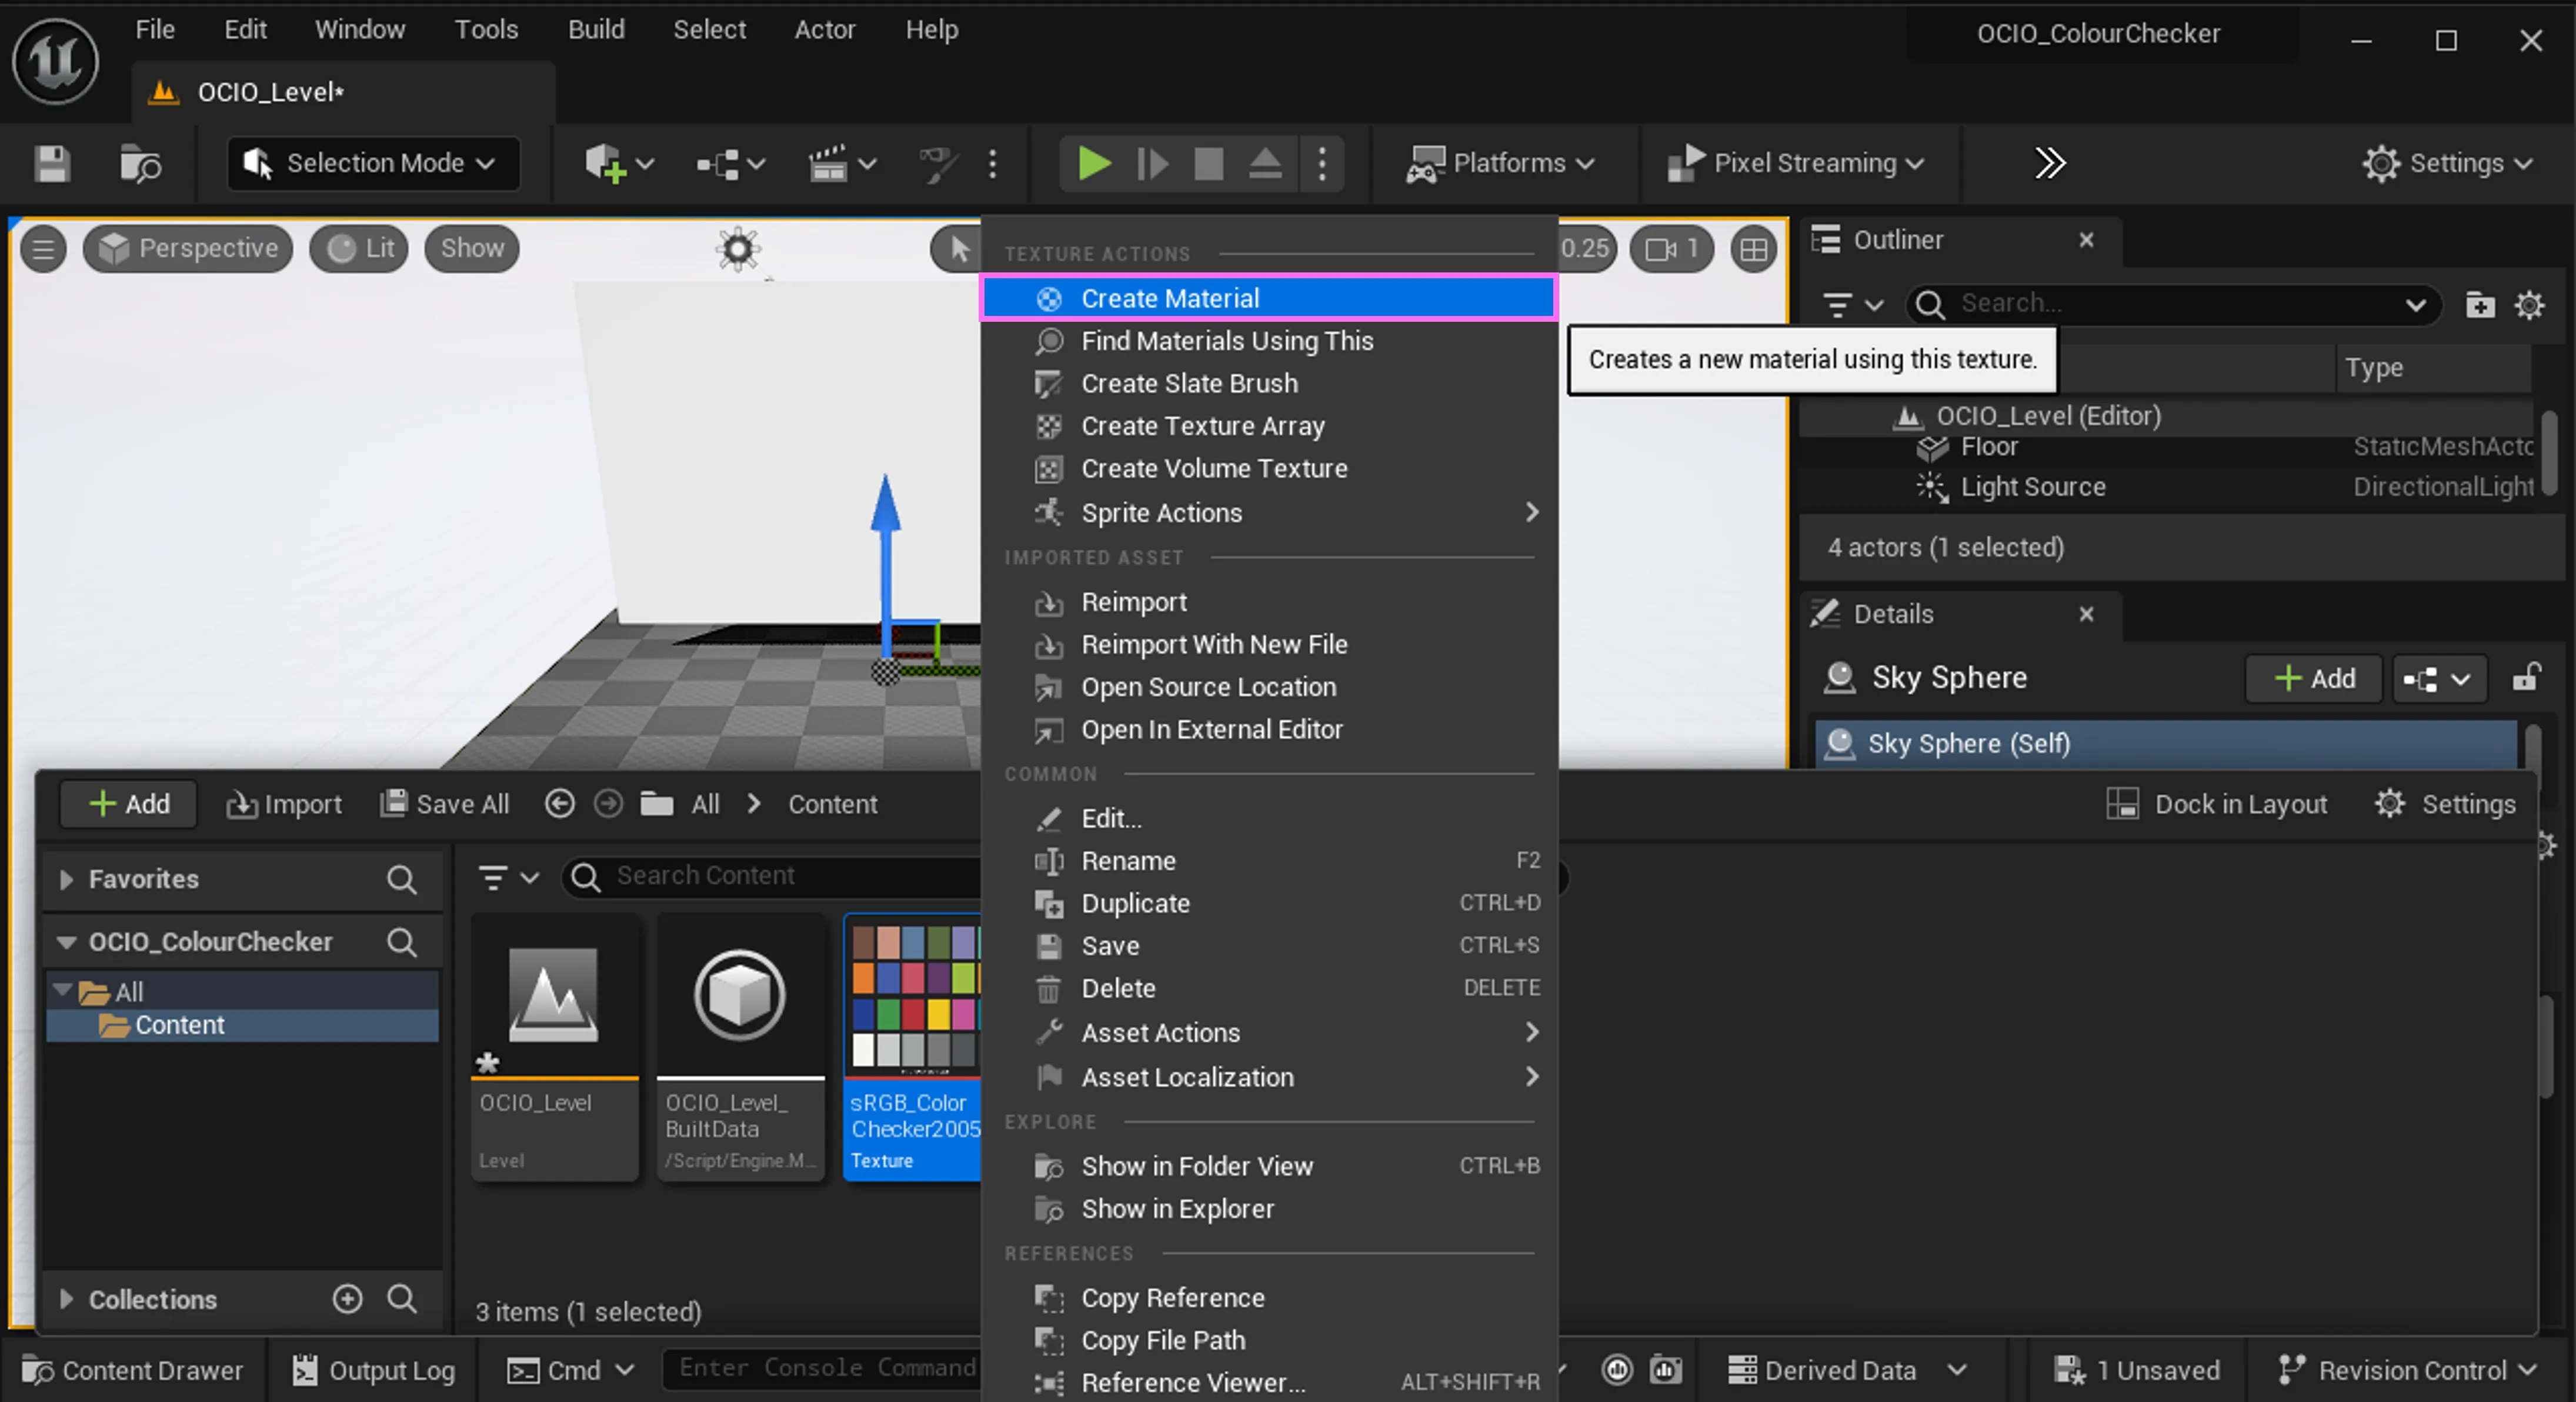 Create Material from Colour Checker Texture
Set colour space of texture (Optional)
If the colour space of the texture is different from your Working Color Space, adjust it:
- Double-click the texture.
- Under Texture > Source Color Settings, set the Color Space accordingly.
sRGB / Rec.709for sRGBACES AP1 / ACEScgfor ACEScg
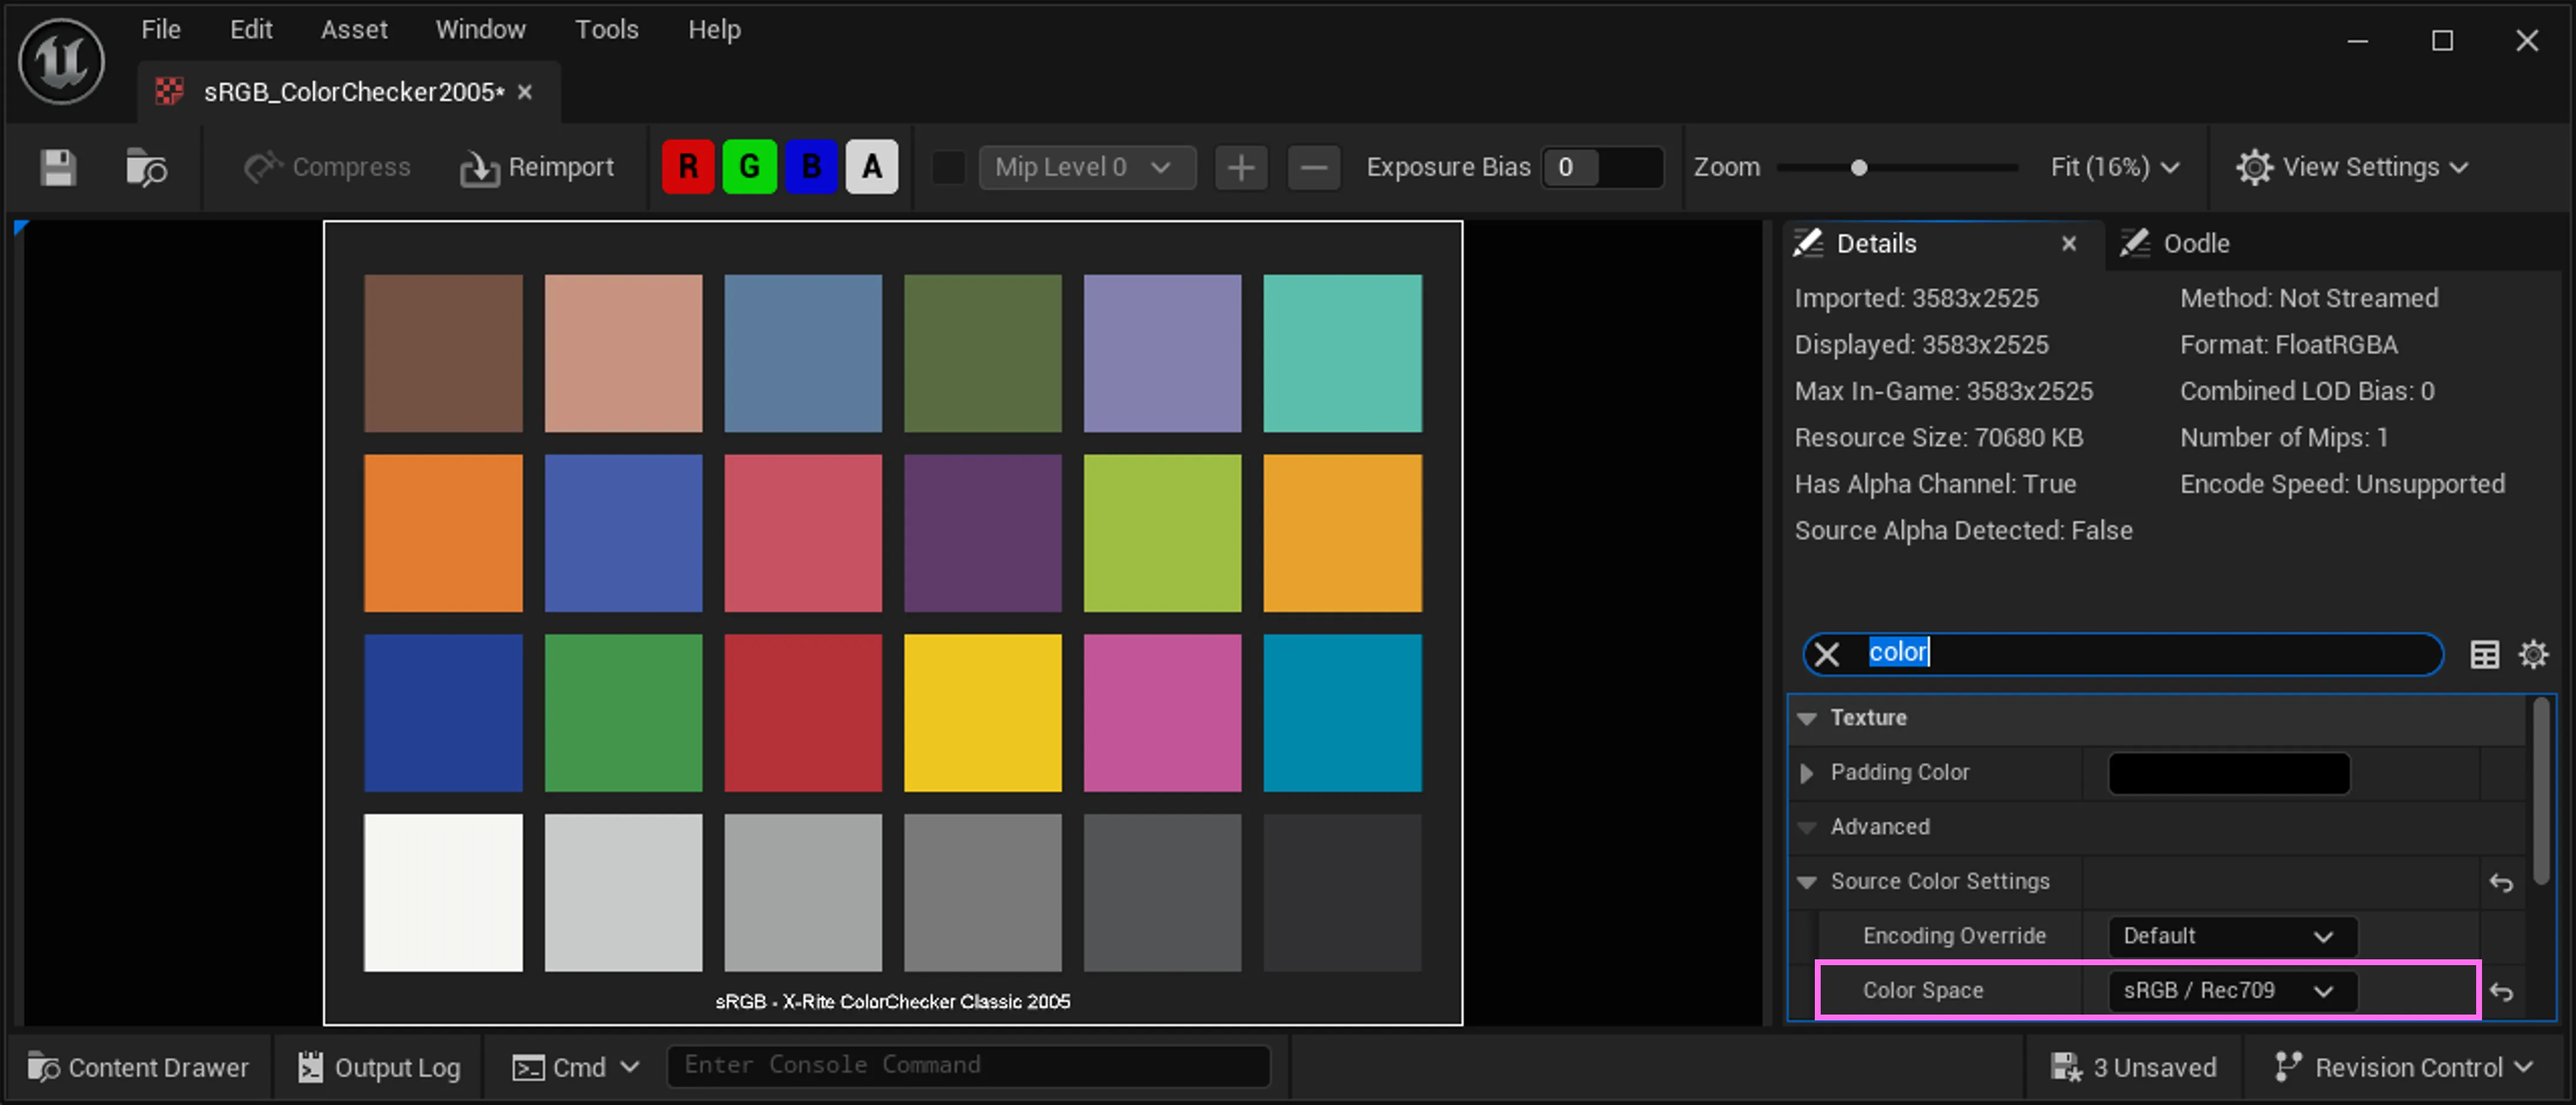 Color Space of Colour Checker Texture
Configure the Material
Section titled “Configure the Material”To avoid lighting effects impacting the colour checker, you need to configure the material to be Unlit:
- Double click the material created from the colour checker texture.
- Set the Shading Model to
Unlit. - Connect the RGB node of the Texture Sample to the Emissive Color input.
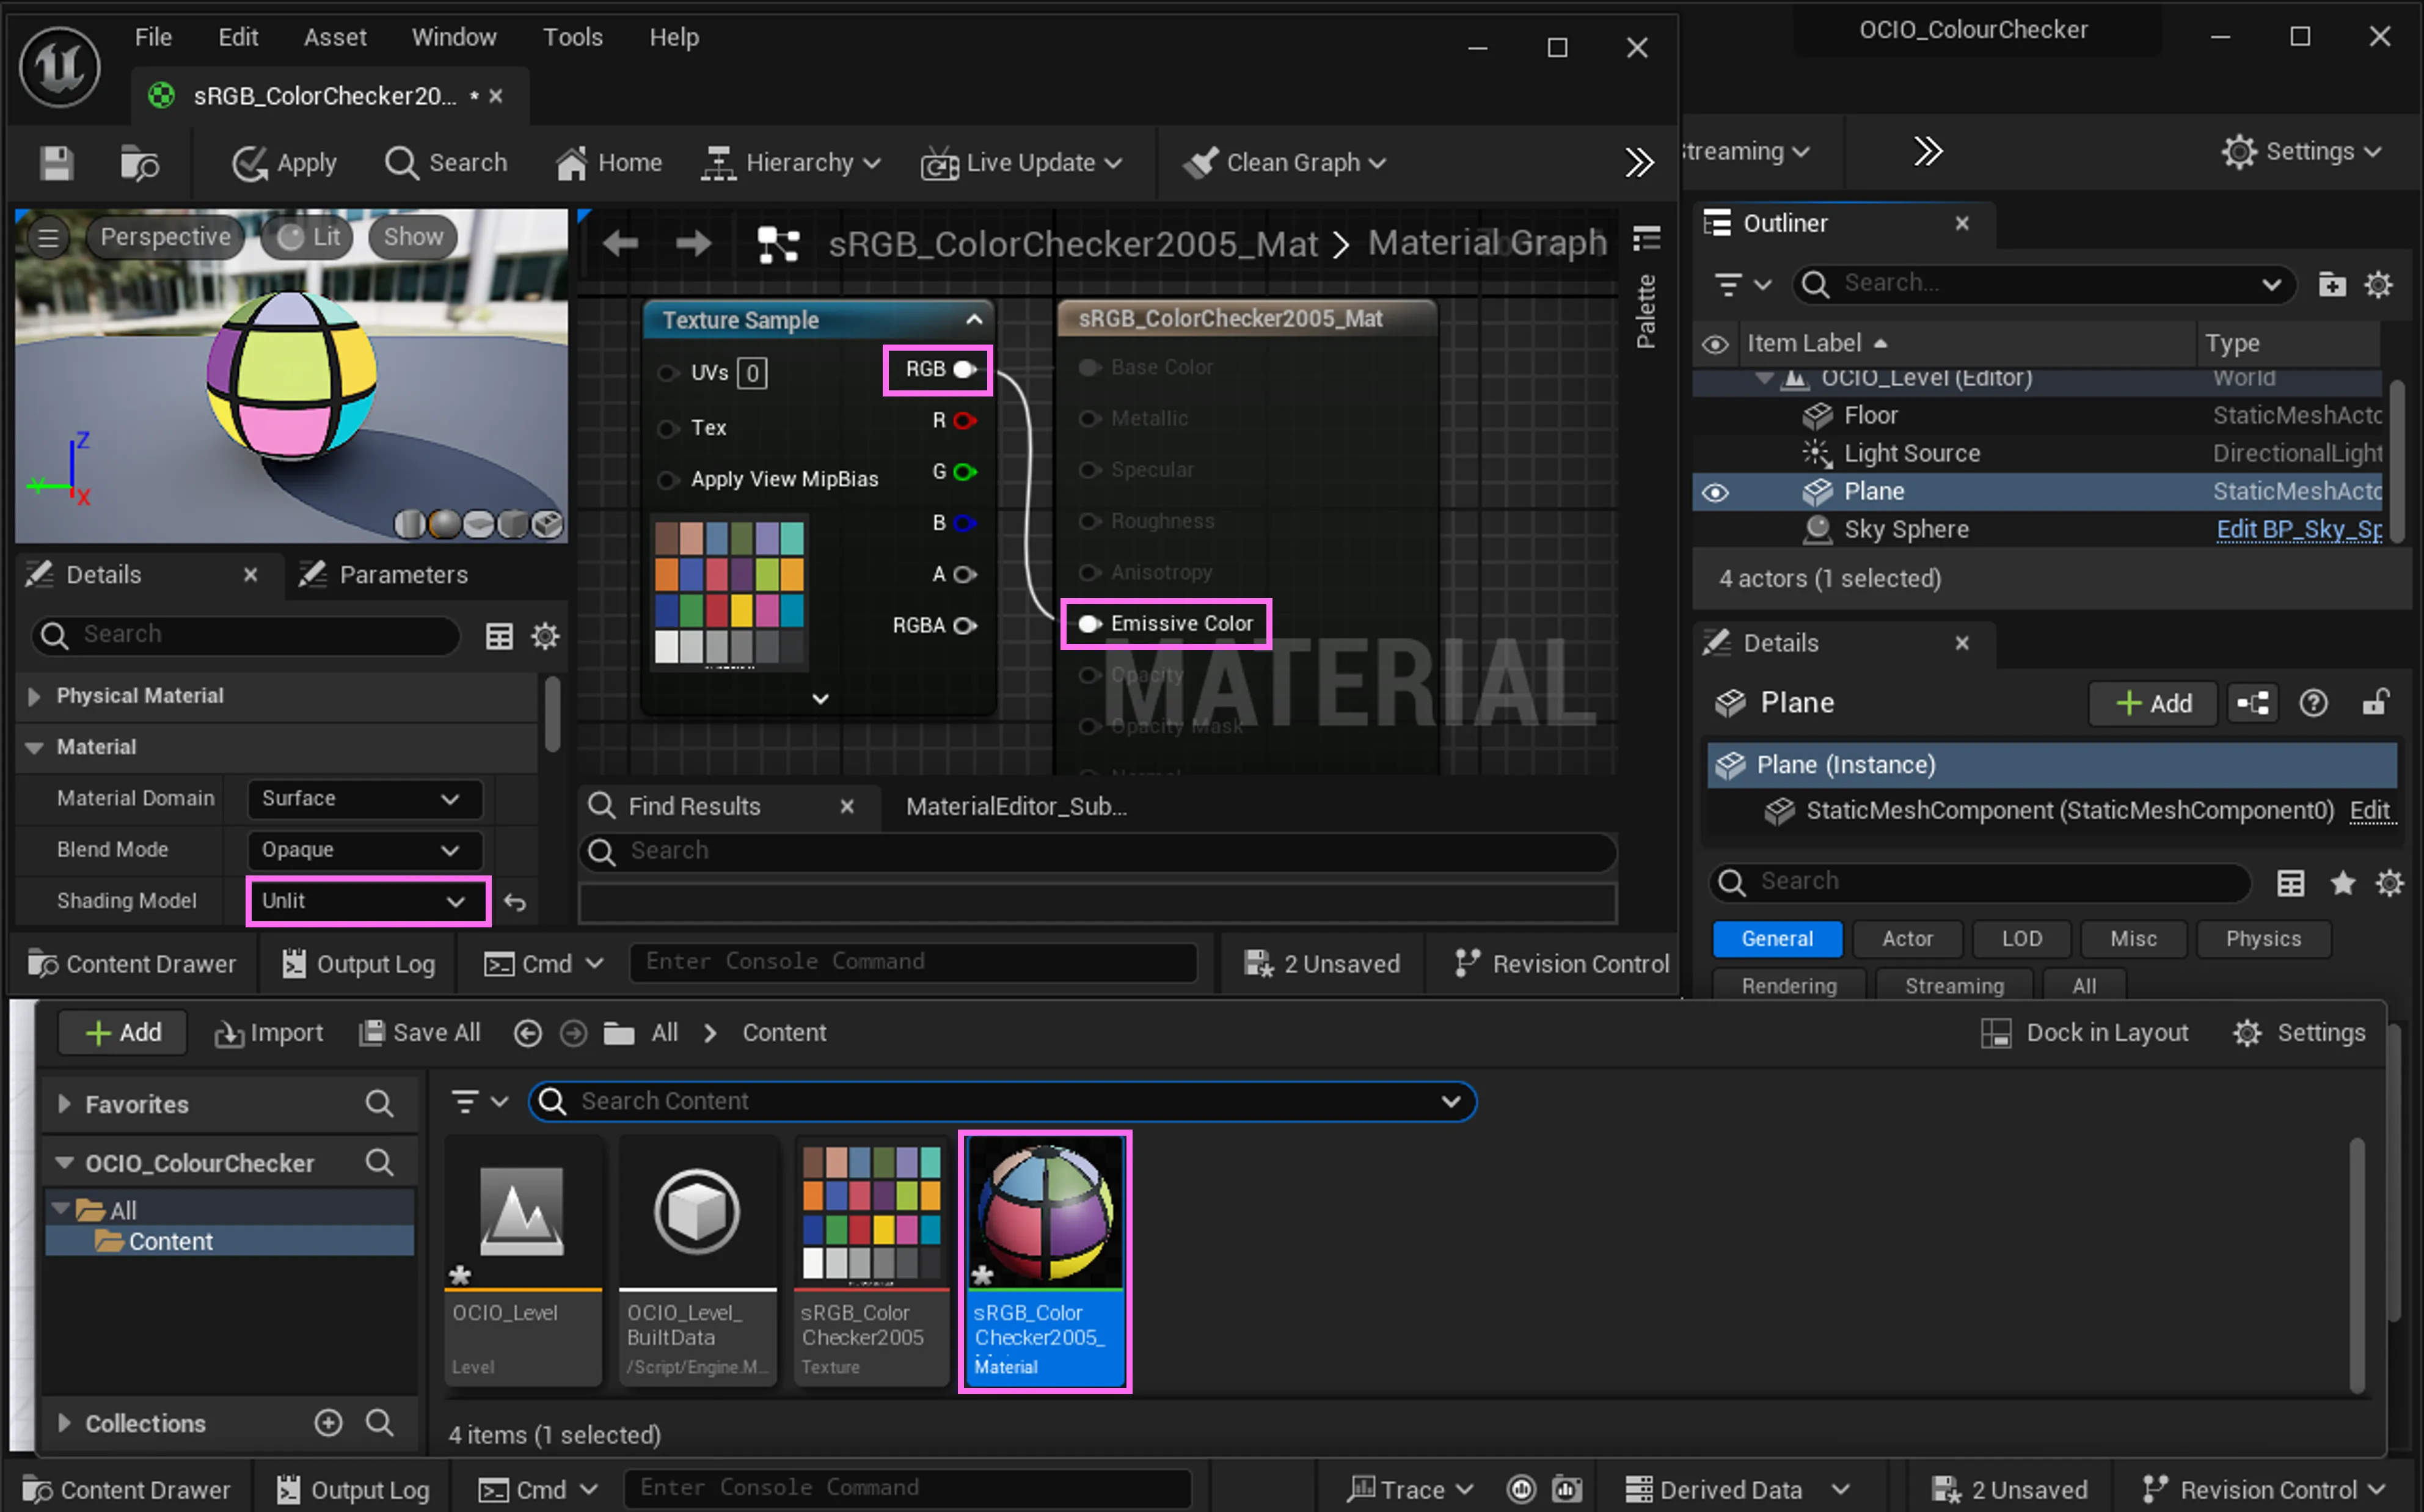 Colour Checker Material Settings
Viewport for Colour Checker
Section titled “Viewport for Colour Checker”To create a viewport fully filled with the colour checker, it is recommended to add a dedicated Plane and CameraActor pair. While it is possible to use an existing CameraActor and Plane, using a dedicated pair ensures better control over the colour checker output.
- Add a Plane and a CameraActor (Optional).
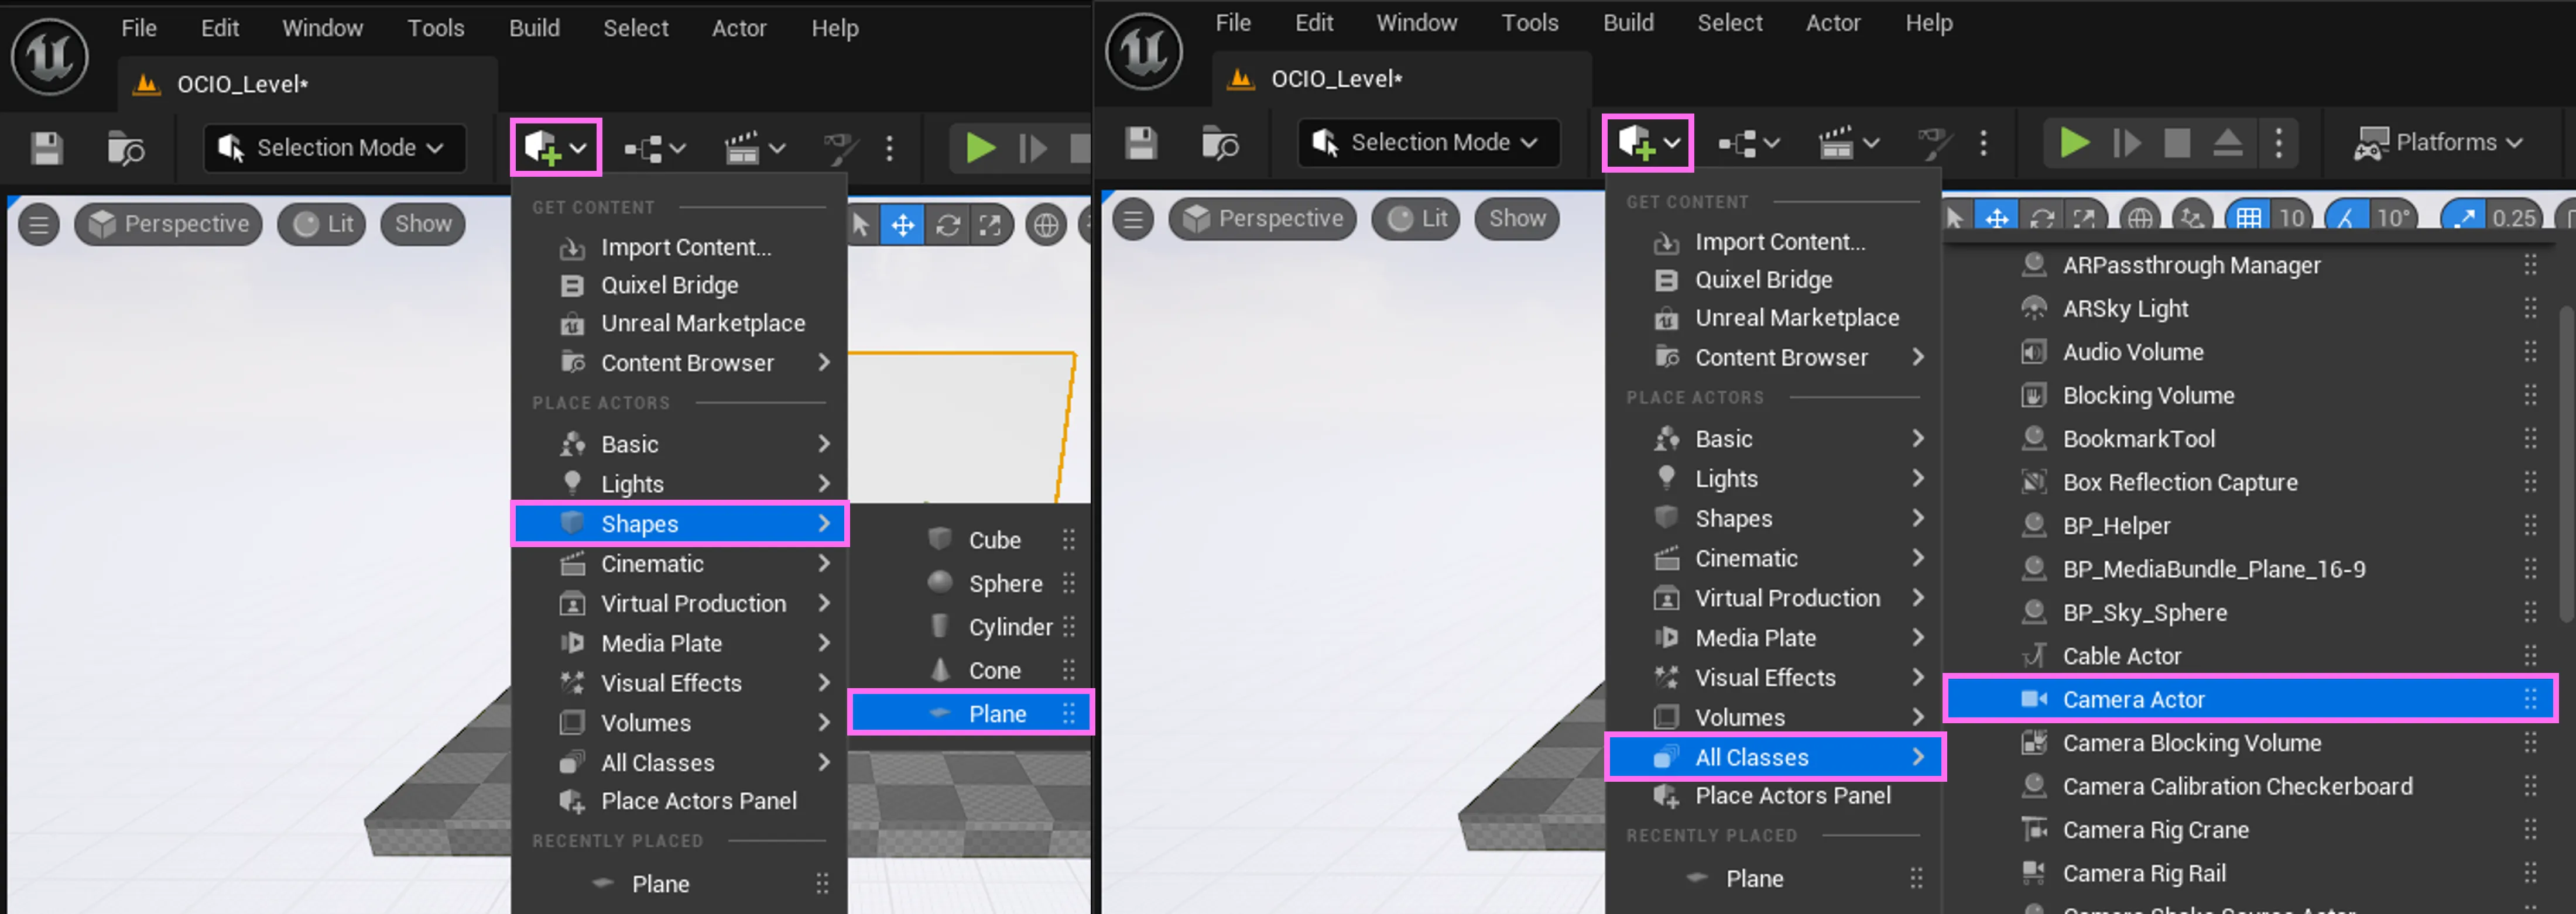 Plane and Camera Actor
- Adjust the Transform of both actors.
- Select the Plane and open the Details panel.
- Expand the Materials section.
- Under Element 0, assign the created colour checker material to the Plane.
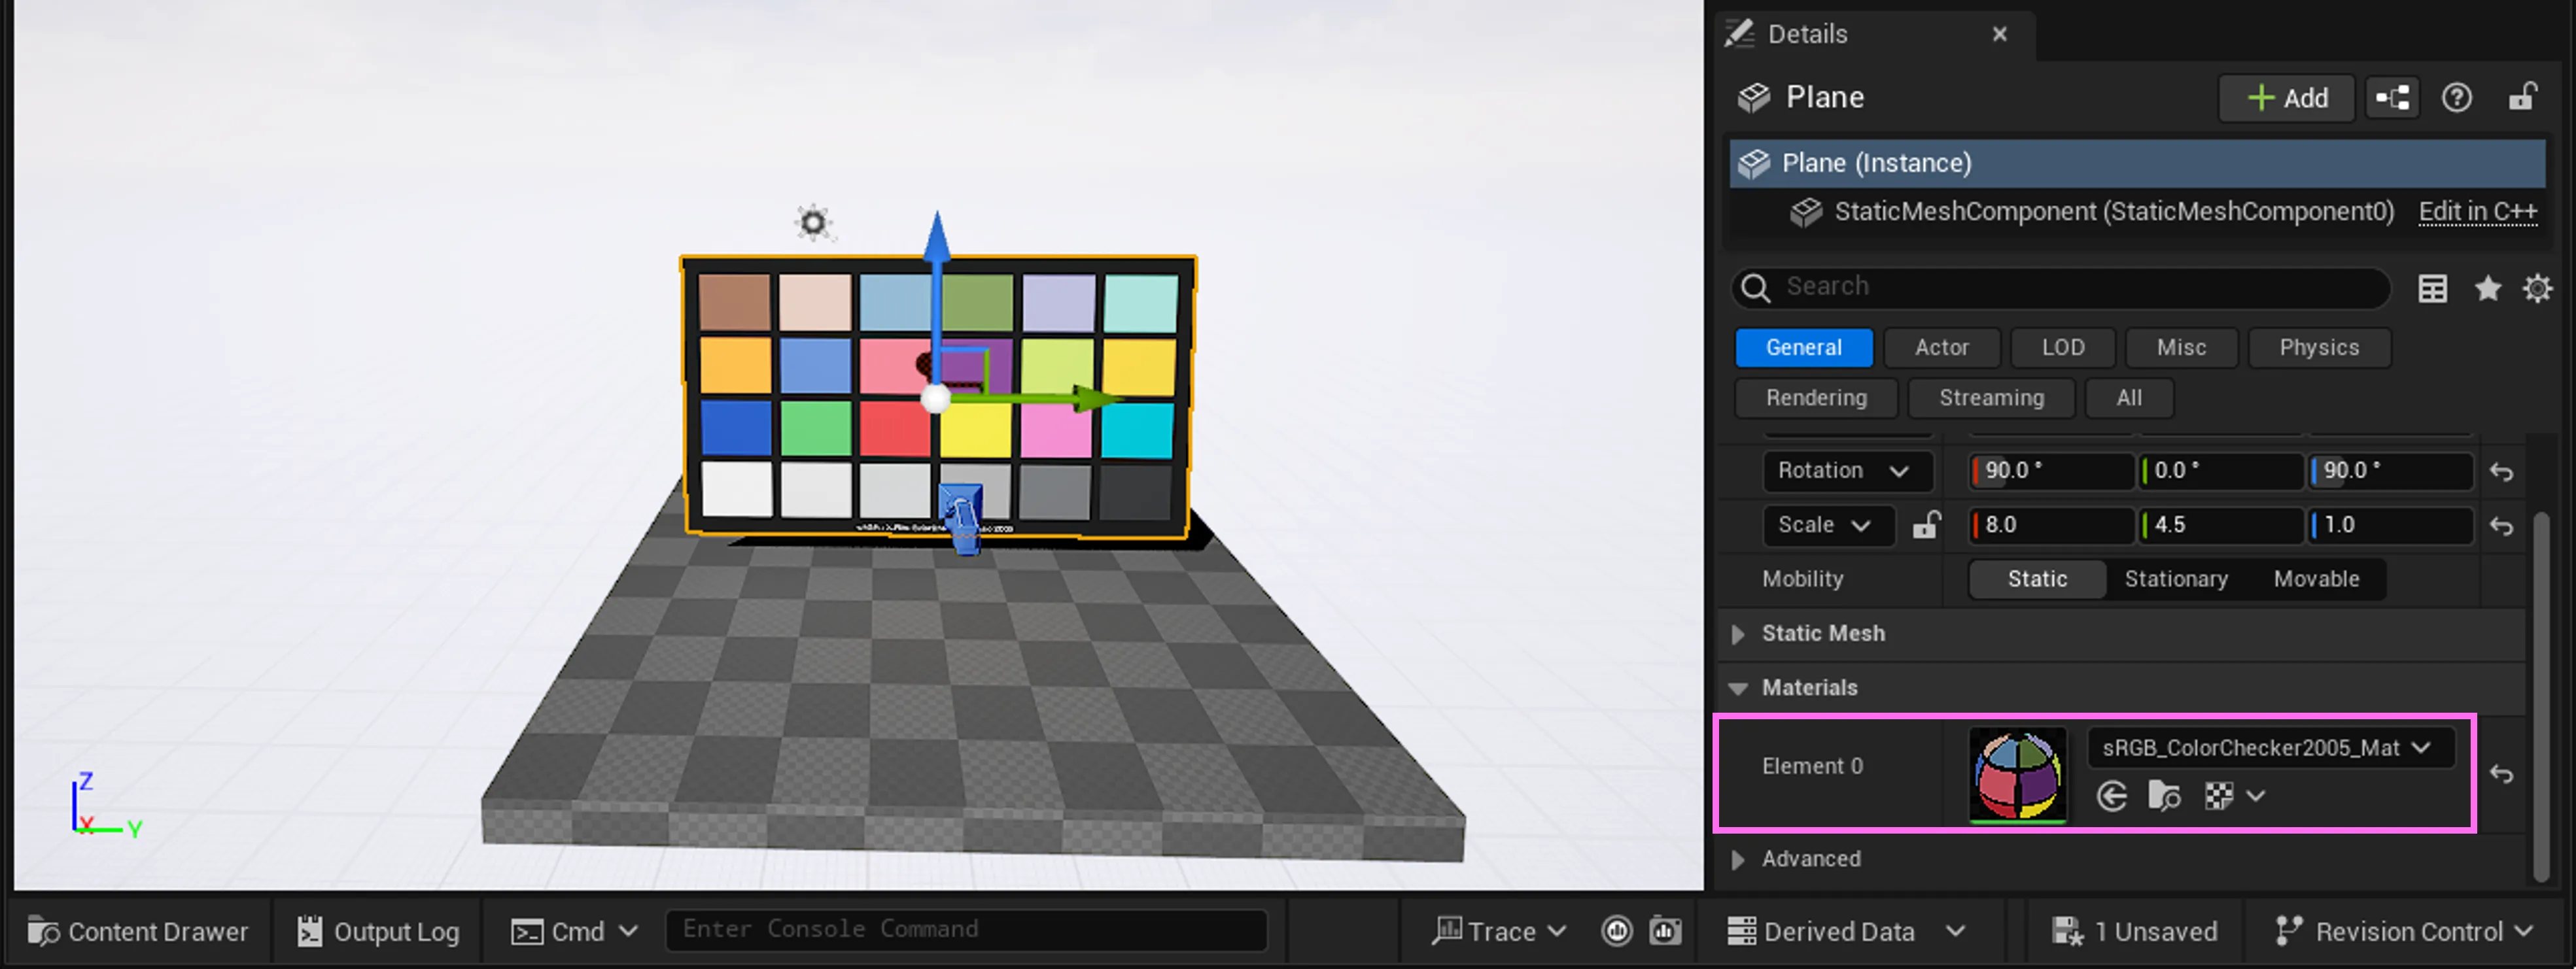 Setup Plane Material
- Select the CameraActor.
- Verify that the viewport is fully filled with the colour checker.
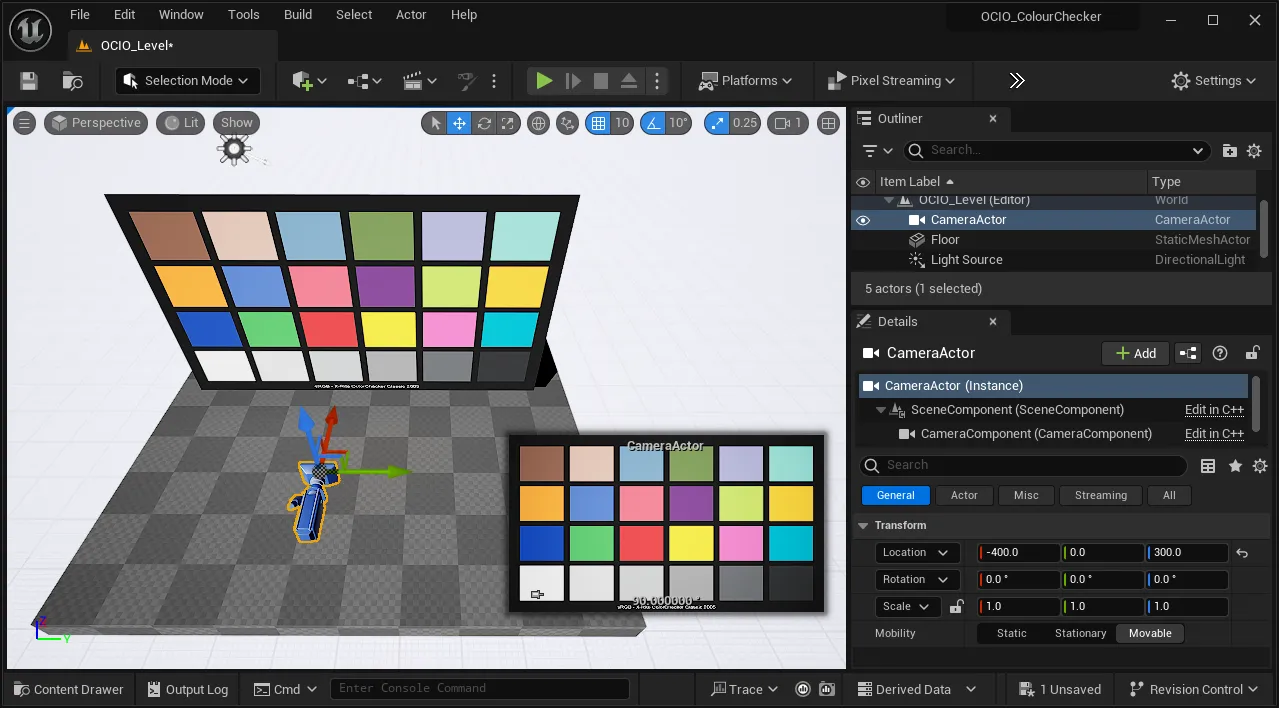 CameraActor Result Viewport
Recommended Transform to achieve the colour checker viewport
Section titled “Recommended Transform to achieve the colour checker viewport”| Actor | Location | Rotation | Scale |
|---|---|---|---|
| Plane | 0.0, 0.0, 300.0 | 90.0, 0.0, 90.0 | 8.0, 4.5, 1.0 |
| CameraActor | -400.0, 0.0, 300.0 | 0.0, 0.0, 0.0 | 1.0, 1.0, 1.0 |
Designer Colour Inspector
Section titled “Designer Colour Inspector”The Designer Colour Inspector tool allows you to inspect colour values at different stages of rendering. Since we are working with a RenderStream layer, follow these steps to use the Colour Inspector for the RenderStream layer:
- Start the RenderStream workload.
- Open the RenderStream layer widget.
- Expand the Default.
- Select Colour Inspector.
- Change the Colour Space to
Custom. - Set the Colour Space to
sRGB - Texture:- Use
sRGB - Texturefor any type of colour checker (i.e.ACEScg).
- Use
- Click on any pixel within the colour checker texture to view its value.
- You can adjust the Number Format if needed.
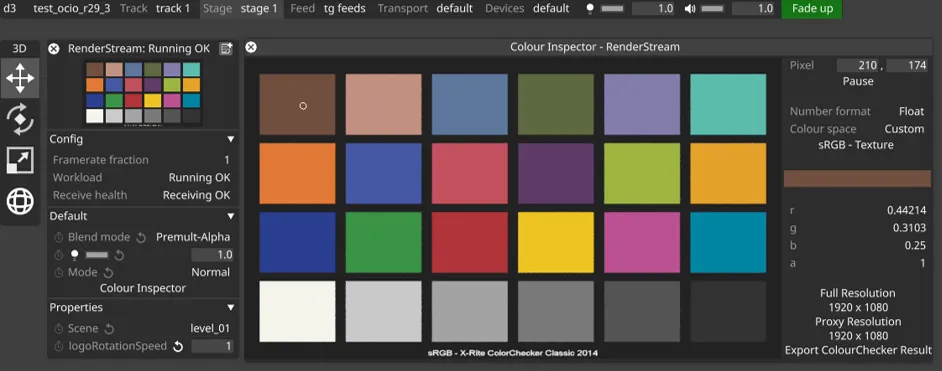
Colour Inspector
- Compare the pixel values with the Manufacturer’s sRGB color values from Wikipedia:
Natural Colours
Section titled “Natural Colours”| Colour Format | Dark skin | Light skin | Blue sky | Foliage | Blue flower | Bluish green |
|---|---|---|---|---|---|---|
| Hex | #735244 | #c29682 | #627a9d | #576c43 | #8580b1 | #67bdaa |
| RGB Floats 0-1 | 0.450980 0.321569 0.266667 | 0.760784 0.588235 0.509804 | 0.384314 0.478431 0.615686 | 0.341176 0.423529 0.262745 | 0.521569 0.501961 0.694118 | 0.403922 0.741176 0.666667 |
Miscellaneous Colours
Section titled “Miscellaneous Colours”| Colour Format | Orange | Purplish blue | Moderate red | Purple | Yellow green | Orange yellow |
|---|---|---|---|---|---|---|
| Hex | #d67e2c | #505ba6 | #c15a63 | #5e3c6c | #9dbc40 | #e0a32e |
| RGB Floats 0-1 | 0.839216 0.494118 0.172549 | 0.313725 0.356863 0.650980 | 0.756863 0.352941 0.388235 | 0.368627 0.235294 0.423529 | 0.615686 0.737255 0.250980 | 0.878431 0.639216 0.180392 |
Primary and Secondary Colours
Section titled “Primary and Secondary Colours”| Colour Format | Blue | Green | Red | Yellow | Magenta | Cyan |
|---|---|---|---|---|---|---|
| Hex | #383d96 | #469449 | #af363c | #e7c71f | #bb5695 | #0885a1 |
| RGB Floats 0-1 | 0.219608 0.239216 0.588235 | 0.274510 0.580392 0.286275 | 0.686275 0.211765 0.235294 | 0.905882 0.780392 0.121569 | 0.733333 0.337255 0.584314 | 0.031373 0.521569 0.631373 |
Greyscale Colours
Section titled “Greyscale Colours”| Colour Format | White | Neutral 8 | Neutral 6.5 | Neutral 5 | Neutral 3.5 | Black |
|---|---|---|---|---|---|---|
| Hex | #f3f3f3 | #c8c8c8 | #a0a0a0 | #7a7a7a | #555555 | #343434 |
| RGB Floats 0-1 | 0.952941 0.952941 0.952941 | 0.784314 0.784314 0.784314 | 0.627451 0.627451 0.627451 | 0.478431 0.478431 0.478431 | 0.333333 0.333333 0.333333 | 0.203922 0.203922 0.203922 |