Creating DMX Screens
Working with DmxScreens is the easiest way to get DMX output with Designer. They behave like regular screens, but each pixel’s colour and/or brightness information is sent out directly via DMX. Designer has no understanding of what kind of fixture is accepting this DMX stream; it sees them only as pixels.
DmxScreens are intended for LED fixtures that accept RGB, CMY or luminance only signals and have no extra control channels.
DmxScreens are not suitable for fixtures that have complex personalities including on/off commands, moving heads etc. For these kinds of fixtures you should create a DmxLight, which allows more complex fixtures to be modeled. For more information please see the following sub-chapter DmxLights.
Creating a DmxScreen
Section titled “Creating a DmxScreen”The DmxScreen is added in the same way as any other screen type. Please see the sub-chapter Creating/removing screens for step-by-step instructions on how to add a screen to a stage, and select DmxScreen from the menu of different screen types.
DmxScreen properties
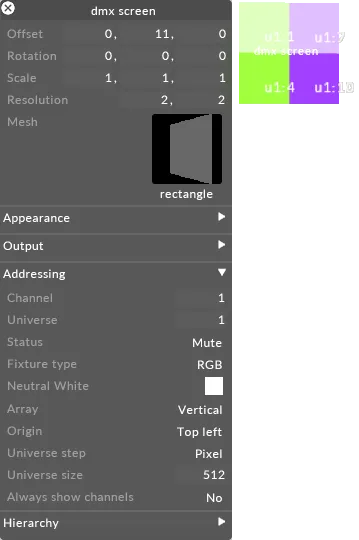
Section titled “DmxScreen properties”The DmxScreen properties are similar to the Screen properties, but with an extra tab called addressing which controls the way each pixels channel number is assigned. Therefore all of the DmxScreen properties not related to addressing can be read in the sub-chapter Editing screens.
Channel
Section titled “Channel”The start channel number of the first pixel to be assigned. You can fill in numbers ranging from 1 to 512.
Universe
Section titled “Universe”The start universe number of the first pixel to be assigned. Valid universe numbers start from 1.
Status
Section titled “Status”This is either mute (not sending DMX ) or active (sending DMX ). Because it may be dangerous to send DMX for an incorrectly addressed screen, the default status is mute. When the screen is addressed correctly, set this to active.
DMX fixture type
Section titled “DMX fixture type”This is the DmxFixtureType object which defines how the DmxScreen turns a pixel into DMX data and back again.
Neutral white
Section titled “Neutral white”This enables the user to color correct the pixels using a paletter or precise RGB value.
Starting from the origin (see below), the assignment algorithm steps horizontally or vertically, increasing the channel number as it goes. This property controls whether the step is horizontal or vertical .
Origin
Section titled “Origin”This controls the starting point for channel assignment. If set to top left , the top left pixel is the first to have its channel assigned; if set to top right , the top right pixel is the first to be assigned; and so on.
Universe step
Section titled “Universe step”For large screens, the total number of channels in the screen may exceed 512, the maximum number of channels in a universe. When this happens, the channel assignment algorithm will jump up a universe and resume assignment. If this universe step happens within a row or column, this may prove inconvenient for physical wiring as two cables will have to be run to the row or column. For this reason, Disguise allows a row/column option which ensures that the universe number will not step halfway through a row or column.
Universe size
Section titled “Universe size”By default, a universe is assumed to be 512 pixels. If you want, you can set the size to something smaller. This allows a portion of the universe to be used for other fixtures or control channels, if required.
Always show channels
Section titled “Always show channels”When set to yes, superimposes the universe and channel number for each pixel over the pixel in the Stage Visualiser. Left-clicking a channel number allows you to edit it using the mouse wheel. Note that changing the colour, array, origin or universe step properties will reassign the channel numbers.