ColourAdjust
The ColourAdjust layer is best suited to changing colour properties in a familiar set values. It is designed to control white balance and tint either through presets or discrete amounts.
Workflow
Effect layers receive their source from other layer types - either content or generative - through arrows. An arrow connects a source layer to a destination layer; the source layer is said to be “piped in” to the destination Effect layer. For more information on arrows, see the compositing layers topic.
To draw an arrow between two layers, hold down ALT and left-click & drag from the source layer to the destination layer.
- Add an Effect layer to your track. For more information about adding layers, see creating layers.
- Draw an arrow from your content layer to the Effect layer so the compositing order looks something like the following image.
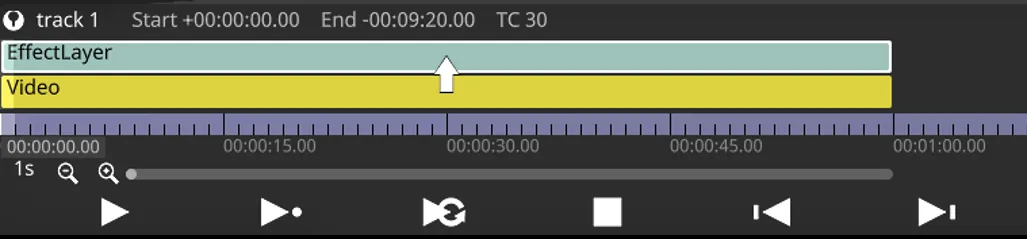
- Adjust the Effect layer properties to achieve the desired result.
ColourAdjust layer properties
Section titled “ColourAdjust layer properties”White balance preset
Section titled “White balance preset”This property defines which White balance preset is used.
The following options are available.
- None
- Custom
- Daylight
- Shade
- Cloudy
- Tungsten
- Florescent
- Flash
Once you have selected a preset, you cannot keyframe Kelvin & Tint.
Kelvin
Section titled “Kelvin”This property controls the Kelvin in degrees kelvin.
This property controls tint and allows you to fine-tune the green/magenta balance. The scale on the slider represents the actual Kelvin value, which is subject to slight variations from camera to camera.
Contrast
Section titled “Contrast”This property controls contrast.
Brightness
Section titled “Brightness”This property controls brightness.
Saturation
Section titled “Saturation”This property controls saturation.
Levels
Section titled “Levels”Levels is a tool in the ColourAdjust layer which can move and compress the brightness levels of an image histogram. It has the power to adjust brightness, contrast, and tonal range by specifying the location of complete black, complete white, and midtones in a histogram. Since every piece of content’s histogram is unique, there is no single way to adjust the levels for all your content. A proper understanding of how to adjust the levels of an image histogram will help you better represent tones in the final image.
Shadow
Section titled “Shadow”Shadow defines the lowest brightness value in the source image. Any pixels at or below this value are pushed towards 0.0.
Midtone
Section titled “Midtone”The midtone can be considered as a gamma adjustment. It adjusts the midtone response or overall curve between black and white, allowing to brighten or darken mid-level tones without heavily altering the extremes.
Highlight
Section titled “Highlight”Highlight defines the highest brightness value in the source image. Any pixels at or above this value are pushed towards 1.0.
Compress
Section titled “Compress”The colour level can be compressed using Output Low and Output High. For example, the colour range of [0.0, 1.0] will be compressed into [Output Low, Output High]. This shifts the entire colour range while minimising the loss of detail in the darkest and brightest regions.
- Output Low sets how dark the darkest pixels in the result will be.
- Output High sets how bright the brightest pixels in the result will be.

To prevent colour shift, clamping can be applied. As the name suggests, colours will be restricted within the range of [Output Low Clamp, Output High Clamp]. This means that colours within the clamp range will be preserved, while colours outside the range will be capped and lost.
