Scheduling Events
A Schedule is useful for long-term running or permanent installations. It allows you to schedule track change events that occur regularly over long periods of time (days, weeks or even months).
How the Scheduler works
Section titled “How the Scheduler works”The scheduler behaves in the following manner:
- The scheduler will go down the list of events to see what to do
- The scheduler will keep going down the list until it finds an active event
- As soon as it finds an event that is active it will switch to it
- Repeat the above steps.
To move the events up/down the scheduler list, simply drag and drop them
Create a schedule
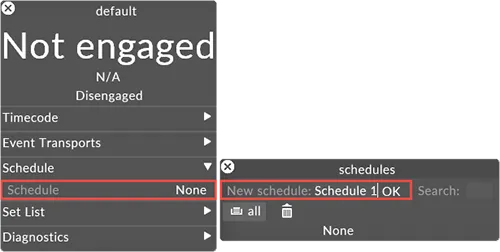
Section titled “Create a schedule”- Left-click the schedule property in the Transport Editor. This will open the Schedules manager which contains a list of all of the schedules available.
- Type the name of the new Schedule into the new schedule text field.
- Hit Enter. This will create the new schedule, add it to the Schedules manager, and open the Schedule manager. The Schedule manager consists of an ordered list of events.
Events are also referred to as schedule items. A schedule item specifies a track trigger event. For example, a schedule item can say: trigger track X for a set duration, repeating on a chosen interval, between the hours of A and B and on dates C to D.
Schedule properties
Section titled “Schedule properties”On startup
Section titled “On startup”The playmode the Schedule sets when the project starts: Stop, Play, Play to end section, or Loop section.
Transition
Section titled “Transition”How the Scheduler switches between tracks:
- Cut — a hard cut straight to the new track.
- Fade — fades to black between tracks.
Events
Section titled “Events”The ordered list of schedule items. The first active item in the list wins, so place higher-priority items (for example, a track that must play on the hour) nearer the top.
Add a schedule item to the Schedule
Section titled “Add a schedule item to the Schedule”- Left-click +. This will open the scheduleitems manager which contains a list of all of the schedule items.
- Type the scheduleitem name into the new scheduleitem text field, in this example the event morning.
- Hit Enter. This will add the schedule item to the schedule menu and open the Scheduleitems editor.
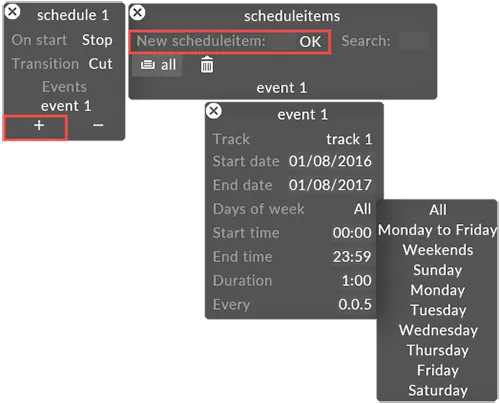
As an example, the Schedule object called schedule 2 has been edited to contain one event called morning. Morning will be active for five minutes every hour, starting at 9am and ending at 4pm, between the 1st of November and the 15th of December, all days of the week.
Schedule item properties
Section titled “Schedule item properties”Specifies the track that will be triggered.
Start date, end date
Section titled “Start date, end date”Specifies the date range over which the event is active. The format is dd/mm/yyyy (a two-digit year is also accepted).
Days of week
Section titled “Days of week”Specifies which days the item applies on: All, Monday to Friday, Weekends, or a single day (Sunday to Saturday).
Start time/end time
Section titled “Start time/end time”Specifies the time range during the day that the event will be active. The format must be hh:mm.
Duration
Section titled “Duration”Specifies how long the track stays active each time the event triggers. The format is hh:mm.
Specifies how often the event re-triggers within its time window — the repeat interval. The format is hh:mm.