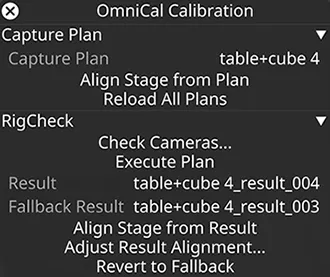
OmniCal RigCheck
RigCheck is the tool for quickly re-calibrating without advanced knowledge of the rest of the OmniCal system. It is primarily used by operators at fixed installations to re-calibrate shows after minor external changes, by comparing live camera images to those from a previous Capture to check whether cameras or projection surfaces have moved. If so, the user can adjust the alignment reference points by dragging them into the correct positions.
Accessing RigCheck
Section titled “Accessing RigCheck”- Open the stage editor by right-clicking Stage in the dashboard, or by right-clicking the floor in the visualiser.
- Left-click OmniCal Calibration to open the OmniCal Calibration editor.
- Ensure that you have a plan already calibrated by a trained operator.
- Left-click Check cameras.
Workflow
Section titled “Workflow”The RigCheck workflow is used after a full OmniCal capture, calibration and alignment has been completed using the Plan workflow.
In RigCheck, the current plan is used as a template to repeat all required OmniCal steps with the same settings, but at a later time. The original plan itself is not modified in this workflow. Each RigCheck result stores its own set of settings and data. RigCheck allows minor alignment adjustments that differ from the original Plan to account for minor changes in projector or camera movement. It is therefore suited for recalibration of proven setups, e.g. when being run by day-to-day operators on fixed installations.
The RigCheck separator in the main OmniCal Calibration window groups all relevant functionality to prepare, run or align a RigCheck.
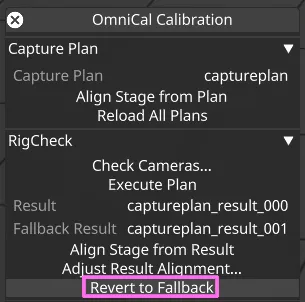
OmniCal Plan with several RigCheck Results.
Using RigCheck
Section titled “Using RigCheck”- Ensure that you have a plan already calibrated by a trained OmniCal operator. It should be selected in the OmniCal Calibration editor.
- Left-click Check Cameras in the OmniCal Calibration editor.
- Verify there are no errors when the Check Cameras window opens. Errors can include the following:
- a. Cameras are unavailable.
- b. Camera names have been modified in the plan. The plan capture is used as a reference for RigCheck. Any changes to cameras names after a completed plan capture will invalidate it.
- The Check Cameras window will open which shows camera pairs consisting of the original plan capture and a snapshot capture of the current stage. You can take a new snapshot using the Refresh Camera Views button.
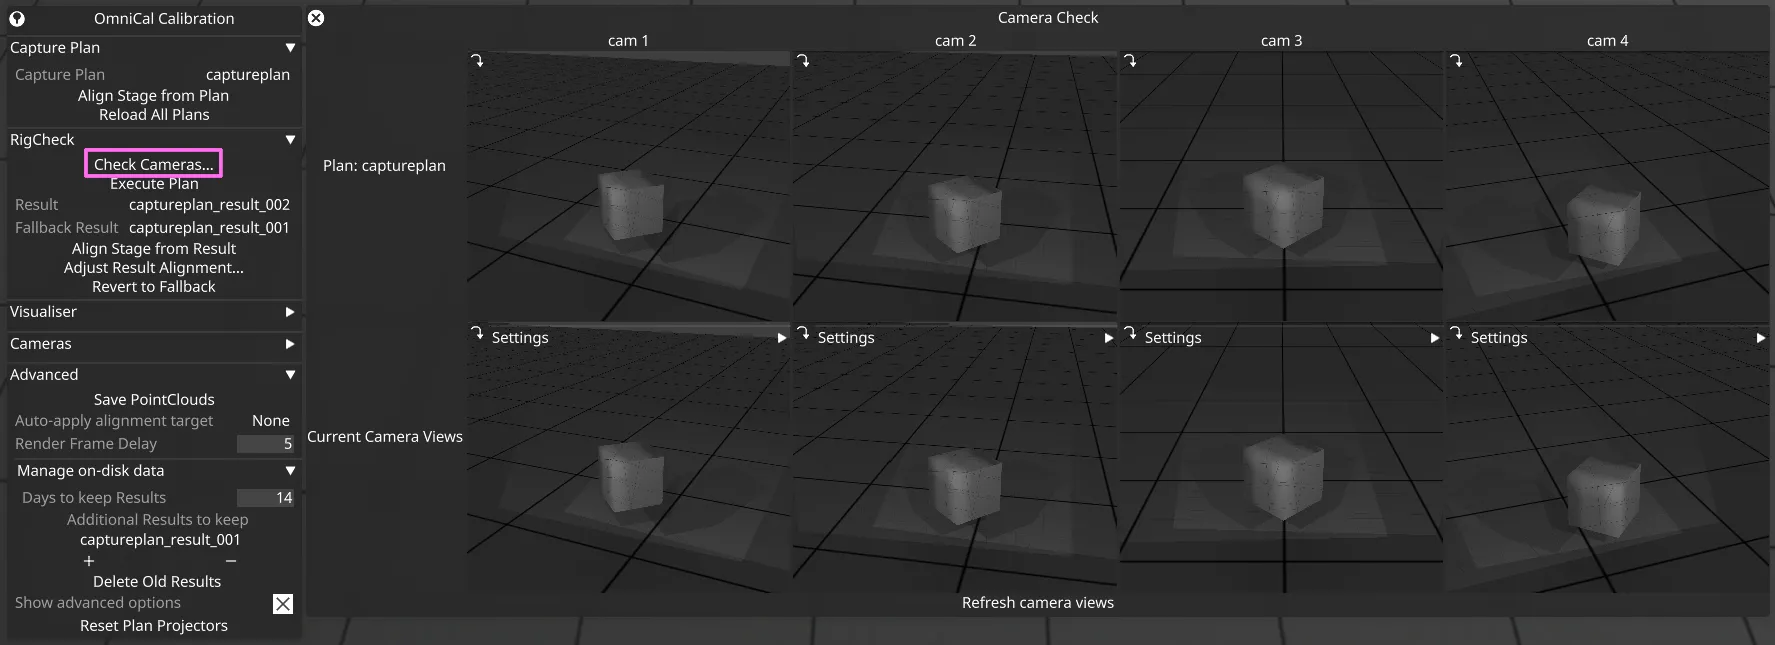
- Ensure that the camera views match:
- a. They don’t need to be identical, but the coverage of projection surfaces should match and they should be in approximately the same positions.
- b. The brightness of the images should also match. The exact camera settings specified in the plan (like exposure time) will be used here, so any differences would be either due to the physical aperture or focus of the camera lens, or the lighting environment. It is therefore recommended that the focus and aperture of machine vision cameras be locked in place for repeatability.
- Once you are happy with the camera views, close the Check Cameras window.
- Left-click Execute Plan. This will perform a capture, calibration, alignment and optionally a mesh deform (if it was configured to run automatically in the plan’s deform settings). A new Result object is created which contains the capture, calibration etc data.
- Ensure that the correct Plan and Result are selected in the OmniCal Calibration editor.
- Left-click Align Stage from Result in the OmniCal Calibration editor. Note that this will apply the result’s alignment to the stage (if it hasn’t been applied already). This will update both projectors and projection surfaces if they have alignment points. If Align Stage from Result is greyed out a tool tip should tell you the reason, which can include the following:
- a. The Plan has no capture or calibration.
- b. The Result has no capture or calibration.
- Verify there are no errors when the Adjust Result Alignment window opens. Errors can include the following:
- a. The camera names in the Plan and Result don’t match. The Plan may have been modified since the Result was created.
- The Adjust Result Alignment window will open which shows camera pairs consisting of the original Plan capture and the Result capture that was taken.
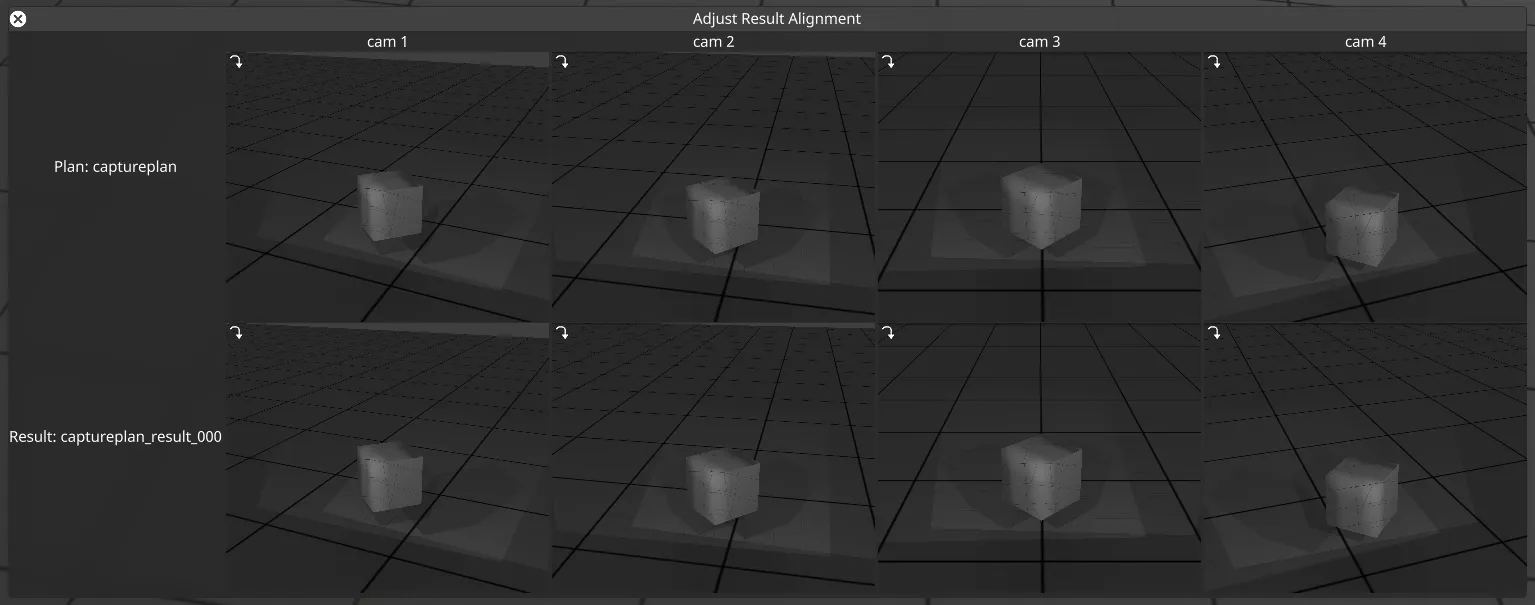
- Left-click on a camera image to open the Result Aligner window. If any Mesh Deforms have been applied these will be undone in order for alignment points to be editable.
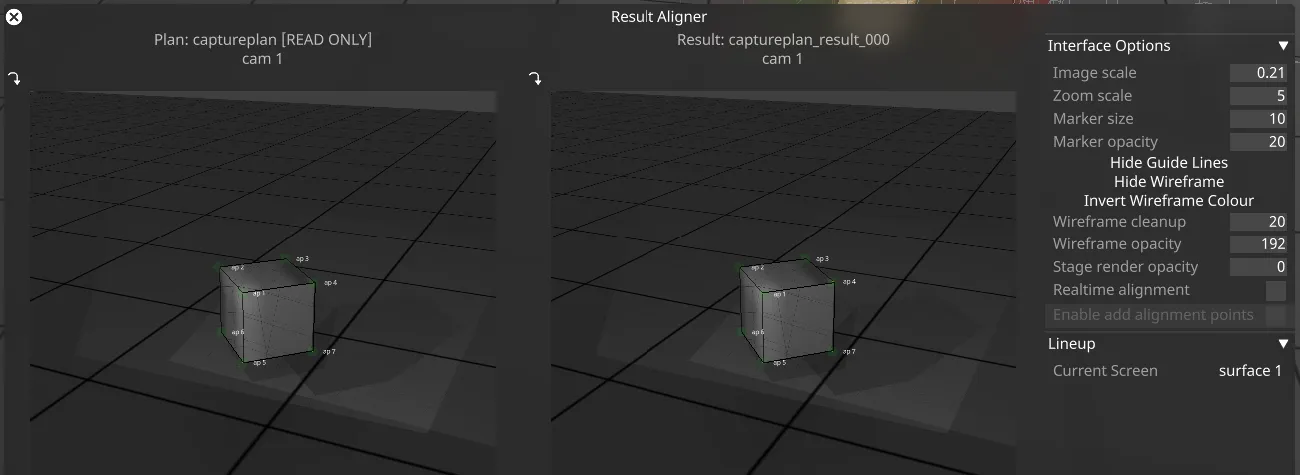
- On the left hand side is the camera view from the original Plan (read only) and on the right the Result. You can then update the alignment points on the right to match the left. This will update the alignment on the stage as you do it. The controls are identical to QuickAlign, except that it’s not possible to add/remove any alignment points.
- Select the next screen by pressing the button at the bottom of the camera views or selecting it from the surfaces drop down and repeat the process of checking and adjusting alignment points.
- Repeat this for all cameras. You could in theory only check cameras or projection surfaces which you know to have moved.
- Close the Adjust Result Alignment window. You will be asked if you’d like to re-apply the Mesh Deform.
Reverting to a Fallback Result
Section titled “Reverting to a Fallback Result”Designer r32.4 added a convenient way to revert the OmniCal calibration state to a previous RigCheck Result, called the Fallback Result. This is useful when a RigCheck failed or produced suboptimal quality.
The fallback should typically be set to the most recent RigCheck Result with the best visual quality, as determined by an OmniCal operator after a visual inspection of the scene. The Fallback Result must be fully calibrated and aligned for all projectors, with no errors.
Click the Revert to Fallback button to switch from the current Result to the Fallback Result. This will revert the OmniCal state and update the calibration and alignment of all affected projectors to the newly selected current Result.
RigCheck API
Section titled “RigCheck API”Essential parts of the RigCheck workflow are now also available via API endpoints for the Designer session.
Managing RigCheck data on disk
Section titled “Managing RigCheck data on disk”OmniCal RigCheck Result data on disk
Section titled “OmniCal RigCheck Result data on disk”Just like in the Plan workflow, RigCheck also stores a mix of data on the hard disk, rather than in the .d3 project itself.
The RigCheck data includes:
- OmniCal settings
- Captured images
- Calculated blob detection results
- Calibration results
- Alignment data
- Report data
This RigCheck data is stored in subfolders of the Designer project’s internal/opticalresult/ folder.
Every RigCheck has its own set of data, and its subfolder has the same name as the associated “Result” object in Designer.
The data in the internal subfolders is managed together with the corresponding Result object in Designer: When the RigCheck Result object is deleted, and the trash in Designer is cleared, any associated folder (including images, config and result files) is also deleted from the hard disk.
Delete old and unused RigCheck Results
Section titled “Delete old and unused RigCheck Results”If a project has many RigCheck Results in Designer, then this may cause the hard disk to fill up over time. To free up disk space, users can move RigCheck results that are no longer needed to the trash, and then empty the trash.
For projects that recalibrate on a regular basis (e.g. via API calls) this manual way of deleting RigCheck data can be too slow and error prone. Designer version r32.4 introduces an easier way to delete any RigCheck Results that are old and unused, via the Delete Old Results button or API endpoint omnical/rigcheck/deleteoldresults.
The API endpoint or button will delete any RigCheck Results that are both:
- Older than the Days to keep Results value configured in Designer.
- Not in use.
The following Results are considered “in use”:
- Currently selected Result.
- Currently selected Fallback Result.
- Any result in the backup list, see Additional Results to keep.
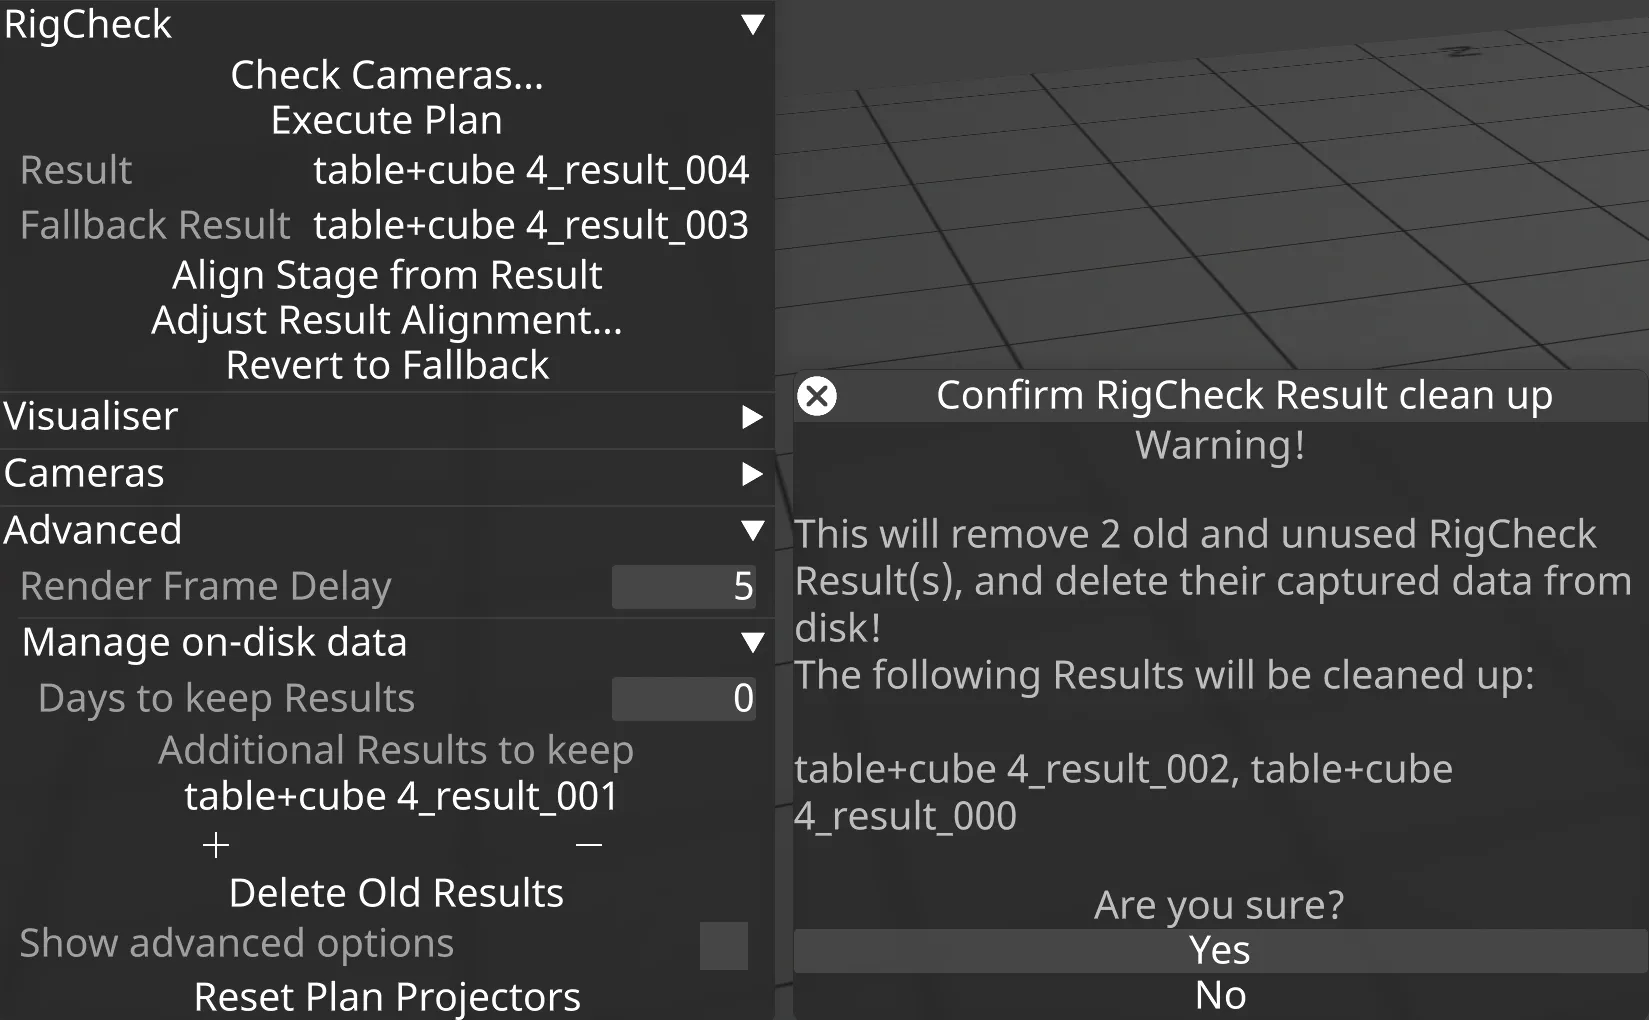
Example usage of Delete Old Results.
Manage on-disk data for API usage
Section titled “Manage on-disk data for API usage”Users can configure Days to keep Results and Additional Results to keep in Designer to suit their needs, but they cannot currently be modified by the API.
The API endpoint omnical/rigcheck/acceptresult automatically adds the current Result to the Additional Results to keep backup list. This allows for cleanup automation by API callers, without the need to interact with Designer directly.