DMX addressing
Addressing is the process of assigning a unique DMX channel and universe number to each fixture in the DmxLights screen. There are two ways this can work: either you specify the addressing layout in Designer and print out a screenshot for the technicians to work to, or you receive an addressing layout chart and have to match it within Designer.
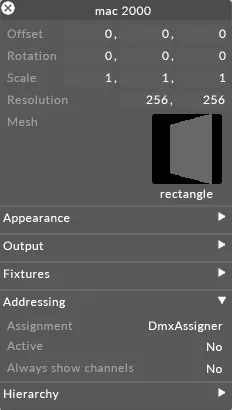
Addressing is handled under the addressing tab of the DmxLights editor.

Addressing properties of the DmxLights editor control how DMX channels and universe numbers are assigned to each fixture.
Addressing properties
Section titled “Addressing properties”Assignment
Section titled “Assignment”The DmxAssigner specifies a set of addressing strings. These strings are used to assign addresses to the fixtures.
- To open the DmxAssigner right-click assignment.

DmxAssigner is used to control how addresses are assigned to fixtures, opened by right-clicking Assignment from the DmxLights editor.
The DmxAssigner contains an array of DmxStrings. Each DmxString specifies a string of fixtures that have contiguous channel numbers.
Active
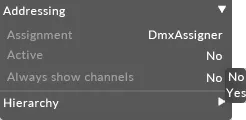
Section titled “Active”This indicates whether the DmxLights screen is actually outputting DMX. By default, this is set to off ; you should only switch it to on once the addressing is checked and complete.
Show channels
Section titled “Show channels”This controls whether the fixture bases and channel numbers are displayed in the visualiser.
 Show Channels property controls whether channel numbers and fixture bases are displayed for each fixture in the Stage Visualiser
Switching show channels to yes will display each fixture in the visualiser.
DmxAssigner
Section titled “DmxAssigner”When wiring DMX fixtures, the usual practice is to arrange fixtures in strings, i.e. a series of fixtures wired in daisychain fashion, with channel numbers that step up in a certain way. A DmxLights screen may contain multiple strings. Each of these strings is specified using a DmxString.
To add a DmxString to the DmxAssigner:**
- Right-click + to open the Dmxstrings manager.
- Type the string name into the new dmxstring text field, in this example Mac2000 String 1 (be sure to include the name of the DmxLights screen in the name).
 Process used to create a new DMX string, in this example Mygroup_str1
 - Hit Enter. This creates the new DmxString, adds it to the DmxAssigner, and opens the DmxString editor.
 DmxString editor
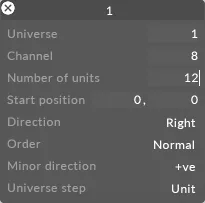
 - Type in the properties you want and hit assign!. The DmxString will then assign the channel numbers, and the visualiser will display the channel numbers.
 Assigning the channel numbers to the fixtures by left-clicking Assign!
DmxString properties
Section titled “DmxString properties”The DmxString starts at a particular fixture position in the grid and then steps across the grid, assigning channel numbers as it goes. The properties of the DmxString editor control which channels are assigned and the step direction.
Universe
Section titled “Universe”This specifies the universe number that should be assigned to the first object in the string. The lowest valid number is 1.
Channel
Section titled “Channel”This specifies the channel number within the universe that should be assigned to the first object in the string. Valid numbers are 1 to 512 inclusive.
Number of Units
Section titled “Number of Units”This specifies the number of fixtures you want in your string. In the example above, our DmxLights screen has a 2 by 4 grid of fixtures, so the number of units is set to 2x4 = 8.
Start position
Section titled “Start position”This specifies the index within the DmxLights screen of the first fixture in the string. The topleft fixture is designated (0,0), the fixture to its right is (1,0) and the fixture below it is (0,1). In general, you can find fixture (i, j) by starting at the top left fixture and counting (i) to the right and (j) down. In this example, we set start pos to (0,0) to indicate the top left fixture.
Direction
Section titled “Direction”Starting at the first fixture, the DmxString will assign a channel, then step in a certain direction across the surface of the DmxLights screen before assigning the next channel number. There are four possibilities: left , right , up or down . In this example, the channel number are stepping to the right.
This specifies the stepping order across the grid as a whole. You can select one of two options. Choosing normal means that when it reaches the edge of the grid, it moves up or down one row/column and starts again at the opposite edge. Selecting alternating means that when it reaches the edge of the grid, it moves up or down one row/column and then starts stepping in the other direction.
Minor Direction
Section titled “Minor Direction”This controls the direction of the step that takes place when the assigner gets to the edge of the grid. There are two options : ve (steps left or up) or +ve (steps right or down).
Universe step
Section titled “Universe step”Since fixtures cannot straddle a universe boundary, the assignment algorithm will step up a universe if it finds that there are not enough channels left in the current universe. However, it is sometimes more useful if each row or column within the grid is constrained to be contained within one universe. If this is the case, set universe step to row/column instead of unit.