Video Receive Delay
Calibrating delays is an important part of the xR workflow. Failure to complete this configuration correctly will result in the set extension and LED screen output not being in sync.
There are two user calibrated delays in every system that must be determined.
The first is the amount of time between the Disguise hardware rendering a frame and receiving the corresponding video frame. This is called the Video Receive Delay.
The second is the time between when the tracking system calculates a camera’s position and when it is received and processed by Designer. This is called the Tracker Delay.
MR is a game of latency - all components of the system are moving independently, and the preservation of a unified image requires compensating for distortions after an image is taken. These delay values allow Disguise to catch up to the camera sensors and tracking sources.
Workflow
Section titled “Workflow”Setting the Video Receive Delay will allow the camera to capture the blobs that are outputting to the screen correctly. If the delay is too high or low, the correct frame will not be captured, which could mean that the structured light pattern is not recognised.
To set the video receive delay
Section titled “To set the video receive delay”- Open the MR set editor.
- Navigate to the calibration tab.
- Add MR set to the calibrate delay tool.
- Click Delay Calibration.
The calibrate delay function is pre-populated with the current camera target, but you can add or remove different combinations of cameras.
- Click Capture.
Designer will output one frame of white to all outputs assigned to the MR set.
- Look at the captures:
- If the white frame is splitting across two frames, you may need to adjust the phase offset of the LED processors.
- If the white frame is fully present in multiple frames, adjust the shutter angle of the camera. This will close the camera shutter faster resulting in only one frame of white to be captured.
- When a single white frame has been captured, left-click the white frame; the delay value will autopopulate in the editor.
- Test your screens are in sync:
At this point you should check that your screens are in sync with each other; you can use the Sync Check tool found in the calibrate delay widget to accomplish this.
- Expand the Sync Check tab to ensure that the set extension and LED screens flash at the same frame.
- Begin Strobe and view on the xR transmission output if the set extension and LED screens seem in or out of sync.
Properties
Section titled “Properties”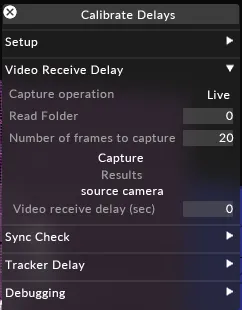
Capture operation
Section titled “Capture operation”Determines if the captured images during testing are archived to the debug folder of the Windows project file structure, or captured and assessed Live.
Number of frames to capture
Section titled “Number of frames to capture”The user defined number of frames to be captured for the capture to be registered.
Capture
Section titled “Capture”Clicking will capture the set number of frames on output. Video Receive Delay (sec): The delay value of the incoming video frame that will be autopopulated by clicking on the correct white frame.
Sync Check
Section titled “Sync Check”The tool used to ensure the Video Receive delay value is correct.