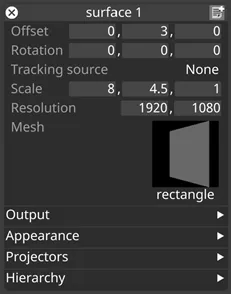
Screen editor
To edit a screen you need to open the Screen editor.
To open the Screen editor:
-
Right-click a screen directly in the Stage level. or
-
Right-click the screen name from the screens list in the Stage editor.
 Screen editor is used to edit a screen.
Screen Properties
Section titled “Screen Properties”Below are the descriptions for all the properties accessible from the Screen editor.
Offset
Section titled “Offset”This controls the screen position in the 3D space. There are three numbers laid out horizontally: respectively the x (left/right), y (up/down) and z (into/out of the screen) coordinates.
Rotation
Section titled “Rotation”This controls the rotation of the screen mesh, in degrees. The x component controls the rotation around the x axis; the y component around the y axis; and the z component around the z axis. Mesh vertices are rotated around their origin; for this reason, it is recommended that mesh vertices are centered around their origin.
Tracking source
Section titled “Tracking source”This property defines which tracking source controls the offset & rotation properties of the object. For more information, see Object tracking source.
The scale property specifies a scaling factor to be applied to the mesh. If the original mesh is a unit mesh (i.e. its x, y and z extents are 1 meter) then the size refers to its actual size. The installed Rectangle, Cylindrical and Concave meshes are examples of unit meshes. The scales z component will have no meaning for flat screens. For screens with curvature (such as the installed Concave mesh) the z component will scale the z size of the screen.
Resolution
Section titled “Resolution”This controls the resolution of the screens physical canvas in pixels. If you are using Disguise’s pre-installed Rectange mesh as the screen, set the resolution to match the physical dimension (aspect) of the screen.
This points to the Mesh file that defines the shape of your screen. Selecting this property will open the Mesh object library, which shows all of the support mesh files saved on your local hard-drive in the Mesh folder. The mesh consists of an array of vertices, each of which specifies a 3D position in space and a 2D texture coordinate that indexes the physical canvas.
To swap a screen mesh with the currently active mesh:
Section titled “To swap a screen mesh with the currently active mesh:”- Left-click mesh to open the Mesh object library.
- Left-click the mesh you want to replace the currently active mesh. This will update the screen mesh.
If you are using any other shape than the standard Rectangle, Cylinder or Convex meshes, the screen requires a UV-mapped mesh file as the screen mesh.
See the Placing media files for a project page to understand where to place a mesh file and how to access it in . Also save the file to a supported file format.
To edit a mesh:
Section titled “To edit a mesh:”- Right-click the mesh inside the Mesh object library to open the Mesh editor. The Mesh editor is used to flip or swap the UV mapping coordinates of a mesh or find out how many vertices a 3D mesh contains.
The page LED Screen examples explains how to create a UV-mapped LED screens.
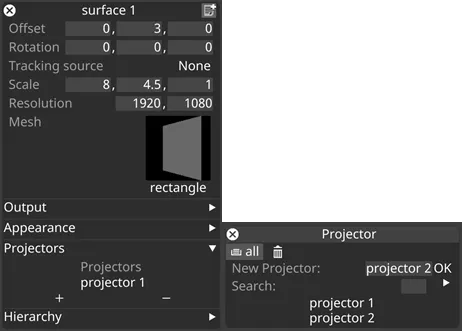
You can expand the Projectors field to access the list of projectors associated with the current screen.
To add or remove projectors from this list:
Section titled “To add or remove projectors from this list:”- Left-click the +/- button to open the Projectors manager.
- Select the projectors you wish to add/remove to/from the screen.
