Sockpuppet Personality Editor
The Sockpuppet personality editor is a feature of Designer that allows users to edit the personality of a patched layer, and export it in either GDTF, .txt chart or MA2 XML format.
It’s important to note that currently, the functionality is limited to patched layers, and you cannot store a custom personality for use with other layers of the same type.
The functionality is useful for setting 16-bit control of some control channels, as well as removing parameters from the personality.
Accessing & using the personality editor
Section titled “Accessing & using the personality editor”- Patch a layer as specified in the patch assignments topic.
- Right-click the patched layer in the patch assignments widget.

OSC and HTTP
Section titled “OSC and HTTP”- Right-click the patched layer on the timeline.
- Click Edit OSC/HTTP Patch.
Patch editor
Section titled “Patch editor”You can now edit values in the Patch editor, which will be stored to the personality in use for that layer.
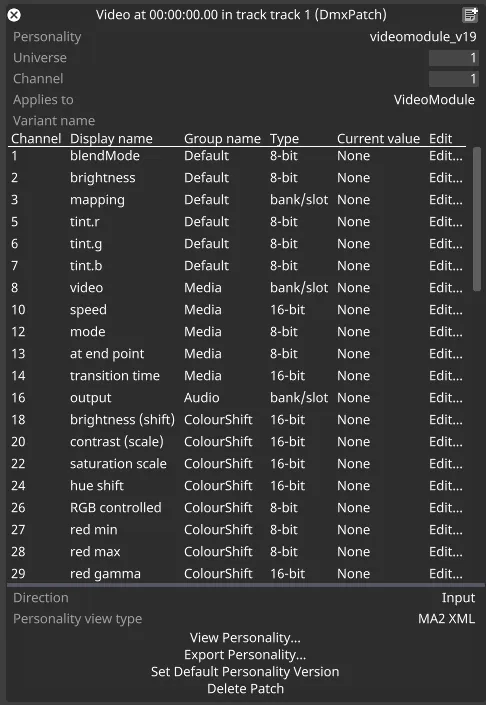
Use the View/Export Personality buttons to show or export the personality in either GDTF, text or MA2 XML format.
The editor automatically sorts personality properties in ascending order based on their assigned channel values.
Changing a channel value automatically moves the selected row according to its new channel value.
Editing and creating a custom DMX personality
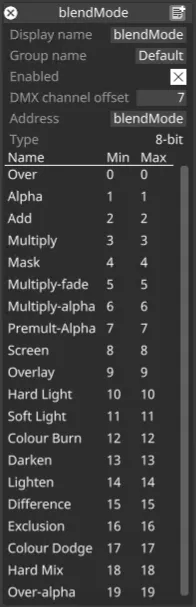
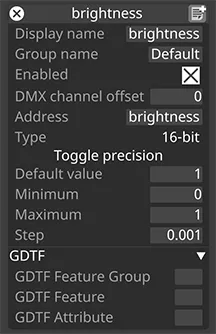
Section titled “Editing and creating a custom DMX personality”Channels can be removed from a personality as well to create a custom DMX profile. Click on Edit… on the right-most column of the personality table to open the sockpuppet property editor.
Properties can be disabled and removed from the personality by unticking the Enabled checkbox. The Channel Offset, Display Name, Group Name, and Min/Max/Default Values can also be customised in this editor and exported.
If a property has options assigned, the corresponding table is displayed as well, allowing you to edit the values of the accepted options. Editing these values affects only the incoming ranges, not the actual value applied to the controlled layer.
Editing multiple properties
Section titled “Editing multiple properties”The multi-editing feature allows assigning similar values to multiple properties at once. Use the following shortcuts to control selection:
- Ctrl + Left Mouse Button — toggles the selection of a property.
- Ctrl + A — toggles the selection of all properties.
- Shift + Left Mouse Button — selects a range of properties, from the currently clicked property to the previously selected one.
Selection (LMB, Ctrl + LMB, Shift + LMB) only occurs when clicking on a read-only field or the row background.
Clicking on an editable field preserves the current selection and applies the entered value to all selected properties after pressing Enter.
Special cases
Section titled “Special cases”-
Channel column: When editing multiple properties, it assigns channel values to ensure that the edited DMX offsets align sequentially without gaps, starting from the chosen base address while preserving order.
For example, if the selected properties have channels 7, 15, 23, and 42, typing in a channel value of 5 and pressing Enter assigns these properties the values 5, 6, 7, and 8 respectively, preserving their order. -
Type column: This column is mainly read-only, except for numeric types.
Fields with types 8-bit or 16-bit are editable and allow selecting a type from a dropdown menu.
When multiple properties are selected, and a numeric type is changed, the change applies only to fields of the same type, and all others remain unchanged.
Sockpuppet property multi editor
Section titled “Sockpuppet property multi editor”- Edit… column opens a special MultiEditor widget when multiple properties are selected.
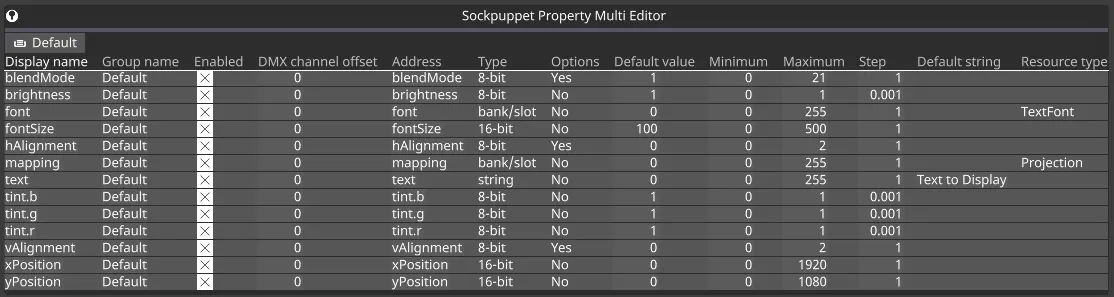
The editor displays all selected Sockpuppet properties with all available parameters for editing.
When first opened, all rows in the table are preselected, allowing you to edit multiple properties by typing a new value and pressing Enter.
The table supports sorting — simply click any header to sort properties by the corresponding field value.
By default, the table sorts properties by their display name.
Use the following shortcuts to control selection:
- Ctrl + Left Mouse Button — toggles the selection of a property.
- Ctrl + A — toggles the selection of all properties.
- Shift + Left Mouse Button — selects a range of properties, from the currently clicked property to the previously selected one.
Columns
Section titled “Columns”-
Type column: This column is mainly read-only, except for numeric types.
Fields with types 8-bit or 16-bit are editable and allow selecting a type from a dropdown menu.
When multiple properties are selected, and a numeric type is changed, the change applies only to fields of the same type; all others remain unchanged. -
Options: Read-only field indicating whether the Sockpuppet property has attached options for supported values.
See editing a single DMX personality for details. -
Default string: Editable only for properties that store text. For all others, this is a read-only empty field.
-
Resource type: Read-only field for properties that provide resource selection, such as mappings or media.
Personality export
Section titled “Personality export”The Personality Editor allows you to view or export the Personality in one of three formats: GDTF, text chart or MA2 XML. The exported Personality is created from the current state of the Personality, so you can (for example) disable channels and see this change reflected in the export.
This editor also allows you to provide manual values for the Property’s matching GDTF Feature Group, Feature and Attribute. If not set, Disguise will automatically match the Property to a suitable Feature Group, Feature and Attribute.
GDTF (General Device Type Format) is a format that is designed to be interoperable between many different products and manufacturers. It does this by trying to describe every fixture using a limited number of Normative Attributes, such that two different manufacturers, for example, can treat a fixture’s RGB channels the same, and additionally support things like colour palettes.
Automatic attribute matching
Section titled “Automatic attribute matching”For every Property in a Personality, we use the address and Group to work out a corresponding GDTF Feature Group, Group and Attribute. Where possible, we map onto a normative Attribute (which also specifies the Feature Group and Feature), but where that’s not possible, we ensure that the same address and group always results in the same Attribute definition, to keep consistency between different modules.
Both the Group and Address can be edited from the Property editor - Address is by default the same as the display name of the field.
Disguise Attribute matching will always result in a normative Feature Group, but we don’t promise normative Features or Attributes when there is simply no GDTF Normative Attribute that matches, for example, the Bugs module’s ‘turniness’ property!
Manual attribute specification
Section titled “Manual attribute specification”If the automatically matched Attribute doesn’t match your needs, it can be manually overridden by opening the Sockpuppet Property editor and typing in the desired Feature Group, Feature and Attribute. Any of these that are not set will continue to be matched automatically.
This feature is particularly useful for grouping things like exposed parameters in Notch, which Disguise has very limited information about.
DMX chart
Section titled “DMX chart”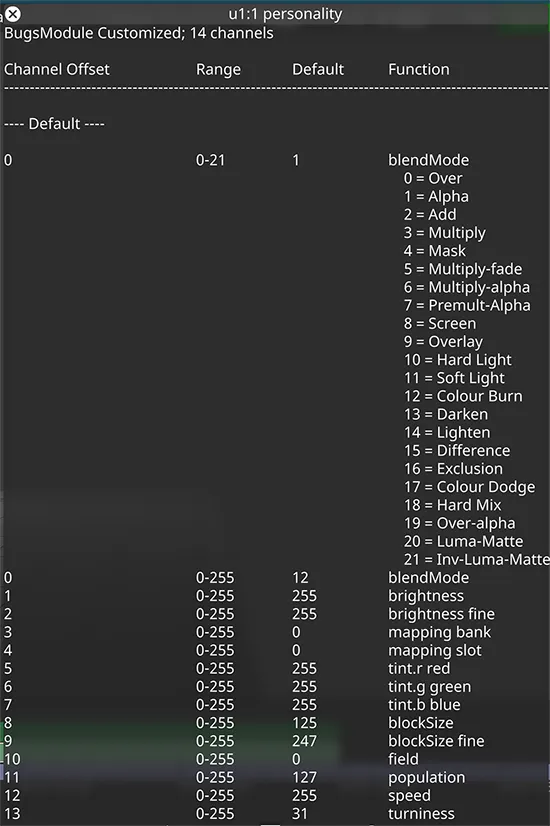
The DMX chart format is designed to allow you to easily reference DMX channel values for manually setting up fixtures when working with equipment that doesn’t support GDTF files.
MA2 XML
Section titled “MA2 XML”We also support export into MA’s proprietary MA2 XML format. Please note that MA have deprecated this format, and MA3 supports GDTF. We recommend that you only use this with legacy MA2 systems.