Create a ProSet Team CMDLet
What is a VLAN?
Section titled “What is a VLAN?”A Virtual Local Area Network (VLAN) is a virtual network adaptor that operates over a physical network interface, such as a 1Gb, 10Gb, 25Gb, or 100Gb Ethernet port found on the back of a Disguise media server.
VLANs allow a single switched network to be segmented into multiple virtual networks using tagging. This eliminates the need for separate physical networks for different use cases, improving efficiency and flexibility.
A typical set of VLANs configured for a Disguise media server in a production or live experience may include:
- d3Net
- KVM Net
- Media Net
- Automation Net (PSN)
- NDI® Net
- Internet
- sACN/Artnet
- OSC/Control
- OmniCal
- PTZ Camera Control
- MGMT
The distinct separation of each network allows devices in:
- d3Net to be set in a
192.0.X.Xrange. - Whilst Artnet/SACN being in the Common
2.X.X.Xor10.X.X.X.
Yet both exist on the same network interface.
As outlined in the initial example, network protocols have different requirements and network settings.
This allows all data to exist in a singular physical interface but be be routed by a network switch.
Configuring VLANS and Teams
Section titled “Configuring VLANS and Teams”Within Disguise servers, VLANs can be created using different tools depending on the operating system:
- Windows 10: VLANs can be configured at the driver level using Intel PROSet.
- Windows 11: VLANs can be configured at the software OS level using Hyper-V.
Configuring Vlans and Teams with PROSET
Create PROSet Team Via GUI
Section titled “Create PROSet Team Via GUI”If your system supports the Intel PROSet GUI for Windows Device Manager, you can use its graphical interface to configure VLANs and NIC Teams easily.
-
Sacrificial NIC: At least one Intel integrated NIC or server-grade adapter must be part of the team to allow configuration. - You may notice X722 Network 10GB interfaces require the use of L210 network port to allow configuration via PROSet.
-
VLAN Restrictions: Ensure your switch supports the configured VLAN IDs and is set up accordingly.
Open the Intel PROSet GUI:
Machines such as the GX 2C/VX 1/2 have PROSet installed as an application
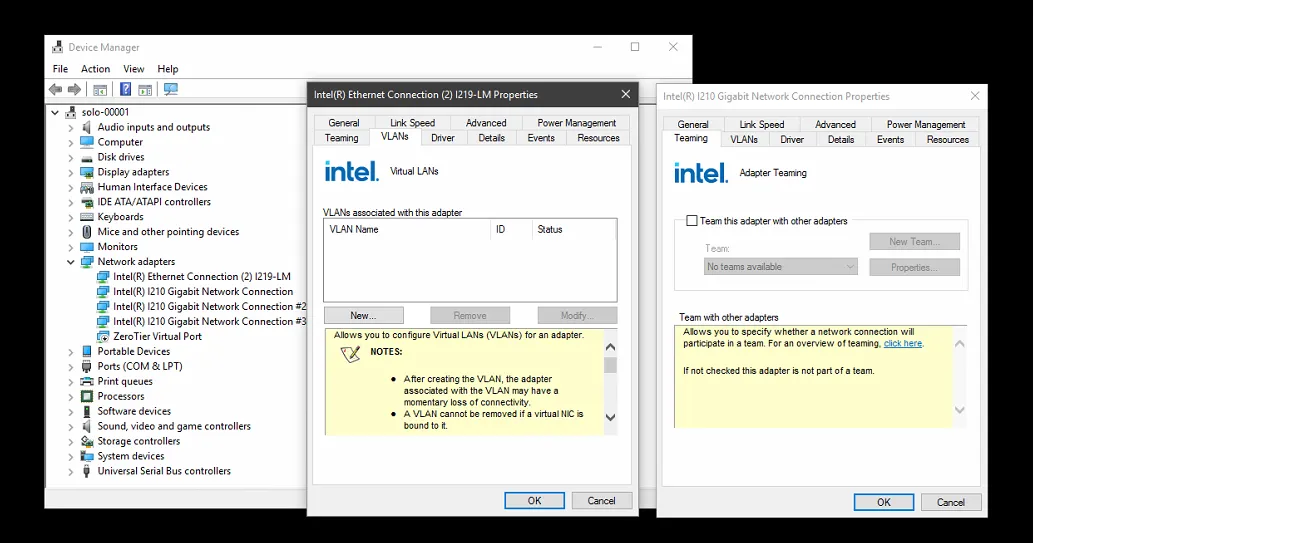
Older Servers such as the solo have PROSet built in to the NIC adaptor settings
- Launch Windows Device Manager.
- Navigate to the properties of an Intel-supported NIC.
-
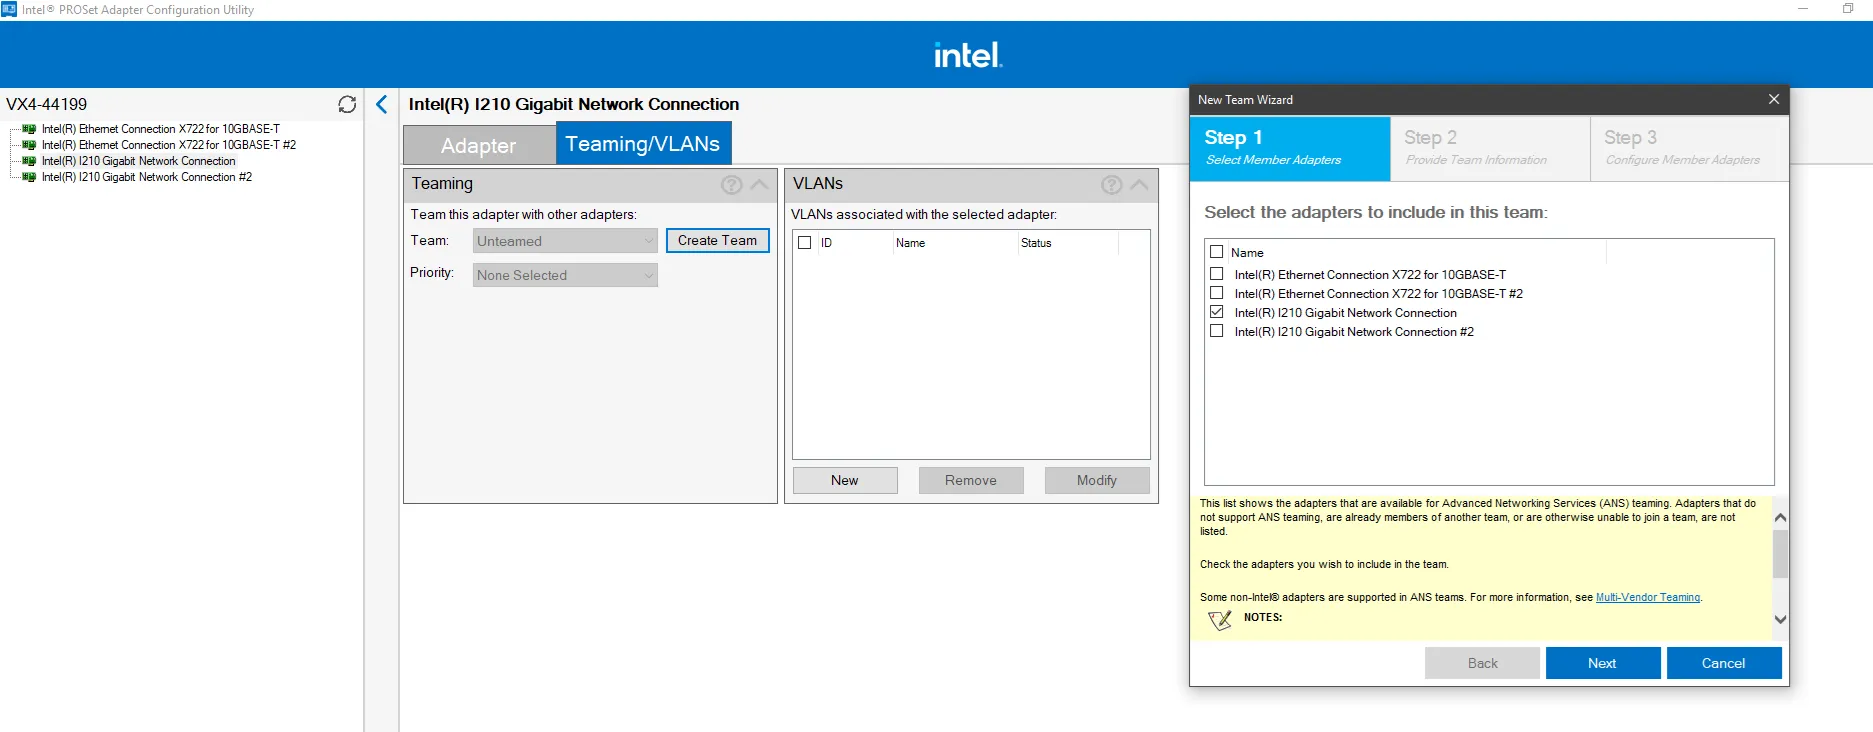
Create a Team:
- In the Team/VLAN tab, click on Create Team.
- Select the adapters you want to include in the team. (X722 require an additional 1gb)
- Choose a team mode (e.g., Adaptive Load Balancing, Static Link Aggregation). - Modes are outlined above the the guide.
-
Configure VLANs:
-
After creating the team, go to the TEAMEd interface and select the VLANs tab.
-
Scroll down and Select New Vlan
-
Click on Add VLAN and specify:
- VLAN IDs (e.g., 10, 20, 30).
- VLAN Name
-
Save your settings.
-
Configuring Vlans and Teams with INTELCMDLET
Create PROSet Team via CMDLETS
Section titled “Create PROSet Team via CMDLETS”For systems without Intel PROSet GUI support (Intel X722), use the IntelNetCmdlets module to configure NIC Teams and VLANs.
Identify Adapters: Use the following command to list available adapters:
Get-IntelNetAdapterCreate a Team: Execute the command to create a NIC Team:
New-IntelNetTeam -TeamMemberNames "Adapter1", "Adapter2" -TeamMode AdaptiveLoadBalancing -TeamName "MyTeam"Replace Adapter1 and Adapter2 with the actual adapter names obtained from Get-IntelNetAdapter.
Such as New-IntelNetTeam -TeamMemberNames "Intel(R) I210 Gigabit Network Connection","Intel(R) I210 Gigabit Network Connection #2" -TeamMode AdaptiveLoadBalancing -TeamName "MyTeam"
Check the team configuration:
Verify the Team:
Get-IntelNetTeam
**Set Team Properties (Optional)**:Modify team settings using:```powershellSet-IntelNetTeam -TeamName "MyTeam" -Property "PropertyName" -Value "PropertyValue"
Steps to Create VLANs with PowerShell
Section titled “Steps to Create VLANs with PowerShell”Add VLANs to the Team:
Use the Add-IntelNetVLAN cmdlet to create VLANs:
Add-IntelNetVLAN -ParentName "MyTeam" -VLANID 10,20,30- Replace
"MyTeam"with your team name. - Replace
10,20,30with the desired VLAN IDs.
View VLANs: Verify the VLAN configuration:
Get-IntelNetVLAN -ParentName "MyTeam"Remove VLANs: Delete unwanted VLANs using:
Remove-IntelNetVLAN -ParentName "MyTeam" -VLANID 10
#### **Script Example for Automated Configuration**Below is a sample PowerShell script to create a team and VLANs on Intel NICs:
```powershell# Load IntelNetCmdlets moduleImport-Module "C:\Program Files\Intel\Wired Networking\IntelNetCmdlets"
# List available adaptersGet-IntelNetAdapter
# Create a NIC teamNew-IntelNetTeam -TeamMemberNames "Intel(R) Ethernet Connection X722 for 10GBASE-T", "Intel(R) I210 Gigabit Network Connection" `              -TeamMode AdaptiveLoadBalancing -TeamName "10GB_Team"
# Add VLANs to the teamAdd-IntelNetVLAN -ParentName "10GB_Team" -VLANID 10,20,30,40
# Verify configurationGet-IntelNetTeamGet-IntelNetVLAN -ParentName "10GB_Team"- Sacrificial NIC: At least one Intel integrated NIC or server-grade adapter must be part of the team to allow configuration.
- VLAN Restrictions: Ensure your switch supports the configured VLAN IDs and is set up accordingly.
This guide outlines both GUI and scripting methods, offering flexibility based on your system’s capabilities.
Steps to Create VLANS with HYPER V
Section titled “Steps to Create VLANS with HYPER V”For Windows 11 Servers such as the RX3/EX2C/VX3
With Intel PROSet and Advanced Network Services (ANS) no longer supported on Windows 11, managing VLANs and network redundancy requires new workflows. This guide shows how to configure basic VLANs on Disguise media servers using Hyper-V and PowerShell.
Install Hyper-V
Section titled “Install Hyper-V”- Open Windows Features:
- Press
Win + S, type Windows Features, and select Turn Windows features on or off.
- Press
- Enable Hyper-V:
- Check:
- Hyper-V Management Tools → Hyper-V Module for Windows PowerShell
- Hyper-V Platform → Hyper-V Hypervisor
- Check:
- Click OK and restart if prompted.
Identify Network Adapters**
Section titled “Identify Network Adapters**”To configure VLANs, you first need to identify the available network adapters.
- Open PowerShell as Administrator.
- Run the following command:
This will list all network adapters and# their details.
Terminal window GET-NETIPCONFIGURATION
Example Output:
InterfaceAlias : Ethernet 1InterfaceIndex : 4IPAddress : 192.168.1.100...Step 2: Create a Virtual Switch
Section titled “Step 2: Create a Virtual Switch”Create a virtual switch in Hyper-V to route traffic through a specific network adapter.
-
Run the following command in PowerShell:
Terminal window New-VMSwitch "disguise" -AllowManagementOS $true- Replace
"disguise"with your desired switch name. - The
-AllowManagementOS $trueflag allows Windows to communicate through this switch.
- Replace
-
When prompted, enter the name of the network adapter you identified in Step 1 (e.g.,
Ethernet 1).
Add a VLAN to the Virtual Switch
Section titled “Add a VLAN to the Virtual Switch”Now, create a VLAN on the newly created virtual switch.
- Use this command:
Terminal window Add-VMNetworkAdapter -ManagementOS -Name VLAN1-D3NET -SwitchName "disguise"- Replace
VLAN1-D3NETwith the desired VLAN name. - Replace
"disguise"with the name of the virtual switch you created.
- Replace
Hyper V Limitations and Considerations
Section titled “Hyper V Limitations and Considerations”No NIC Teaming: Windows 11 does not support NIC teaming, so redundancy for network port failure is not included. Single Adapter: Configure VLANs on only one adapter per virtual switch for stability. Redundancy Options: Consider using hardware redundancy with stacked switches.
By following this guide, you can successfully configure VLANs on a Disguise server using Windows 11.
OmniCal Networking
Section titled “OmniCal Networking”Disguise OmniCal is a calibration system designed to enhance projection mapping and screen alignment. It uses camera-based technology to:
- Automatically calibrate projectors using all visible physical surfaces.
- Correct for distortions and misalignments in projection.
- Allow flexible alignment, scaling and reshaping of projection surfaces.
- Ensure seamless visuals in complex setups, such as:
- Large-scale projection mapping
- Multi-projector configurations
OmniCal uses machine vision cameras that have specific requirements for network infrastructure. For more information, please refer to the detailed OmniCal Networking Guide.
RenderStream Networking
Section titled “RenderStream Networking”Disguise RenderStream is a protocol and technology developed to enable real-time streaming of rendering data between systems, such as media servers and rendering engines.
It is designed for synchronized, high-quality, and low-latency workflows, commonly used in applications like:
- Virtual production
- Live events
- Immersive experiences
Bandwidth Considerations
Section titled “Bandwidth Considerations”- RenderStream handles high-resolution, high-frame-rate content, including textures, video, and rendering data.
- Uncompressed data significantly increases bandwidth demands.
Uncompressed Streams: Require much higher bandwidth, especially for:
- High bit depths (e.g., 10-bit, 12-bit)
- Broad color gamuts and fidelity
Compressed Streams: Use codecs like H.264 or H.265 to reduce size while preserving quality, lowering bandwidth needs.
Hardware Considerations
-
Practical Throughput:
- Even with 100Gb Ports, actual throughput is typically around 80Gb due to protocol overheads, error checking, and operational processes. Using the Assigner and predictions on workload traffic you can aim to calculate the expected throughput needed per workload.
-
Clustered Rendering:
- Distributing rendering tasks across multiple RX servers improves processing efficiency.
- However, it also increases network traffic, which must be carefully managed to prevent bottlenecks
By using a structured and distributed system like Fabric, high-bandwidth, low-latency workflows become more manageable as this is included in our system designs, especially in complex rendering scenarios.