Unity Project Setup
This topic covers how to set up a Unity project for use with RenderStream, including plugin installation, build settings, and Designer configuration.
Plugins
Section titled “Plugins”-
Unity requires a plugin to communicate with Designer. Install the plugin on each render node.
-
Download the pre-packaged RenderStream plugin from the Disguise RenderStream-Unity GitHub. For the latest version, compile from source code under releases.
-
Place the plugin into this folder:
PROJECT_ROOT/Assets/DisguiseUnityRenderStream -
The plugin folder must be named correctly and placed in the exact location shown above, otherwise unexpected errors may occur.
-
The available plugin uses DX11,
Direct3D11.
Create a new Unity project
Section titled “Create a new Unity project”- Launch Unity, navigate to Projects and select New.
- Create a new 3D project.
- Name the project, set the location to:
C:\Users\USERNAME\Documents\RenderStream ProjectsorD:\RenderStream Projectsif using a system with a media drive (e.g. RX) and select Create. - Open the project folder and place the plugin inside the Assets folder.
- Select File followed by Build Settings:
- Set Architecture to Intel 64-bit.
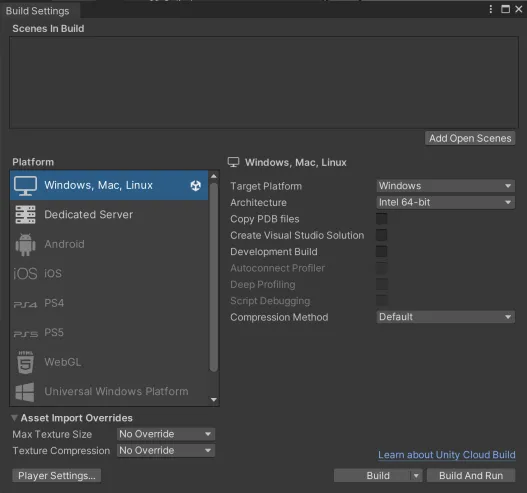
- Set Architecture to Intel 64-bit.
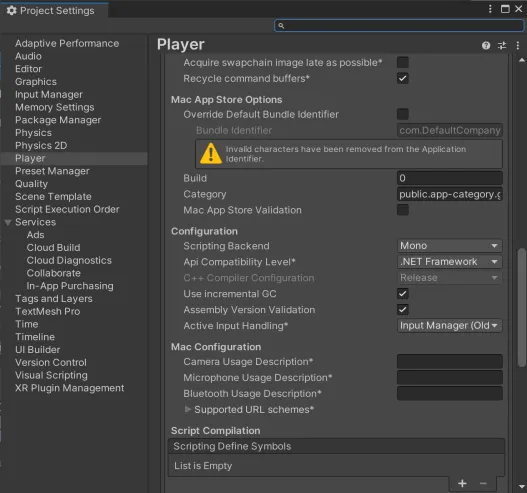
- Navigate to Player Settings… > Configuration and set API Compatibility Level to .NET Framework.
Set GameObject Channel visibility
Section titled “Set GameObject Channel visibility”- In Project Settings > Tags and Layers, expand Layers.
- Name an empty User Layer.
- Select any object from the scene.
- In the Inspector panel, add your new layer in the Layer parameter.
- Select your Camera(s).
- Open the Culling Mask dropdown in the Inspector panel and choose whether each Camera can see the objects in your new Layer.
Scenes
Section titled “Scenes”Scenes in Unity can be composed of any number of GameObjects which are unique to that scene (by default). The Unity plugin offers two forms of multi-scene support:
Manual - this option restricts Designer’s control of scenes and instead merges all Channels and remote parameters into a single scene.
Selection - this option allows scenes to be controlled from inside Designer; Channels are merged into a single list (duplicates removed) and remote parameters are per-scene.
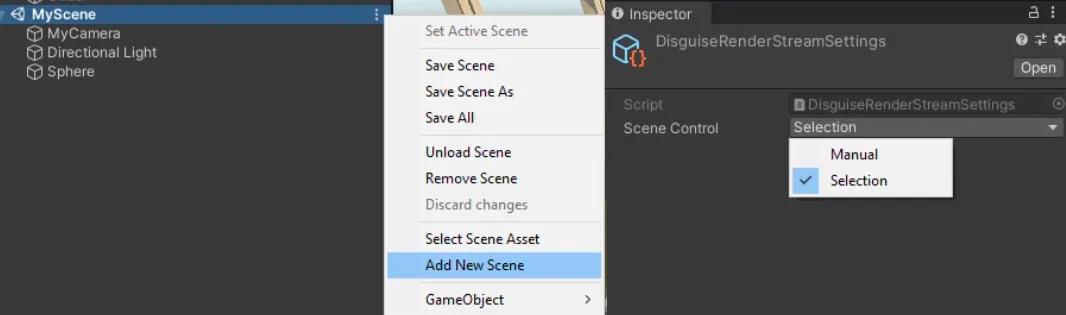
- Create a new scene, or open an existing scene.
- In the Project window, open the Resources folder and select DisguiseRenderStreamSettings.
- Set Scene Control option accordingly.
- Ensure all required scenes are selected in the Build settings.
- Build the Unity project.
- Save and close Unity.
- Ensure that the build folder is copied to your RenderStream Projects folder.
- Open the RenderStream layer in Designer and start the workload.
- Modify the Scene parameter as part of your normal sequencing.
Building the Unity project
Section titled “Building the Unity project”RenderStream integrates with Unity builds rather than the Unity editor/game mode.
- If you have multiple scenes in your project, ensure that the scene you wish to build appears in File > Build Settings.
- Build the project.
- Save the project and then close Unity.
- Ensure that the build folder is copied to your RenderStream Projects folder.
RenderStream Layer configuration in Designer
Section titled “RenderStream Layer configuration in Designer”- Create a new RenderStream Layer in your Designer project.
- Select Asset and choose your executable.
- Right-click the Asset to open its editor and set Source Machine to the machine with the asset (used for syncing content).
- Select Cluster Pool and create a new cluster.
- Within the Cluster Pool, add the desired machines.
- Select Cluster Assigner and create a new Cluster Assigner.
- Within the Cluster Assigner, select the Asset.
- Select New Channel Mapping.
- Within each Channel’s row, select the relevant mapping type, assigner and load weight.
- If the machines in the Cluster Pool do not have the content or the project has changed, press Sync.
- Ensure all Sync Tasks are marked completed.
- Press Start.
- Wait for Workload status to switch to Running.
Unity assets can only be split across multiple nodes when using 3D Mappings (i.e. Camera Plate or Spatial). Attempting to split using a 2D Mapping will not work; all nodes will render the entire frame.