Keyframing Overview
キーフレームは、レイヤーのプロパティを時間とともにアニメーション化するために使用します。
Keyframe エディターとは?
Section titled “Keyframe エディターとは?”キーフレームを使うと、レイヤーのプロパティを時間とともにアニメーション化できます。レイヤーのプロパティには、そのレイヤーエディターからアクセスできます。
Layer エディターに馴染みがない場合は、Editing layers をお読みになることをお勧めします。
Keyframe エディターを開く
Section titled “Keyframe エディターを開く”Keyframe エディターを開くには
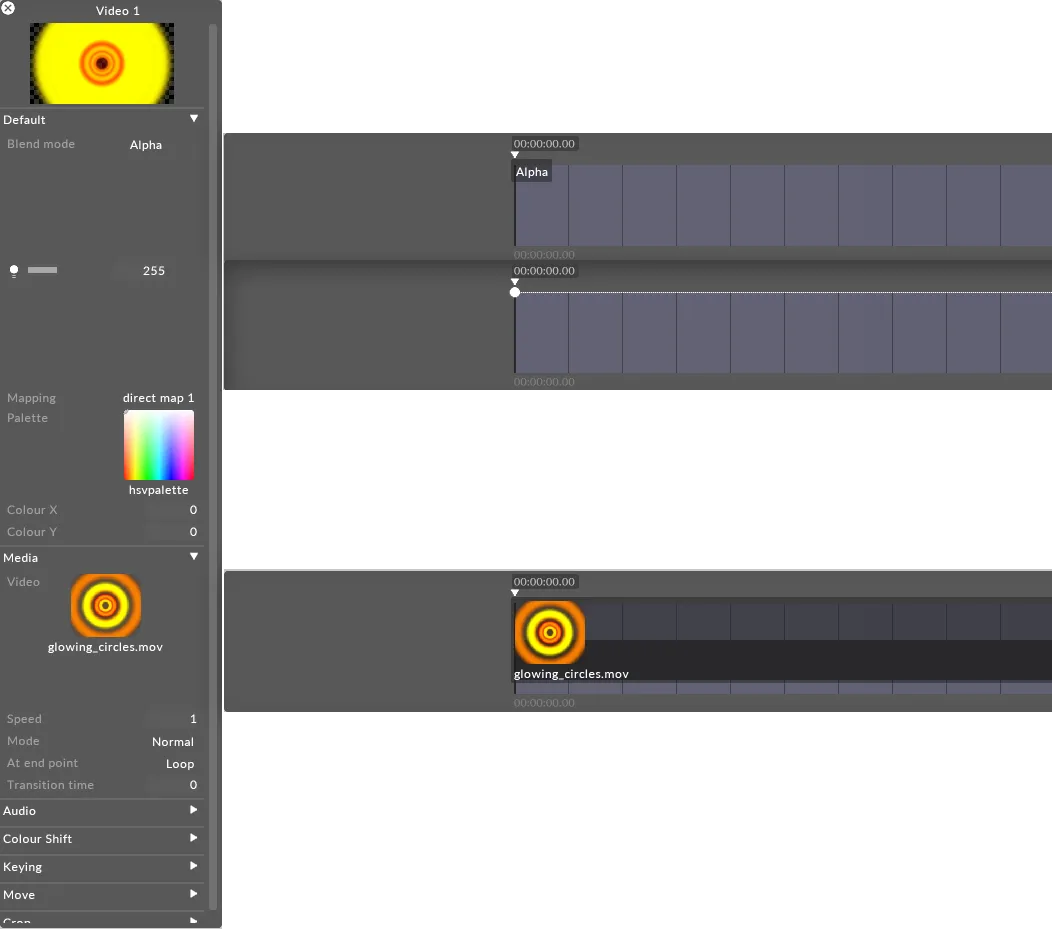
Section titled “Keyframe エディターを開くには”- Layer プロパティを左クリックして Keyframe エディターを開きます。Keyframe エディターを開くと、他に開いている Keyframe エディターは閉じられます。
Keyframe トグル
Section titled “Keyframe トグル”- r20 以降、Keyframe トグルが追加され、レイヤー内の属性のすべてのキーフレームをリセットできるようになりました。キーフレームトグルのアイコンをクリックするだけで、キーフレームを簡単に有効 / 無効にできます。Keyframe トグルの詳細については、この リンク を参照してください。
複数の Keyframe エディターを開く
Section titled “複数の Keyframe エディターを開く”- レイヤーエディターのプロパティを左クリックする際に Ctrl を押すと、複数の Keyframe エディターを開けます。
Keyframe エディターのタイプ
Section titled “Keyframe エディターのタイプ”Keyframe エディターには 3 つの異なるタイプがあります。これら 3 つのタイプの例は、Bitmap レイヤーとそのエディターを例に、以下および次の 3 つのサブチャプターで説明します。オブジェクトプロパティのタイプの詳細については、Editing objects サブチャプターをお読みください。
Numeric
Section titled “Numeric”数値の Keyframe エディターでは、数値プロパティ(この例では brightness)を編集するときに数値をアニメーション化できます。
Option
Section titled “Option”オプションベースのプロパティをアニメーション化する場合、Keyframe エディターは有効な値の固定された option リストに制限します。例えば、blendMode をアニメーション化する場合、サポートされているブレンドモードからのみ選択できます。
Object
Section titled “Object”オブジェクトの Keyframe エディターは、オブジェクトプロパティをアニメーション化するときに別のオブジェクトを参照します。
Keyframe エディターのナビゲーション
Section titled “Keyframe エディターのナビゲーション”-
タイムラインの Track bar を左クリックすると、現在選択されているトラックで前方または後方に再生されます。タイムラインを移動すると、現在開いている Keyframe エディターがそれに応じて調整されることに注目してください。Keyframe エディターは、現在のタイムライン位置の少し前から、その後の一定数の小節までの時間のバーを表示します。小節数は画面幅と現在のズーム倍率によって決まります。
-
Keyframe エディターを左クリックし、Alt を押しながらマウスのスクロールホイールを動かすと、ズームイン / ズームアウトできます(Keyframe エディターが選択されている間は - キーと = キーも使用できます)。ズームを正常に行うには、マウスが Keyframe エディターにフォーカスされたままである必要があります。
Keyframe エディターのスナップ動作は、エディターのズームレベルに対する相対的なものです。デフォルトでは、上記のように手動で調整しない限り、このズームレベルはタイムラインのズームレベルと同期します。スナップは、ズームレベルに基づいて 3 つの異なる方法で動作します。
| ズームレベル | スナップ動作 | 例 |
|---|---|---|
1s、2s、5s、15s、Max、およびズームレベルに関係なく量子化されたトラック | 4 分の 1 秒 キーフレームは、フレーム単位で最も近い* 4 分の 1 秒間隔にスナップします。 | 30fps のタイムラインでは、キーフレームは各秒の 0、7、15、22 番目のフレームにスナップします。 |
15f、10f、5f | ハーフタイムステップ キーフレームは、ズームレベルの半分によって決まる最も近い* 間隔にスナップします。ズームレベルが 10f の場合、スナップは 5 フレームごとになります。 | 30fps のタイムラインでズームレベルが 5f の場合、キーフレームは各秒の 0、2、5、7、10、12 番目などのフレームにスナップします。 |
1f | 1 フレーム キーフレームは、タイムラインのフレームレートで定義される個々のフレームごとにスナップします。 | 該当なし |
* すべてのタイプのスナップはタイムラインのフレームレートに対する相対的なもので、間隔が 2 つのフレームの中間に位置する場合は常に__切り捨て__られます。
共通の Keyframe プロパティ
Section titled “共通の Keyframe プロパティ”3 つの Keyframe エディタータイプすべてに、次の共通点があります。
-
これらは Keyframe または キー値のシーケンスで構成され、option の選択、numeric 値、または object のいずれかになります。数値プロパティの場合、キーフレーム間の値は、キーフレームを通過する直線または曲線に従って生成されます。
-
1 拍の時間は 1 本の縦線として表示されます。4 本の線のグループは 1 つの Track bar を表し、そのすぐ下に小節番号が付けられます。Keyframe エディターの背景色は、タイムラインの対応する Track bar の色と一致します。
-
Keyframe エディターのすぐ上には、その上にタイムコードが付いた小さな三角形があります。これは「Now」ポインターで、現在ステージにレンダリングされているタイムライン位置を示します。Keyframe を編集すると、now ポインターがその Keyframe の時間に移動するため、値を変更した効果を即座に確認できます。
Keyframe オプション
Section titled “Keyframe オプション”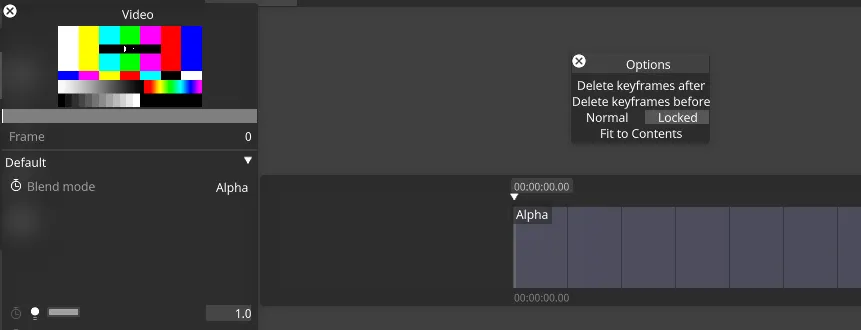
キーフレームタイムラインの境界線を右クリックすると、次のオプションを含む Options ウィンドウが表示されます。
-
Delete keyframes after
-
Delete keyframes before
-
Normal: セクションブレークの後にループするキーフレームがあり、再生ヘッドがそのセクションブレークに達すると、セクションブレークの後のキーフレームをそのまま再生します。
-
Locked: セクションブレークの後にキーフレームがあり、再生ヘッドがそのセクションブレークに達すると、セクションブレークを尊重し、キーフレームを再生しません。
-
Fit to Contents: レイヤーの長さを、そのレイヤーの最後のキーフレームと同じ長さの時間に短縮します。
Track ウィジェット内のキーフレーム
Section titled “Track ウィジェット内のキーフレーム”r30.8 以降、レイヤー上のすべてのキーフレームが、各レイヤーの下部に小さなティックとしてタイムラインに表示されます。
