Porta On Prem WSL 仮想ディスクの復元
このガイドでは、以前に作成したバックアップから Porta On Prem 用の WSL 仮想ディスクを復元する手順を説明します。
1. バックアップが存在することを確認する
Section titled “1. バックアップが存在することを確認する”- バックアップの保存場所に、最新の
.tarファイルが存在することを確認します。- デフォルトでは、バックアップ手順 に従っている場合、これはおそらく
D:\wsl\backups\docker-desktop-data.tarです。
- デフォルトでは、バックアップ手順 に従っている場合、これはおそらく
- 最新のバックアップがない場合は、バックアップ手順 を実行して作成してから、このステップに戻ってください。
- 最新のバックアップがある場合は、次のセクションに進みます。
2. ターゲットドライブが NTFS でフォーマットされていることを確認する
Section titled “2. ターゲットドライブが NTFS でフォーマットされていることを確認する”- エクスプローラーで
This PCに移動します。 - 復元先のドライブを右クリックし、コンテキストメニューから
propertiesを選択します。 - 開いたウィンドウで
File systemプロパティを確認します。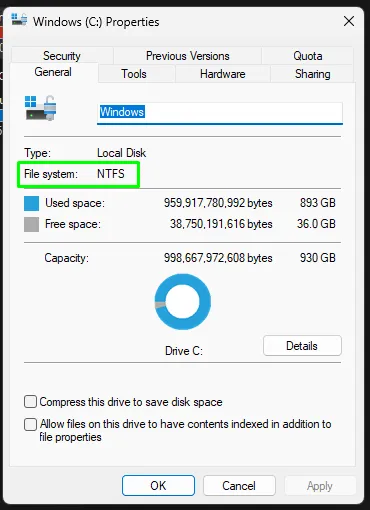
3. 既存の仮想ディスクの場所を確認する
Section titled “3. 既存の仮想ディスクの場所を確認する”- エクスプローラーで
%LOCALAPPDATA%\Docker\wsl\dataに移動し、ext4.vhdxという名前の既存の仮想ディスクファイルを見つけます。 - Docker Desktop の Settings > Resources > Advanced で
Disk image locationを確認することもできます。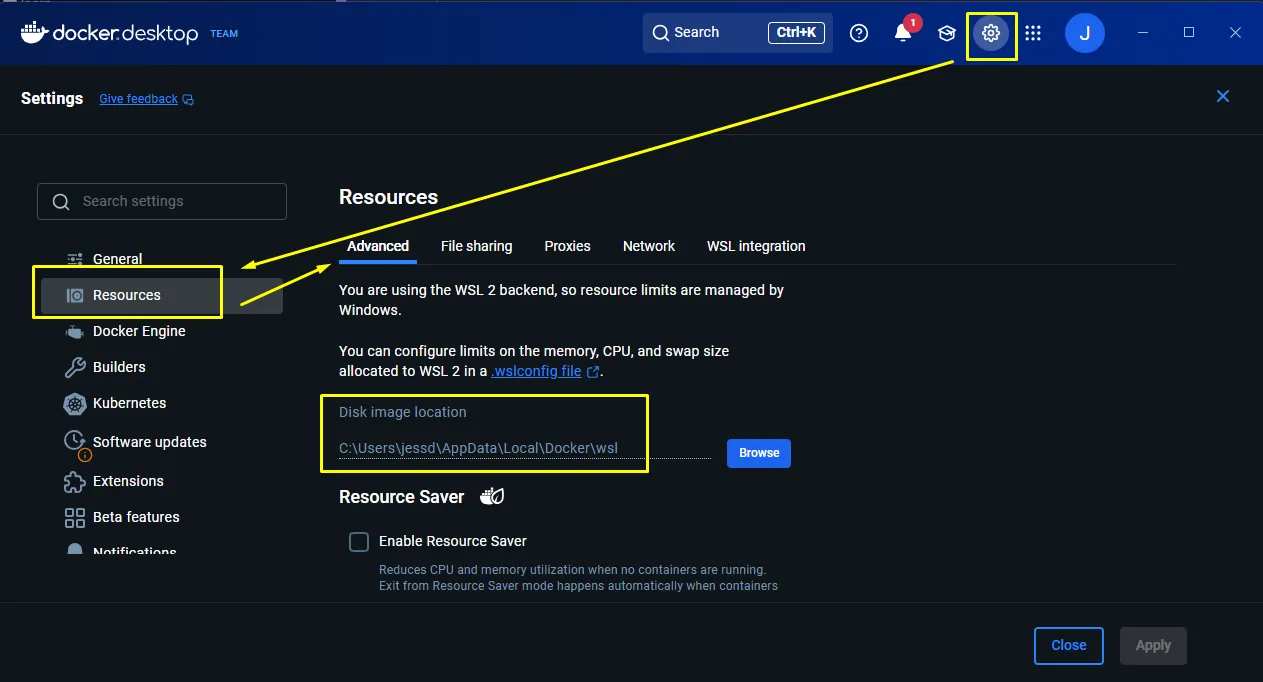
- 後でコピーして使用できるよう、このパスをメモします。
4. Docker Desktop をシャットダウンする
Section titled “4. Docker Desktop をシャットダウンする”- システムトレイを使用して Docker Desktop を終了します。
- PowerShell を開きます。
wsl --shutdownを実行して、すべてのディストリビューションを停止します。wsl -l -vを実行し、docker ディストリビューションが停止していることを確認します。成功した出力は次のようになります。NAME STATE VERSION* Ubuntu-22.04 Stopped 2docker-desktop-data Stopped 2docker-desktop Stopped 2
5. 既存の docker-desktop-data ディストリビューションを登録解除(削除)する
Section titled “5. 既存の docker-desktop-data ディストリビューションを登録解除(削除)する”-
PowerShell を 管理者として 開きます。
-
次を実行して、
docker-desktop-dataが存在し停止していることを確認します。Terminal window wsl -l -v成功した出力は次のようになります。
NAME STATE VERSION* Ubuntu-22.04 Stopped 2docker-desktop-data Stopped 2docker-desktop Stopped 2 -
PowerShell で次のコマンドを実行して、
docker-desktop-dataディストリビューションを登録解除(削除)します。Terminal window wsl --unregister docker-desktop-data -
確認メッセージは表示されませんが、
wsl -l -vを再度実行して削除されたことを確認できます。- 出力に
docker-desktop-dataがもう一覧表示されないはずです。
NAME STATE VERSION* Ubuntu-22.04 Stopped 2docker-desktop Stopped 2 - 出力に
-
Windows エクスプローラーでディスクの場所(おそらく
%LOCALAPPDATA%\Docker\wsl\data)を確認し、ext4.vhdxファイルが削除されたことを確認することもできます。
6. 仮想ディスクを復元する
Section titled “6. 仮想ディスクを復元する”-
データを復元するフォルダがすでに存在することを確認します(例:
%LOCALAPPDATA%\Docker\wsl\dataまたはD:\wsl\docker-desktop-data)。 -
バックアップ
.tarファイルからデータをインポートして、docker-desktop-dataディストリビューションを復元します。- PowerShell を開きます。
- 次のコマンドを実行してバックアップをインポートします。
D:\path\to\backupをバックアップファイルへのパスに置き換えてください。D:\path\to\restore\folderを復元先ディレクトリへのパスに置き換えてください。
Terminal window wsl --import docker-desktop-data "D:\path\to\restore\folder" "D:\path\to\backup\docker-desktop-data.tar" --version 2 - 次の行に
PS C:\Users\username>プロンプトが再び表示されたら、インポートは完了です。
-
インポートが完了したら、PowerShell を開いて次を実行し、ディストリビューションが WSL で認識されていることを確認します。
Terminal window wsl -l -v成功した出力は次のようになります。
NAME STATE VERSION* Ubuntu-22.04 Stopped 2docker-desktop-data Stopped 2docker-desktop Stopped 2 -
Docker Desktop を再度起動します。新しくインポートされた
docker-desktop-dataディストリビューションを見つけて使用するはずです。 -
Docker の起動後、PowerShell で
docker imagesまたはdocker volume lsコマンドをすばやく実行し、イメージ/ボリュームがまだ存在することを確認します。 -
これで、すべて正常に戻っているはずです。