OmniCal リグチェック
RigCheck は、OmniCal システムの他の部分に関する高度な知識なしに、素早く再キャリブレーションするためのツールです。 主に固定設置のオペレーターが、軽微な外部変更の後にショーを再キャリブレーションするために使用します。ライブのカメラ画像を以前の Capture のものと比較して、カメラやプロジェクションサーフェスが動いたかどうかを確認します。動いた場合、ユーザーはアライメント reference point を正しい位置にドラッグして調整できます。
RigCheck へのアクセス
Section titled “RigCheck へのアクセス”- ダッシュボードで Stage を右クリックするか、ビジュアライザーで床を右クリックして、ステージエディターを開きます。
- OmniCal Calibration を左クリックして、OmniCal Calibration エディターを開きます。
- 訓練を受けたオペレーターによってすでにキャリブレーションされた plan があることを確認します。
- Check cameras を左クリックします。
ワークフロー
Section titled “ワークフロー”RigCheck ワークフローは、Plan ワークフローを使用して完全な OmniCal capture、calibration、alignment が完了した後に使用します。
RigCheck では、現在の plan がテンプレートとして使用され、同じ設定で必要なすべての OmniCal ステップを、後の時点で繰り返します。このワークフローでは、元の plan 自体は変更されません。各 RigCheck の結果は、それ自身の設定とデータのセットを保存します。RigCheck では、プロジェクターやカメラの軽微な動きを考慮するために、元の Plan と異なる軽微な整列調整が可能です。したがって、実証済みのセットアップの再キャリブレーション、例えば固定設置で日常のオペレーターによって実行される場合に適しています。
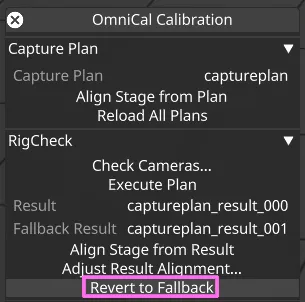
メインの OmniCal Calibration ウィンドウの RigCheck セパレーターは、RigCheck を準備、実行、整列するための関連するすべての機能をグループ化しています。
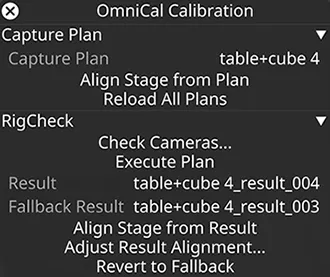
複数の RigCheck Result を持つ OmniCal Plan。
RigCheck の使用
Section titled “RigCheck の使用”- 訓練を受けた OmniCal オペレーターによってすでにキャリブレーションされた plan があることを確認します。それが OmniCal Calibration エディターで選択されているべきです。
- OmniCal Calibration エディターで Check Cameras を左クリックします。
- Check Cameras ウィンドウが開いたときにエラーがないことを確認します。エラーには以下が含まれます。
- a. カメラが利用できない。
- b. plan 内でカメラ名が変更された。plan capture が RigCheck の参照として使用されます。完了した plan capture の後にカメラ名を変更すると、それが無効になります。
- Check Cameras ウィンドウが開き、元の plan capture と現在のステージのスナップショット capture から成るカメラペアが表示されます。Refresh Camera Views ボタンを使用して新しいスナップショットを取得できます。
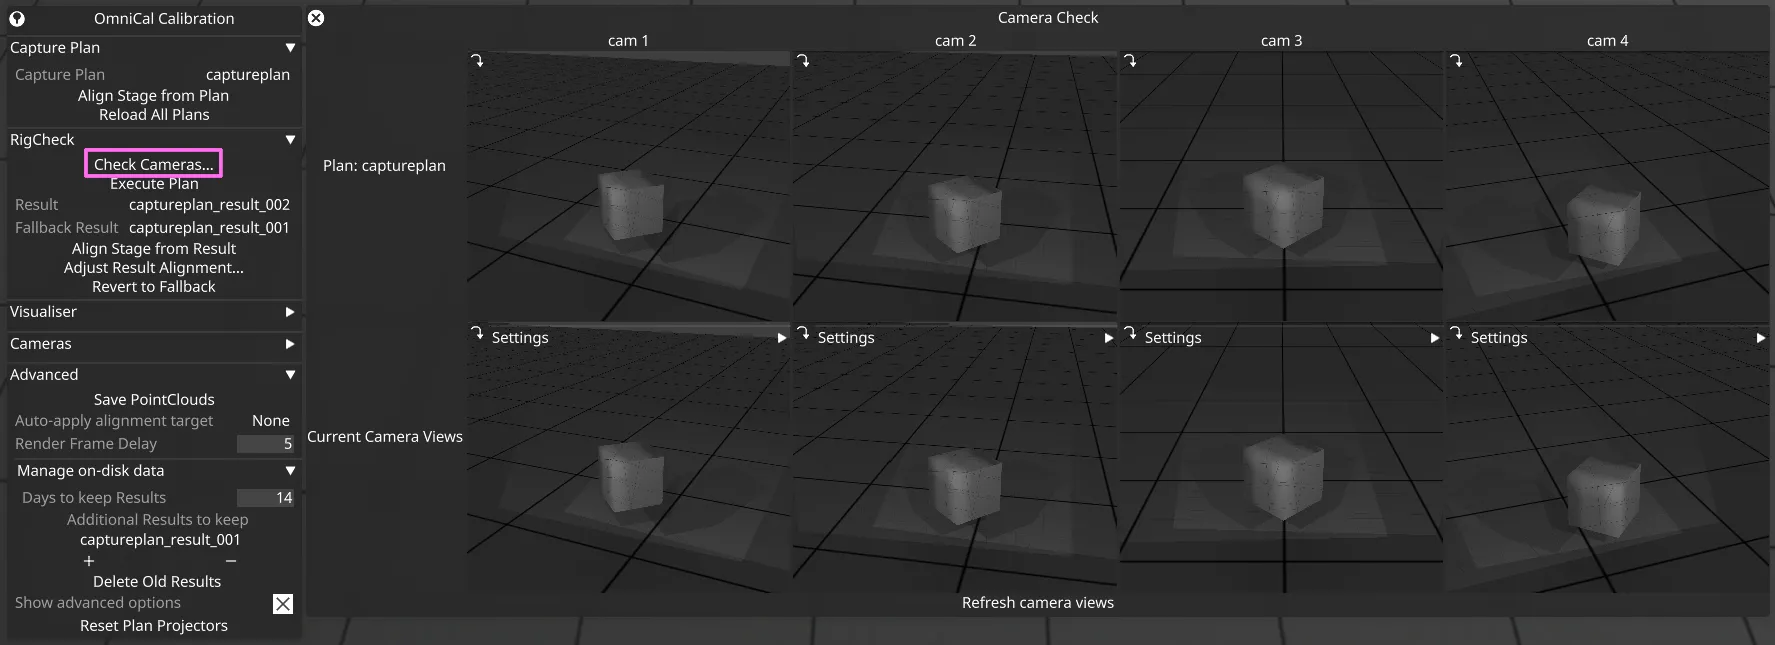
- カメラビューが一致することを確認します。
- a. 同一である必要はありませんが、プロジェクションサーフェスのカバレッジが一致し、ほぼ同じ位置にあるべきです。
- b. 画像の明るさも一致すべきです。plan で指定された正確なカメラ設定(露出時間など)がここで使用されるため、差異があるとすれば、それはカメラレンズの物理的な絞りやフォーカス、または照明環境によるものです。したがって、再現性のために、machine vision カメラのフォーカスと絞りを固定することをお勧めします。
- カメラビューに満足したら、Check Cameras ウィンドウを閉じます。
- Execute Plan を左クリックします。これにより、capture、calibration、alignment、およびオプションで mesh deform(plan の deform 設定で自動実行するように構成されている場合)が実行されます。capture、calibration などのデータを含む新しい Result オブジェクトが作成されます。
- OmniCal Calibration エディターで正しい Plan と Result が選択されていることを確認します。
- OmniCal Calibration エディターで Align Stage from Result を左クリックします。なお、これにより result の整列がステージに適用されます(まだ適用されていない場合)。これにより、アライメントポイントを持つプロジェクターとプロジェクションサーフェスの両方が更新されます。Align Stage from Result がグレーアウトされている場合、ツールチップがその理由を伝えるはずで、以下が含まれます。
- a. Plan に capture または calibration がない。
- b. Result に capture または calibration がない。
- Adjust Result Alignment ウィンドウが開いたときにエラーがないことを確認します。エラーには以下が含まれます。
- a. Plan と Result のカメラ名が一致しない。Result の作成以降、Plan が変更された可能性があります。
- Adjust Result Alignment ウィンドウが開き、元の Plan capture と取得された Result capture から成るカメラペアが表示されます。
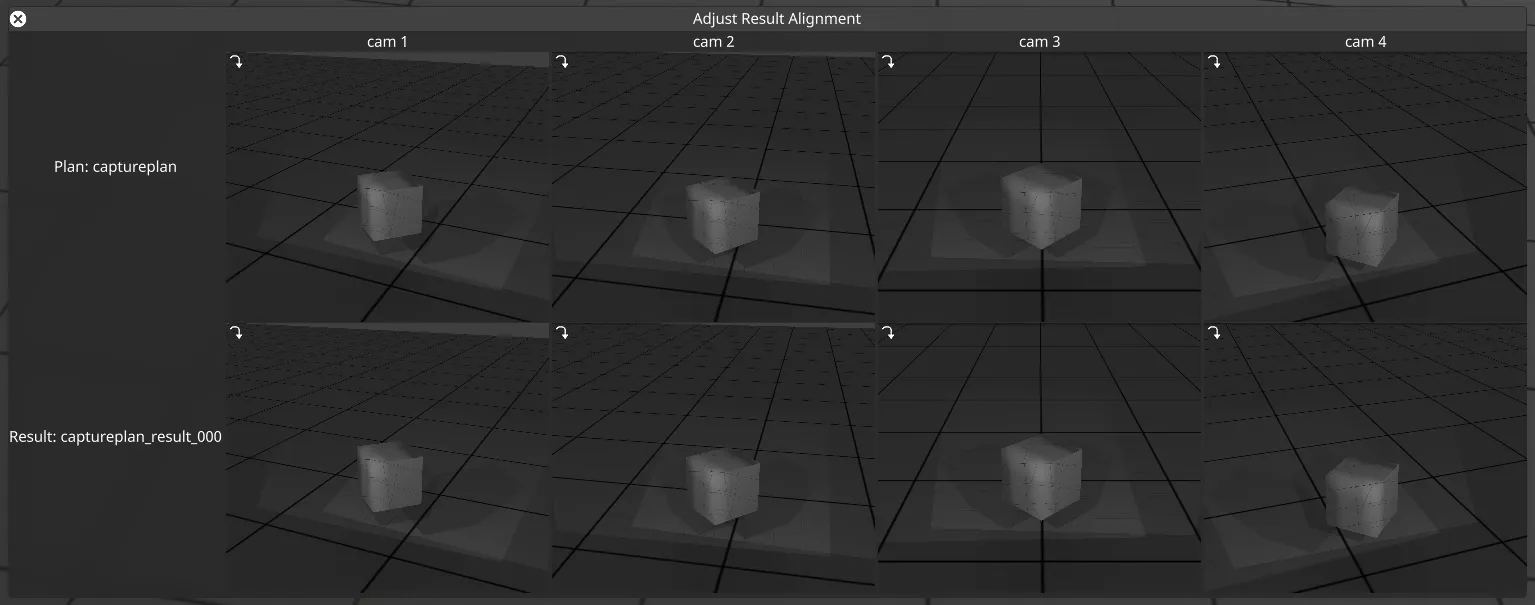
- カメラ画像を左クリックして Result Aligner ウィンドウを開きます。Mesh Deform が適用されている場合、アライメントポイントを編集可能にするために、それらは元に戻されます。
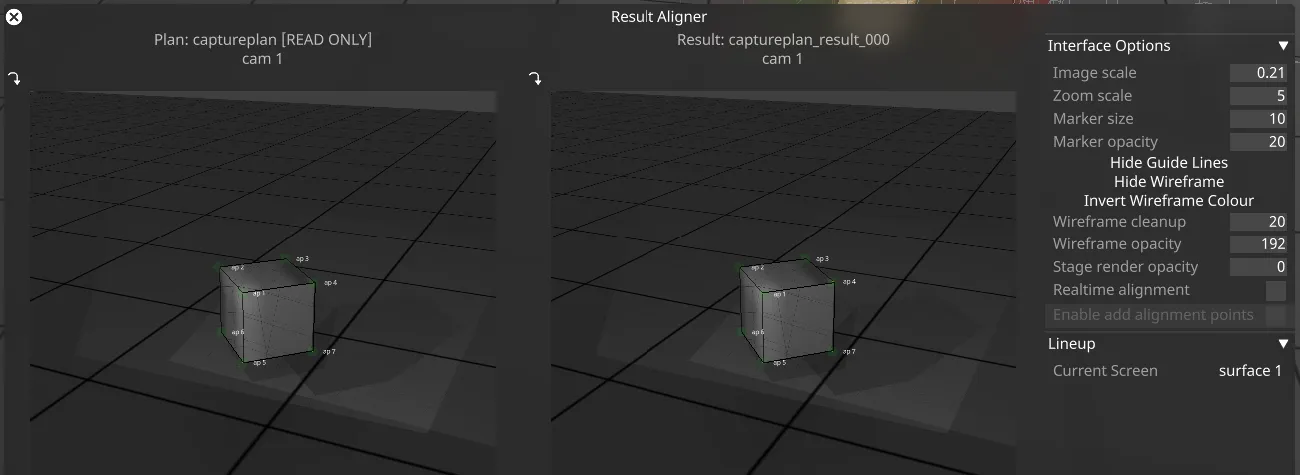
- 左側は元の Plan のカメラビュー(読み取り専用)で、右側は Result です。次に、右側のアライメントポイントを左側に一致するように更新できます。これを行うと、ステージ上の整列が更新されます。コントロールは QuickAlign と同一ですが、アライメントポイントの追加/削除はできません。
- カメラビューの下部のボタンを押すか、surfaces ドロップダウンから選択して次のスクリーンを選び、アライメントポイントの確認と調整のプロセスを繰り返します。
- これをすべてのカメラについて繰り返します。理論的には、動いたとわかっているカメラやプロジェクションサーフェスのみを確認することもできます。
- Adjust Result Alignment ウィンドウを閉じます。Mesh Deform を再適用するかどうか尋ねられます。
Fallback Result への復帰
Section titled “Fallback Result への復帰”Designer r32.4 では、OmniCal のキャリブレーション状態を以前の RigCheck Result(Fallback Result と呼ばれる)に戻す便利な方法が追加されました。これは、RigCheck が失敗したり、品質が最適でない結果を生成したりした場合に便利です。
fallback は通常、シーンの視覚的検査の後に OmniCal オペレーターが判断した、最も視覚的品質の良い最新の RigCheck Result に設定すべきです。Fallback Result は、すべてのプロジェクターについて完全にキャリブレーション・整列され、エラーがない必要があります。
Revert to Fallback ボタンをクリックすると、現在の Result から Fallback Result に切り替わります。これにより OmniCal の状態が元に戻され、影響を受けるすべてのプロジェクターのキャリブレーションと整列が、新しく選択された現在の Result に更新されます。
RigCheck API
Section titled “RigCheck API”RigCheck ワークフローの重要な部分は、Designer セッション用の API endpoints を介しても利用できるようになりました。
RigCheck データのディスク上での管理
Section titled “RigCheck データのディスク上での管理”OmniCal RigCheck Result データのディスク上での保存
Section titled “OmniCal RigCheck Result データのディスク上での保存”Plan ワークフロー と同様に、RigCheck も .d3 プロジェクト自体ではなく、ハードディスク上にさまざまなデータを保存します。
RigCheck データには以下が含まれます。
- OmniCal 設定
- キャプチャされた画像
- 計算された blob detection の結果
- キャリブレーション結果
- 整列データ
- レポートデータ
この RigCheck データは、Designer プロジェクトの internal/opticalresult/ フォルダーのサブフォルダーに保存されます。
各 RigCheck は独自のデータセットを持ち、そのサブフォルダーは Designer 内の関連する「Result」オブジェクトと同じ名前を持ちます。
internal サブフォルダー内のデータは、Designer 内の対応する Result オブジェクトと一緒に管理されます。 RigCheck Result オブジェクトが削除され、Designer のゴミ箱が空にされると、関連するフォルダー(画像、config、result ファイルを含む)もハードディスクから削除されます。
古い未使用の RigCheck Result を削除する
Section titled “古い未使用の RigCheck Result を削除する”プロジェクトに Designer 内で多くの RigCheck Result がある場合、時間の経過とともにハードディスクがいっぱいになることがあります。 ディスク容量を解放するには、不要になった RigCheck の結果をゴミ箱に移動し、ゴミ箱を空にします。
定期的に(例: API 呼び出しを介して)再キャリブレーションするプロジェクトでは、この手動での RigCheck データ削除方法は遅すぎてエラーを起こしやすいことがあります。Designer バージョン r32.4 では、Delete Old Results ボタンまたは API endpoint omnical/rigcheck/deleteoldresults を介して、古く未使用の RigCheck Result を削除するより簡単な方法が導入されました。
API endpoint またはボタンは、以下の両方を満たす RigCheck Result を削除します。
- Designer で構成された Days to keep Results の値より古い。
- 使用中でない。
以下の Result は「使用中」とみなされます。
- 現在選択されている Result。
- 現在選択されている Fallback Result。
- バックアップ一覧内の任意の result。Additional Results to keep を参照。
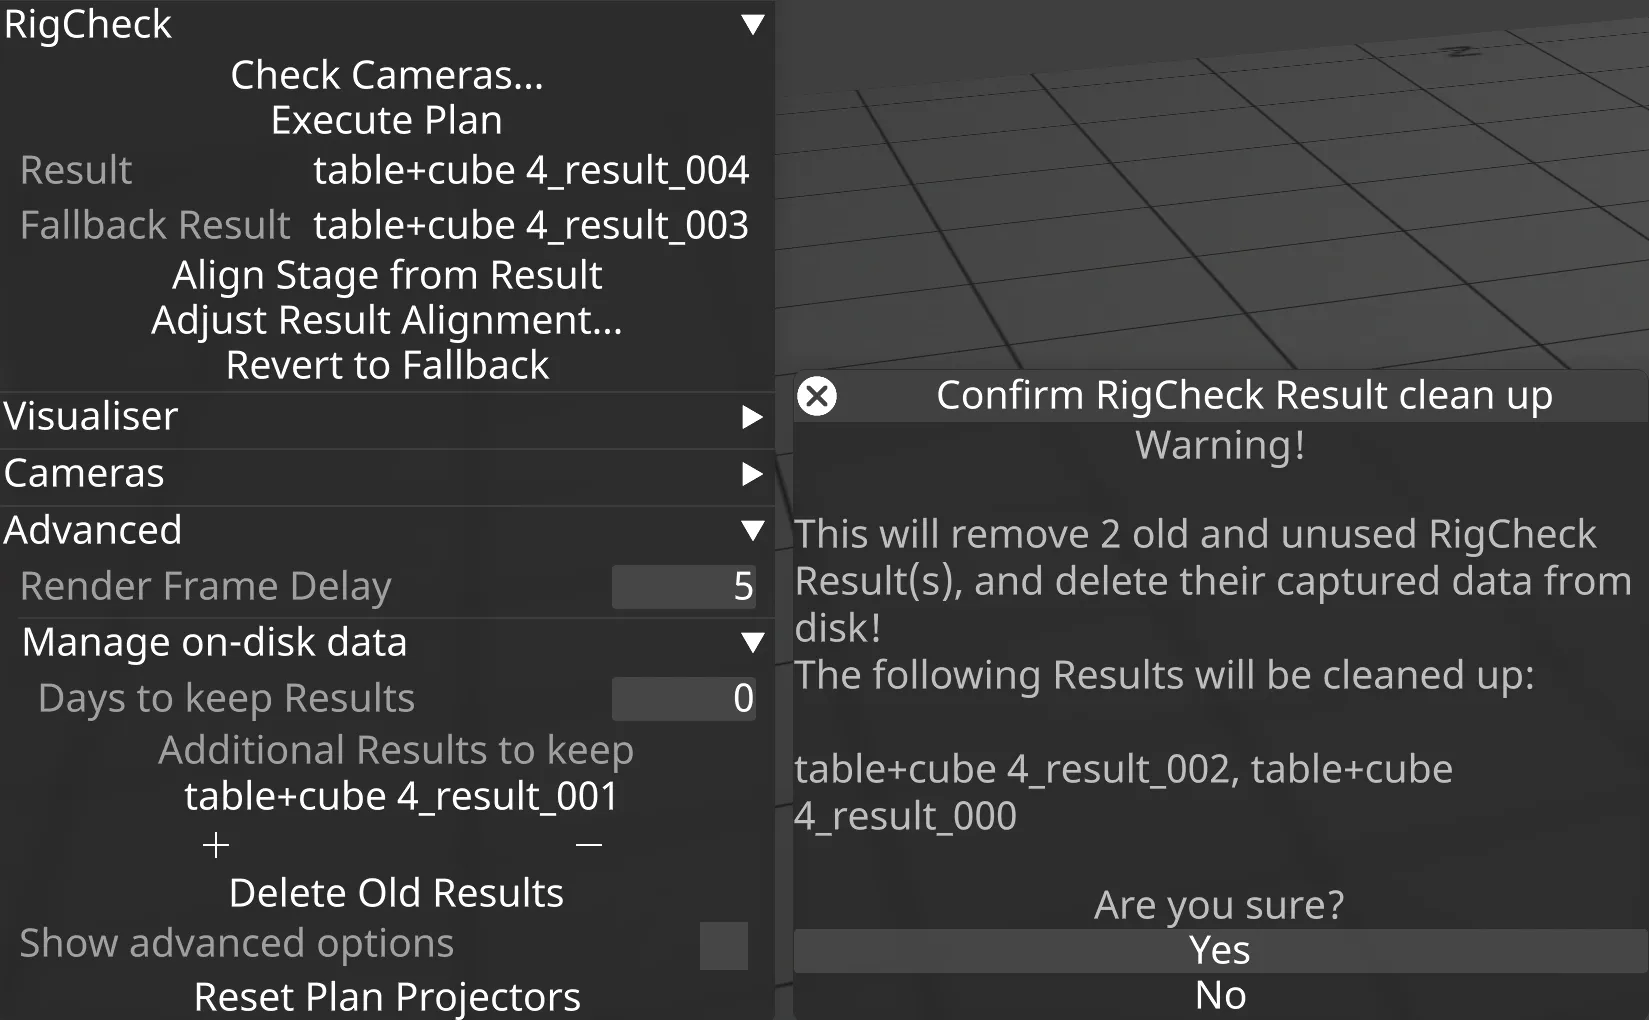
Delete Old Results の使用例。
API 使用のためのディスク上のデータ管理
Section titled “API 使用のためのディスク上のデータ管理”ユーザーは Designer で Days to keep Results と Additional Results to keep をニーズに合わせて構成できますが、現在 API では変更できません。
API endpoint omnical/rigcheck/acceptresult は、現在の Result を Additional Results to keep バックアップ一覧に自動的に追加します。これにより、Designer と直接やり取りすることなく、API 呼び出し元によるクリーンアップの自動化が可能になります。