Porta Unreal プラグイン
Porta Unreal Engine 連携を使用すると、Unreal Engine で作成された既製のビジュアルエフェクト、シーン、アニメーションを Porta から制御できます。
デザイナーは Unreal アセット上でパラメーターと関数を公開し、Porta からアイテムのオン/オフの切り替え、レベルや環境の変更、ライティングの調整、アセットの再配置、カメラビューの切り替え、アニメーションのトリガーをリモートで行えるようにします。拡張現実(AR)アセット(スポーツ選手、F1 カー、天気要素など)もレベルに追加し、Porta から駆動できます。
対応する Unreal Engine バージョン
Section titled “対応する Unreal Engine バージョン”お使いの Unreal Engine バージョンに合った Porta Unreal Engine プラグインのビルドをダウンロードします。
| Unreal Engine バージョン | 最新プラグインリリース |
|---|---|
| 5.7 | Plugins_UE5.7.4_24.0.5.zip |
| 5.6 | Plugins_UE5.6.1_24.0.5.zip |
| 5.5 | Plugins_UE5.5.4_24.0.5.zip |
| 5.4 | Plugins_UE5.5.4_24.0.5.zip |
| 5.3 | Plugins_UE5.3.2_24.0.5.zip |
Unreal Engine の推奨ハードウェア・ソフトウェア仕様については、Epic Games ドキュメントサイト をご覧ください。Unreal Engine の一般的なドキュメントや学習リソースについては、Unreal Engine ウェブサイト をご覧ください。
必要なプラグイン
Section titled “必要なプラグイン”Unreal プロジェクトで以下のプラグインを有効にする必要があります。
- Remote Control API — Unreal Engine に付属しています。
- Pixel Streaming — Unreal Engine に付属しています。Porta Preview に必要です。
- Porta Unreal Engine プラグイン — Porta からダウンロードします。
Porta Unreal Engine プラグインのインストール
Section titled “Porta Unreal Engine プラグインのインストール”-
Porta の Web インターフェースで Help → Plugins に移動し、お使いの Unreal Engine バージョンに合った Porta Unreal Engine プラグインをダウンロードします。
-
アーカイブを解凍し、すべてのフォルダ(
DefaultPorta.iniを除く)を Unreal プロジェクトのPluginsフォルダにコピーします。Pluginsフォルダが存在しない場合は、プロジェクトのルートに作成します。
-
Unreal Editor で Edit → Plugins に移動し、Remote Control API と Pixel Streaming を検索して、両方を有効にします。
-
Unreal にプロンプトが表示されたらプロジェクトを再起動し、読み込んだプラグインを有効化します。
プラグインの構成
Section titled “プラグインの構成”プラグインを構成する推奨方法は、Unreal Editor の UI を使用することです。ヘッドレスまたは自動化されたセットアップの場合は、Advanced: DefaultPorta.ini を参照してください。
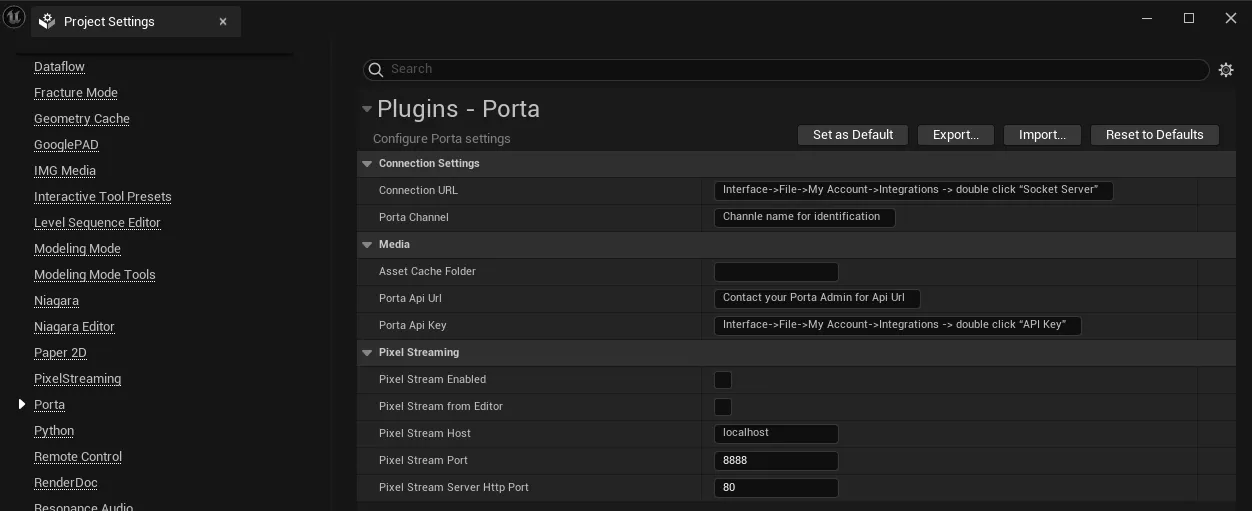
Unreal Editor で Edit → Project Settings → Porta に移動し、各セクションに入力します。
Connection
- Connection URL — Porta で File → My Account → Integrations に移動し、Socket Server をダブルクリックして URL を表示します。
- Porta Channel — この Unreal Engine 接続を Porta で識別するための一意の名前。
- Namespace — デフォルト値のままにします。
Media
- Asset Cache Folder —
C:\PortaCache(または Porta がメディアアセットをステージングできる任意の書き込み可能なパス)。 - Porta Api Url — API URL については Porta 管理者にお問い合わせください。
- Porta Api Key — Porta で File → My Account → Integrations に移動し、API Key をダブルクリックしてキーを表示します。
Pixel Streaming
Porta Preview を使用する場合は、このセクションを有効にします。ここで設定するホストとポートの値は、Porta がプレビュー接続を確立するために使用されます。詳細は Porta Preview を参照してください。
Advanced: DefaultPorta.ini
Section titled “Advanced: DefaultPorta.ini”エディターを開かずにプラグインを構成する必要がある場合(CI、ヘッドレスビルド、プロジェクトテンプレートの一部など)は、DefaultPorta.ini を直接編集します。
プラグインアーカイブに付属していた DefaultPorta.ini ファイルを、プロジェクトの config フォルダ <Project_Folder>/Config/DefaultPorta.ini にコピーします。テキストエディターで開き、以下のキーを設定します。URL を含む文字列値は二重引用符で囲む必要があります。
| キー | 値 |
|---|---|
ConnectionURL | Socket server URL。Porta On-prem の場合: "http://<host-ip>:6001"。 |
PortaChannel | この Unreal 接続の一意の名前。 |
Namespace | デフォルトの unreal のままにします。 |
AssetCacheFolder | C:\PortaCache または別の書き込み可能なパス。 |
PortaApiUrl | Porta API URL。Porta On-prem の場合: "http://<host-ip>:3000"。 |
PortaApiKey | Porta の File → My Account → Integrations から取得した API キー。 |
例:
[/Script/PortaInterface.PortaSettings]ConnectionURL="http://192.168.1.10:6001"PortaChannel=NYCUnrealEngineNamespace=unrealAssetCacheFolder=C:\PortaCachePortaApiUrl="http://192.168.1.10:3000"PortaApiKey=YOUR_API_KEY_HEREProject Settings UI と DefaultPorta.ini は同じ値を書き込みます。どちらか便利な方を使用してください。
接続をテストする
Section titled “接続をテストする”-
Unreal プロジェクトを開き、Play をクリックします。
-
Output Log で次を探します。
LogPorta: Connected -
Porta で Window → Settings → Channels に移動し、上部の更新ボタンをクリックします。新しいチャネルがリストに表示されるはずです。
接続に失敗した場合は、Troubleshooting を参照してください。
Remote Control Preset を作成する
Section titled “Remote Control Preset を作成する”Porta は、Remote Control Preset と呼ばれる Unreal アセットを介して Unreal を制御します。これは、プロジェクト内の変数や関数を外部ツールに公開するものです。
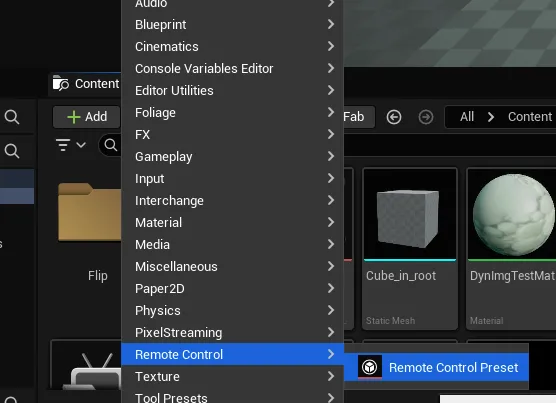
-
Content Browser で Add → Remote Control → Remote Control Preset をクリックします。
-
プリセットを開きます。開いた状態で、シーン内のアクターのプロパティと関数を公開できます。公開したものはすべて、Porta から制御できるようになります。

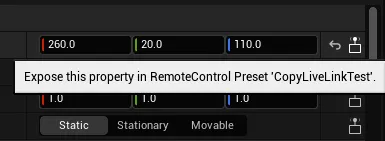
プロパティを公開する
Section titled “プロパティを公開する”シーン内のアクターを選択し、Details パネルで目的のプロパティを見つけ、その横にある Expose this property ボタンをクリックします。公開されたプロパティは、Remote Control Preset の Properties エリアに表示されます。
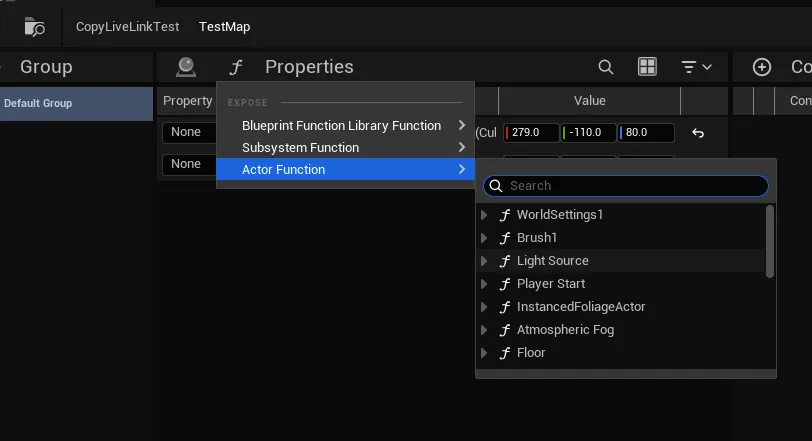
関数を公開する
Section titled “関数を公開する”Remote Control Preset ウィンドウで、Properties ヘッダー付近の F ボタンをクリックして関数を公開します。
画像を公開する
Section titled “画像を公開する”Porta に画像を公開するには、使用方法に応じて 3 つの方法があります。
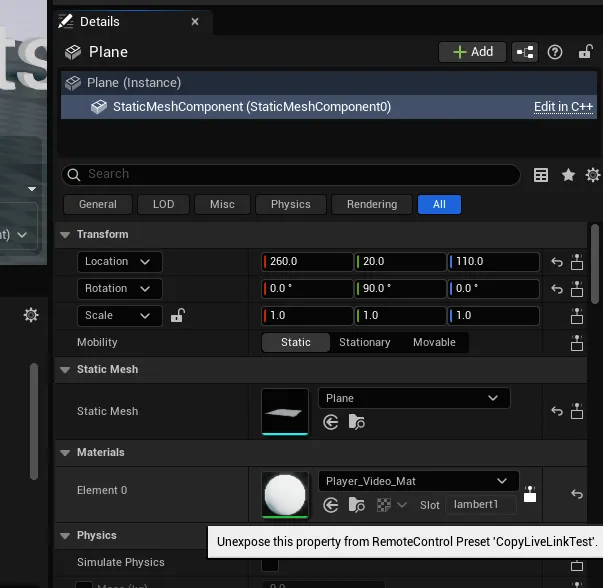
アクター上でマテリアルを直接オーバーライドする
アクターを選択し、Details パネルで Mesh Component をクリックし、Materials プロパティを見つけて Element 0 を公開します。
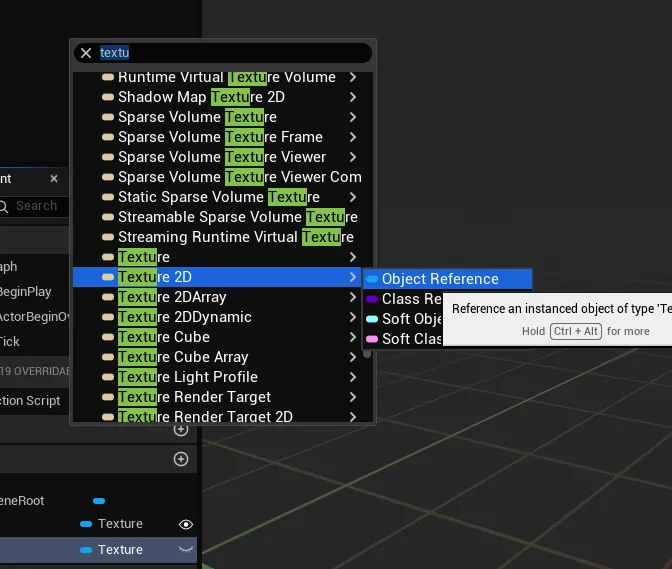
Blueprint 変数として
Texture または Texture 2D 型の Blueprint 変数を作成し、変数の横にある目のアイコンをクリックして public としてフラグを立てます。
関数パラメーターとして
Texture または Texture 2D パラメーターを受け取る関数を作成し、他の関数と同じ方法で公開します。
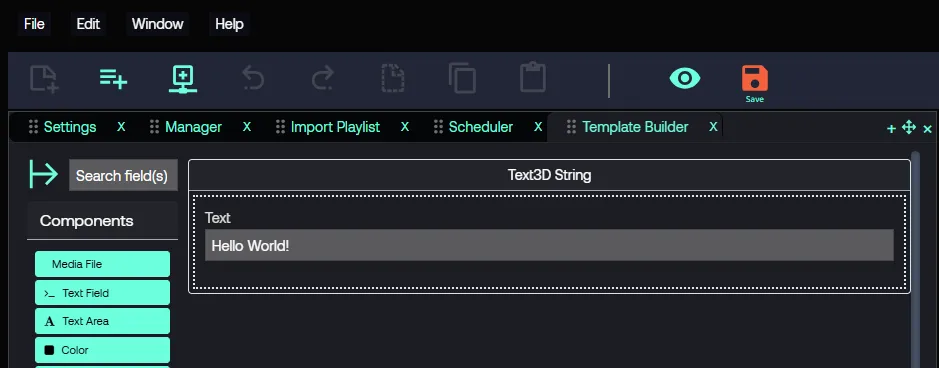
プリセットから Porta テンプレートを構築する
Section titled “プリセットから Porta テンプレートを構築する”Unreal を実行し Play 状態にすると、Remote Control Preset を Porta テンプレートに変換できます。
-
Porta で Window メニューから Settings パネルを開きます。
-
Channels タブを選択し、sync ボタンをクリックして新しいチャネルを追加します。
-
File メニューから New → Template を選択して、テンプレートビルダーを開きます。
-
Unreal Template を選択します。
-
チャネルのアドレスを選択し、Next をクリックします。
-
Select Preset ボックスで、Unreal Engine から公開されたプリセットを選択し、Next をクリックします。
-
制御したいプリセットのプロパティを選択し、Next をクリックします。
-
選択したプロパティがコンポーネントとしてテンプレートに追加されます。
-
各コンポーネントにデフォルト値を設定します。
-
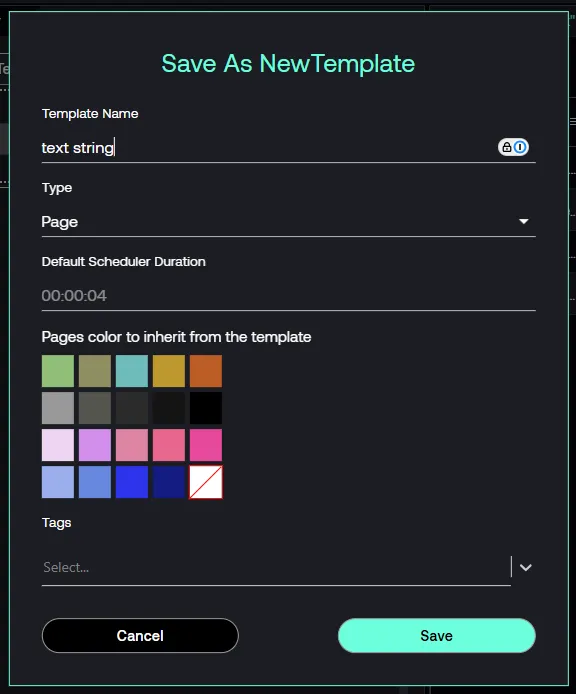
アクションメニューリボンの Save をクリックします。
-
ポップアップで、テンプレートの一意の名前を入力し、Save をクリックします。
-
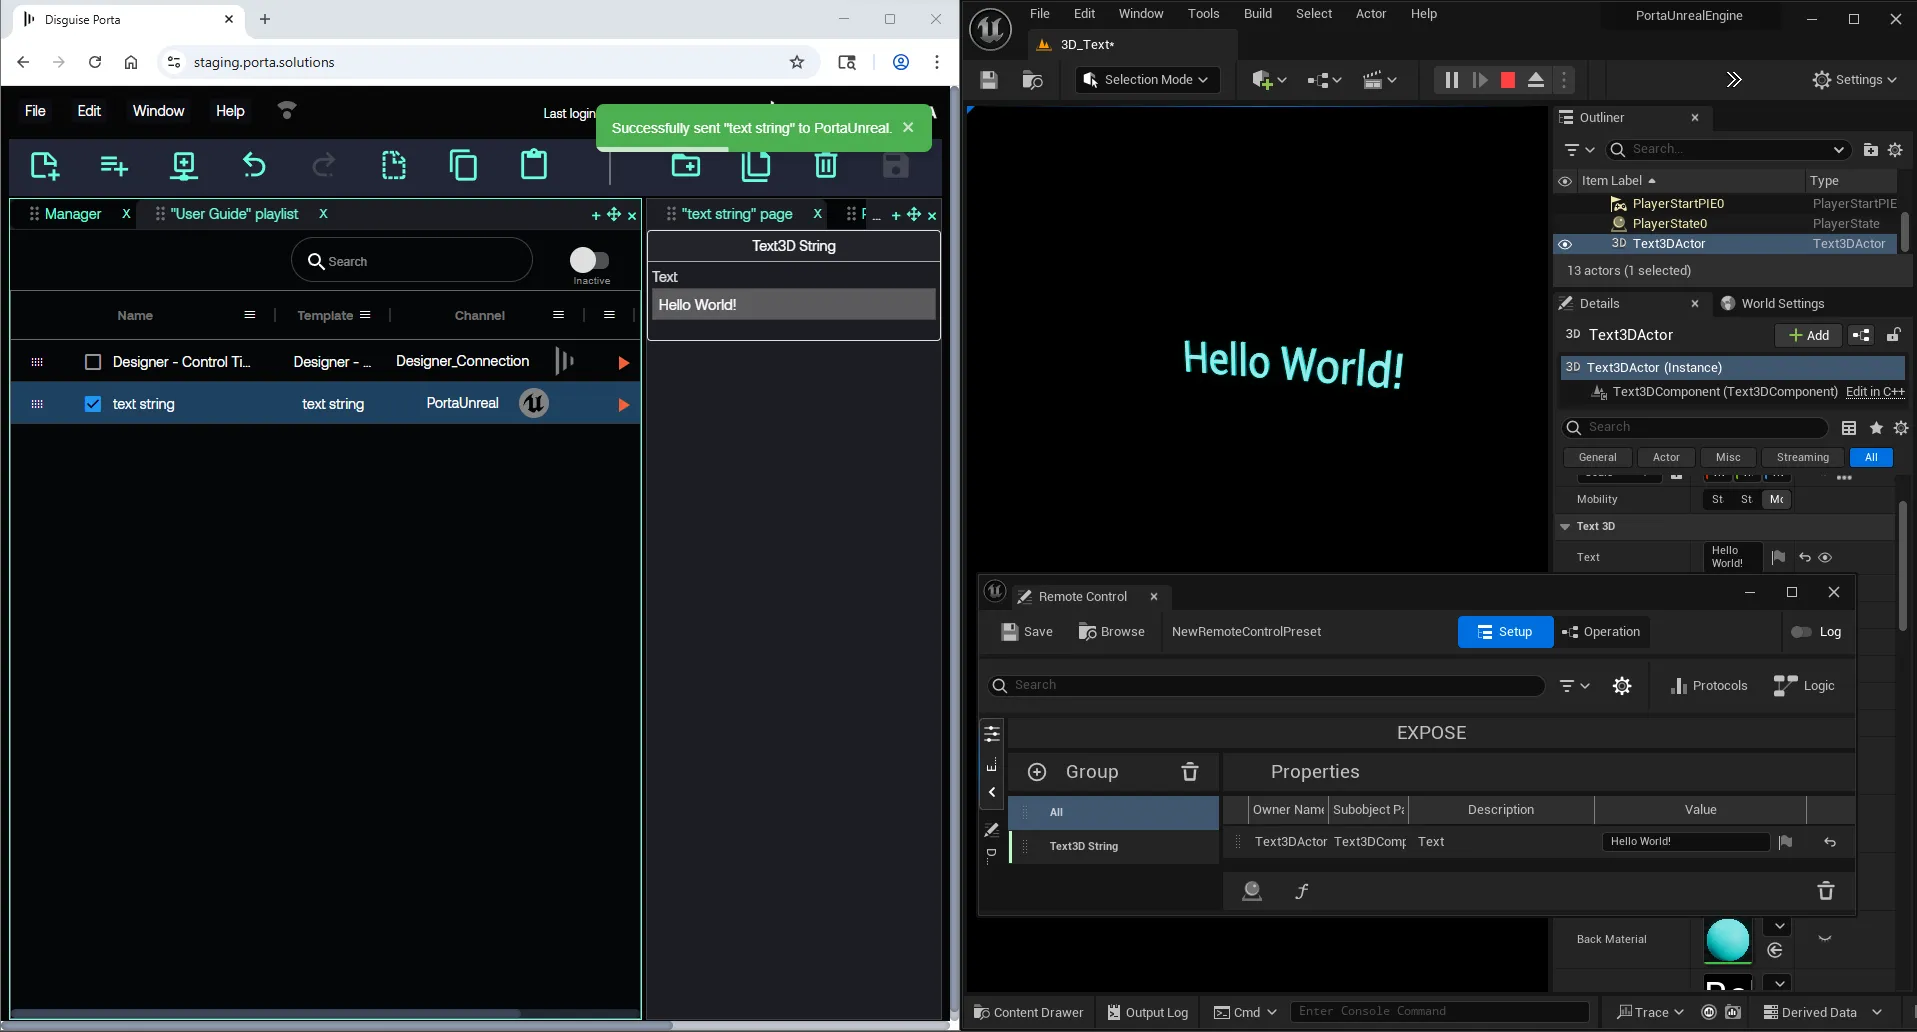
プレイリストに戻り、アクションメニューリボンの New Page を使用してテンプレートからページを作成します。ポップアップでテンプレートをダブルクリックして、ページとして追加します。
-
ページ行の Send now(再生アイコン)をクリックして、値を Unreal Engine にプッシュします。
Level Sequences
Section titled “Level Sequences”Level Sequences は、Unreal シーン内のアクターをアニメーション化します。Porta から Level Sequence を再生するには:
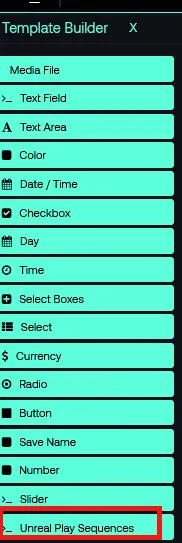
- Template Builder で、Unreal play sequences アイテムをテンプレートにドラッグします。
- テンプレートをプレビューするか、そこからページを作成すると、利用可能な level sequence のリストが表示されます。選択したシーケンスは Play page を押すと再生されます。
Take Out または Stop 時に再生すべきシーケンスには、Unreal Out Sequences を使用します。
Porta Preview
Section titled “Porta Preview”Porta Preview は Unreal Pixel Streaming プラグインを使用して Unreal のビューポートを Porta にストリーミングし、変更をプレビューできるようにします。この機能が不要な場合は、Project Settings の Pixel Streaming セクションを無効のままにします。
ローカルセットアップ
Section titled “ローカルセットアップ”シンプルなローカルセットアップの場合は、Edit → Project Settings → Porta → Pixel Streaming(または DefaultPorta.ini)で、以下の値を設定して Pixel Streaming を有効にします。
PixelStreamEnabled=TruePixelStreamFromEditor=TruePixelStreamHost=localhostPixelStreamPort=8888PixelStreamServerHttpPort=80PixelStreamEnabledは機能をオンにします。PixelStreamFromEditorを使用すると、エディターから直接ストリーミングできます(通常はこれが望ましい設定です)。- 残りの値は通常、ポート 80 または 8888 がホスト上の他のものと競合する場合にのみ変更が必要です。
Porta 側では、チャネルを Preview チャネルとしてマークします。
![]()
次に、Unreal マシンの IP アドレスを設定します。
![]()
すると、チャネルが Preview ウィンドウのドロップダウンに表示されます。
![]()
複数のオンプレミスマシンやクラウドホストにまたがる Pixel Streaming のセットアップはより複雑であり、このガイドの範囲外です。
トラブルシューティング
Section titled “トラブルシューティング”LogPorta: Warning: Socket IO connection failed
Socket Server に到達できません。以下を確認してください。
- Project Settings の
Connection URL(またはDefaultPorta.iniのConnectionURL)が、Porta の File → My Account → Integrations → Socket Server に表示される URL と一致していること。 - Porta の Socket Server が実行されていること。
- ファイアウォールが構成済みのポート(Porta On-prem のデフォルトは 6001)をブロックしていないこと。
LogPorta: Error: Invalid Porta config options
1 つ以上の必須構成値が欠落しているか、形式が正しくありません。Edit → Project Settings → Porta の各フィールドを再確認し、DefaultPorta.ini を使用している場合は引用符に注意してください。
チャネルが Porta に表示されない
Unreal を Play モードで実行している間に、Porta で Window → Settings → Channels に移動し、上部の更新ボタンをクリックします。
Pixel Streaming プレビューが表示されない
- Project Settings で Pixel Streaming が有効になっており、Porta でチャネルが Preview チャネルとしてマークされていることを確認します。
- Porta で設定した IP アドレスが Unreal ホストマシンと一致していることを確認します。
- 構成済みのポート(デフォルトは 8888 と 80)がファイアウォールでブロックされていないか、別のサービスで使用されていないことを確認します。
Unreal Engine のガイド
Section titled “Unreal Engine のガイド”以下は、Epic Games が提供する外部の英語リソースです。