OpenVPCal プラグイン - クイックスタート
このページでは、OpenVPCal プラグインでキャリブレーションを実行する手順を説明します。プラグインはキャリブレーションをできるだけ簡単にしますが、最良のキャリブレーション結果を妨げる要因を理解しておくことが重要です。分析結果の解釈方法は Analyse タブ で学べます。考慮すべき主な要素は、ハードウェア設定と Designer のカラースペース設定です。
キャリブレーションチェックリスト
Section titled “キャリブレーションチェックリスト”OpenVPCal キャリブレーションを実行する前に、次を確認してください。
ハードウェア
- LED ウォールが接続され、Designer でマッピングされている。
- LED パネルがウォームアップされ(グレーを 20〜40 分表示)、ショーの明るさになっている。
- LED プロセッサーが目的のカラースペースとトランスファー関数に設定されている。
- フレアを避けるため、未使用の LED セクションがオフになっている。
- カメラ設定(露出、ホワイトバランス、ISO、シャッター)が本番用に構成されている。
Designer の構成
- カラーマネジメントが OCIO に設定されている。
- Camera、LED Screen、MR Set が作成され、リンクされている。
- MR Set の Delay Calibration が完了している。
- 信号経路にクリエイティブなカラールックや LUT が適用されていない。
- Designer のオプションで
enableResourceFileDeletionが有効になっている(Advanced Machine Settings を参照)。
OpenVPCal プラグインの起動
Section titled “OpenVPCal プラグインの起動”OpenVPCalPlugin.exe を起動して、Designer のプラグインウィジェットで OpenVPCal プラグインを利用可能にします。起動したら、システムトレイアイコンでサーバーが実行中かどうかを確認します。
- 色付きアイコン: サーバーが正しく実行されています。
- グレーアウトしたアイコン: サーバーが失敗しました。トラブルシューティングは System Tray を参照してください。
Designer のセットアップ
Section titled “Designer のセットアップ”Designer のカラーマネジメント、ステージコンポーネント、キャリブレーションの前提条件を構成します。このセットアップが、OpenVPCal プラグインが OpenVPCal ベースのキャリブレーションを実行するための基盤となります。
- カラーマネジメント設定を行う
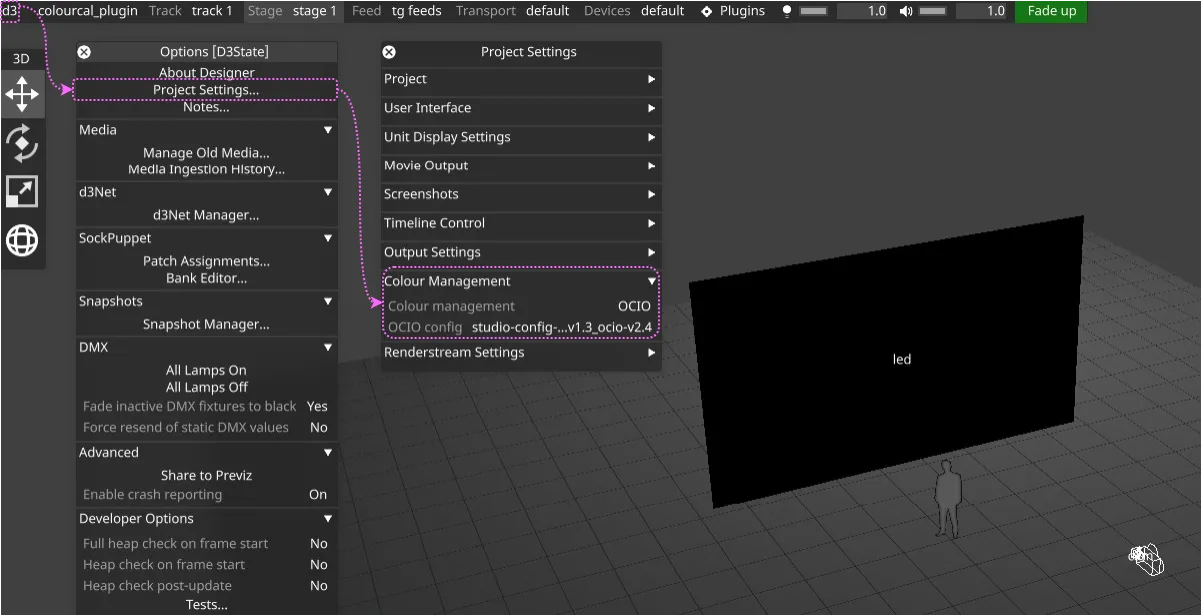
d3 > Project Settings > Colour Management > Colour managementに移動します。- Colour management を
OCIOに設定します。 - OCIO config を選択: プロジェクトのベース OCIO 設定を使用します(以前のキャリブレーションで存在する場合でも
pre_calibration_openvpcalやpost_calibration_openvpcal設定は使用しないでください)。
- LED Screen、Camera、MR Set を Stage に追加する
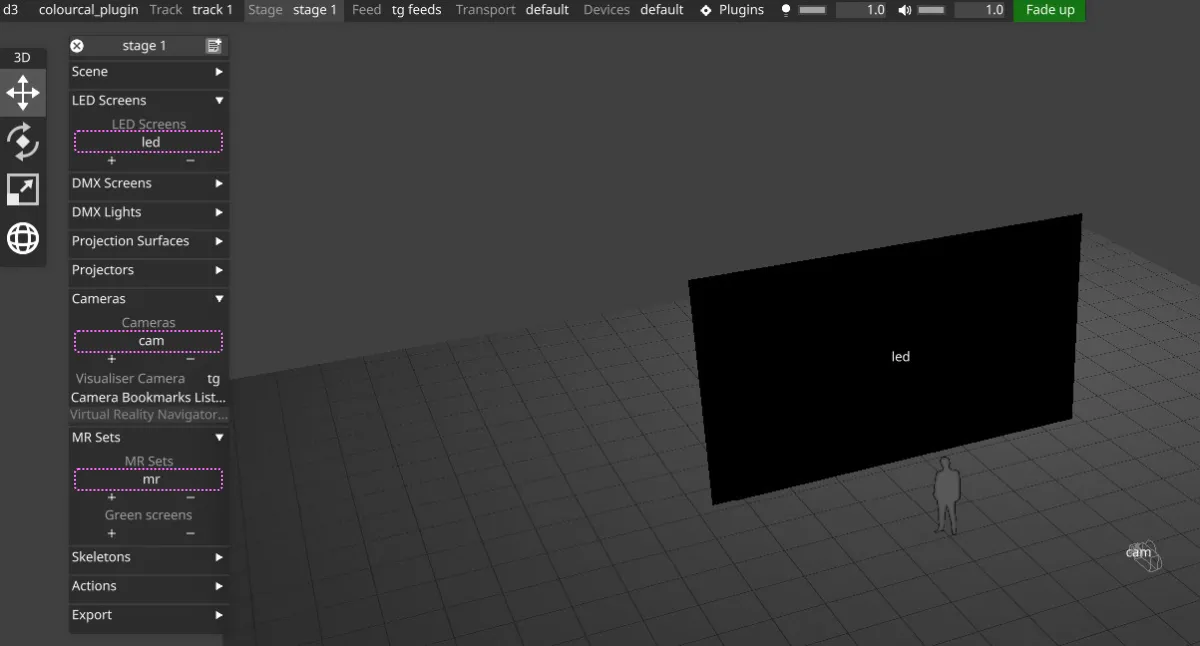
- キャリブレーションに使用するコンポーネントを追加します。
Stage > Cameras— キャリブレーション画像をキャプチャーするカメラ。Stage > LED Screens— キャリブレーションする LED ウォール。Stage > MR Sets— カメラと LED screen をリンクするコンテナ。
- キャリブレーションに使用するコンポーネントを追加します。
- Camera 設定を構成する
- Video Input Patch Editor で Input Transform を設定する
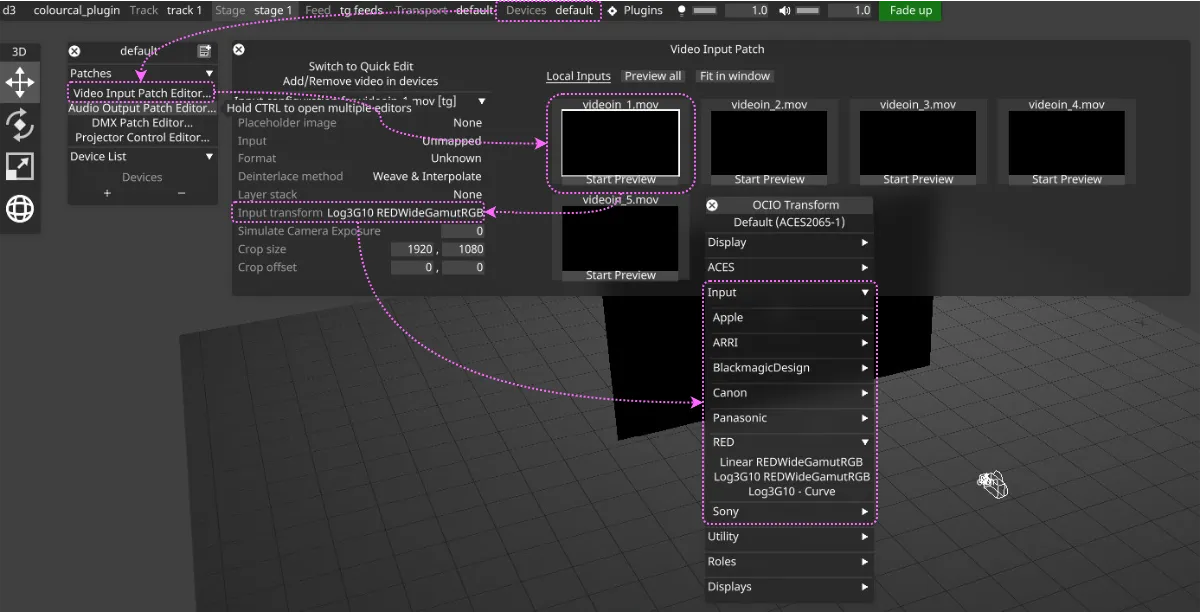
Devices > Video Input Patch Editor...に移動します。- Camera に割り当てる
videoin_[0...9].movを選択します。 - Input transform をカメラのカラースペース(例: RED カメラの場合は
Log3G10 RedWideGamutRGB)に合わせて設定します。 - これにより、キャプチャーされた画像がカラーパイプラインで正しく解釈されます。
- Video Input を Camera に割り当てる
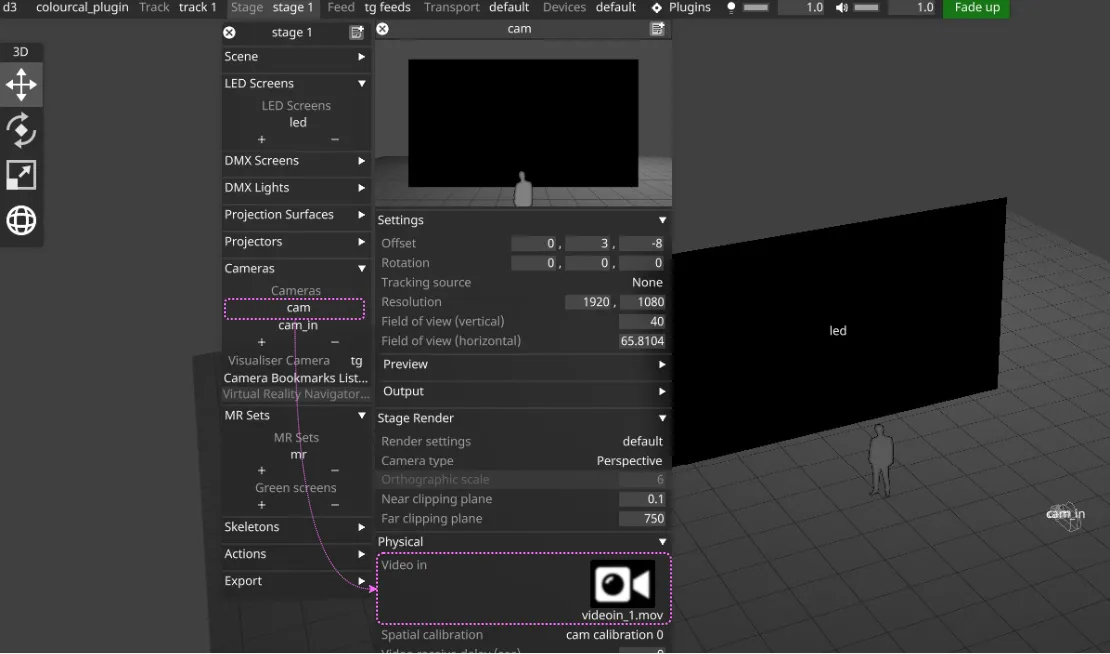
- Stage で Camera ウィジェットを開きます。
- 上で構成した
videoin_[0...9].movソースで Video in を割り当てます。
- Video Input Patch Editor で Input Transform を設定する
- LED Screen 設定を構成する
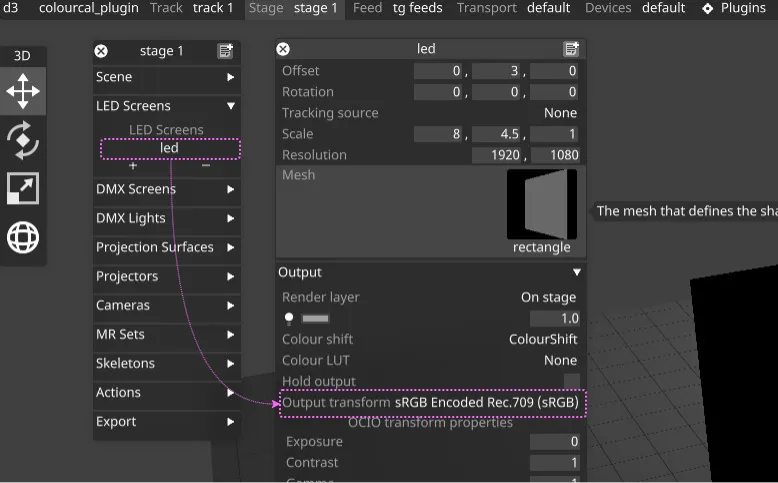
- Stage で LED Screen ウィジェットを開きます。
- Output transform をターゲットガモット(例: Rec.2020、P3)に設定します。
- MR Set 設定を構成する
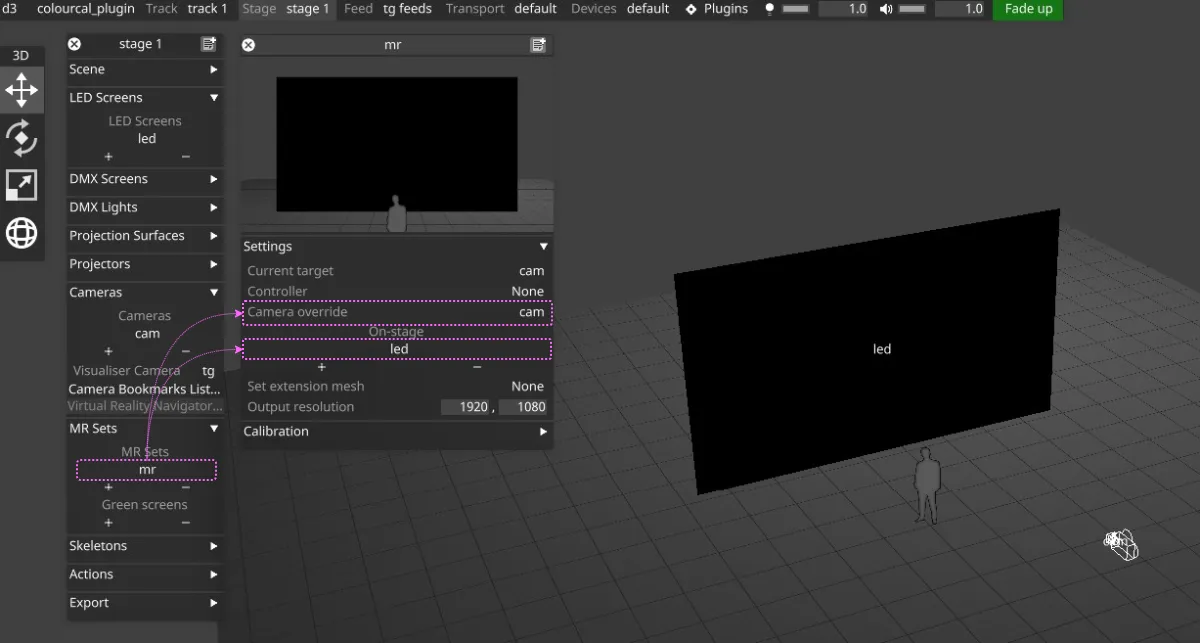
- Stage で MR Set ウィジェットを開きます。
- Camera を割り当てます(
Camera overrideの下)。 - LED Screen を割り当てます(
On-Stageセクションの下)。 - これにより、キャリブレーション用にカメラと LED screen がリンクされます。
- Delay Calibration を完了する
- MR Set に対して Designer Delay Calibration を実行します。
- これにより、カメラのキャプチャータイミングと LED ディスプレイのリフレッシュが同期されます。これは OpenVPCal プラグインが正確なキャリブレーション画像をキャプチャーするために不可欠です。
- リンク先のガイドに従って、Video Receive Delay と Tracker Delay のキャリブレーションを完了します。
- Pre-Calibration ステップを完了する
- Designer Colour Calibration ワークフロー に従います。
- これにより、OpenVPCal キャリブレーションの前にステージが準備され、カメラ/LED 構成が検証されます。
- セットアップを確認する
- OCIO config がプロジェクトのベース設定に設定されている。
- Camera、LED Screen、MR Set が作成され、リンクされている。
- Delay Calibration と Pre-Calibration が正常に完了している。
注意:
enableResourceFileDeletionオプションスイッチが無効になっていると、プラグインが生成した既存のキャリブレーションパターンの上書きが失敗することがあります。その場合は、Designer の Advanced Machine Settings から有効にしてください。
OpenVPCal プラグインのセットアップ
Section titled “OpenVPCal プラグインのセットアップ”- プラグインインターフェースを開く
- Designer で
Plugins > OpenVPCal Plugin。 - またはブラウザで開く:
https://localhost:8000。 - 接続を確認: ステータスフッターにプロジェクト名とともに「Connected」と表示されるはずです。
- 切断されている場合: Designer が実行されているか確認するか、別のネットワークにある場合は Settings で Designer の IP を設定します。
- Designer で
- Settings タブを構成する
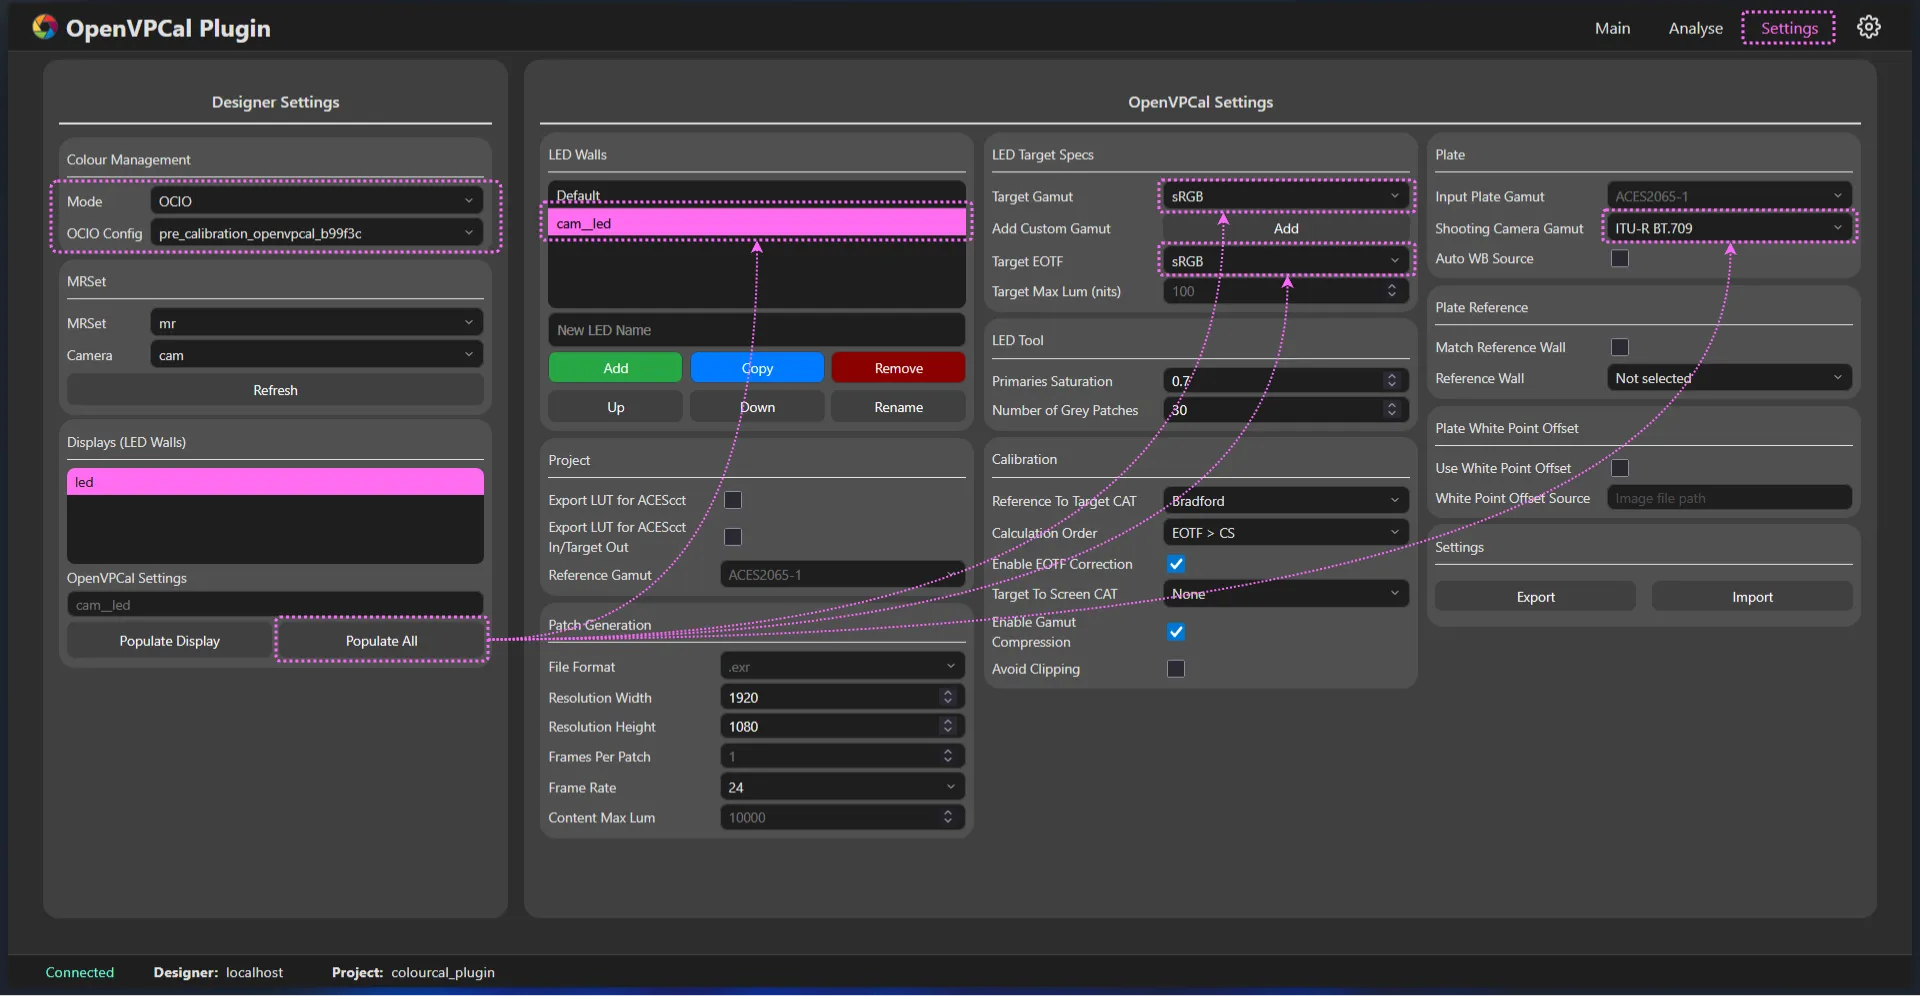
- Mode が
OCIOで、OCIO Config にプロジェクト設定が表示されていることを確認します。 - MRSet、Camera を選択し、Displays リストを確認します。
- Populate All をクリックして、Designer のカラースペースから OpenVPCal の LED ウォール設定を作成します。
- 各ディスプレイに OpenVPCal 設定名(「Missing」ではなく)が表示されていることを確認します。
- 任意: LED Walls ドロップダウンで設定を確認・調整します(Settings タブ を参照)。
- Mode が
- キャリブレーションの操作(順番に従ってください)
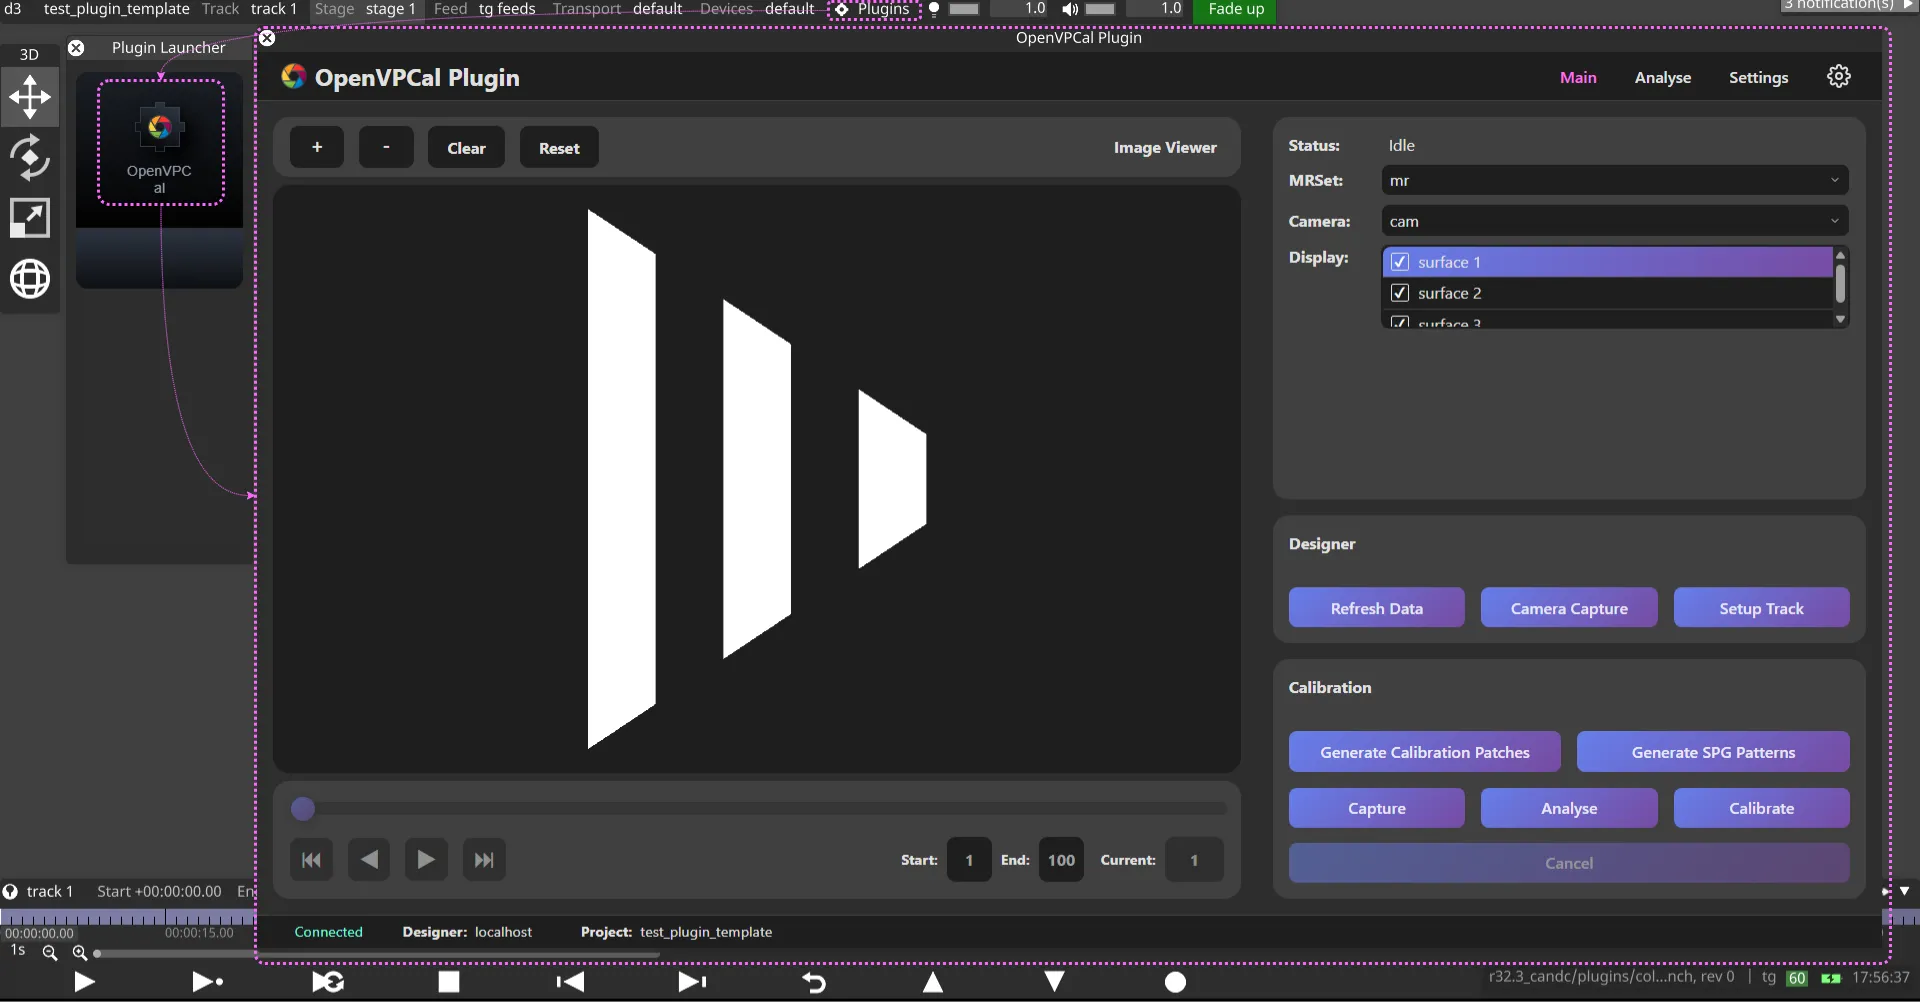
- ディスプレイを選択
- メインタブで、キャリブレーションするディスプレイのチェックボックスをオンにします。
- 注意: チェック済み = キャリブレーション対象、ハイライト = キャンバスプレビューのみ。
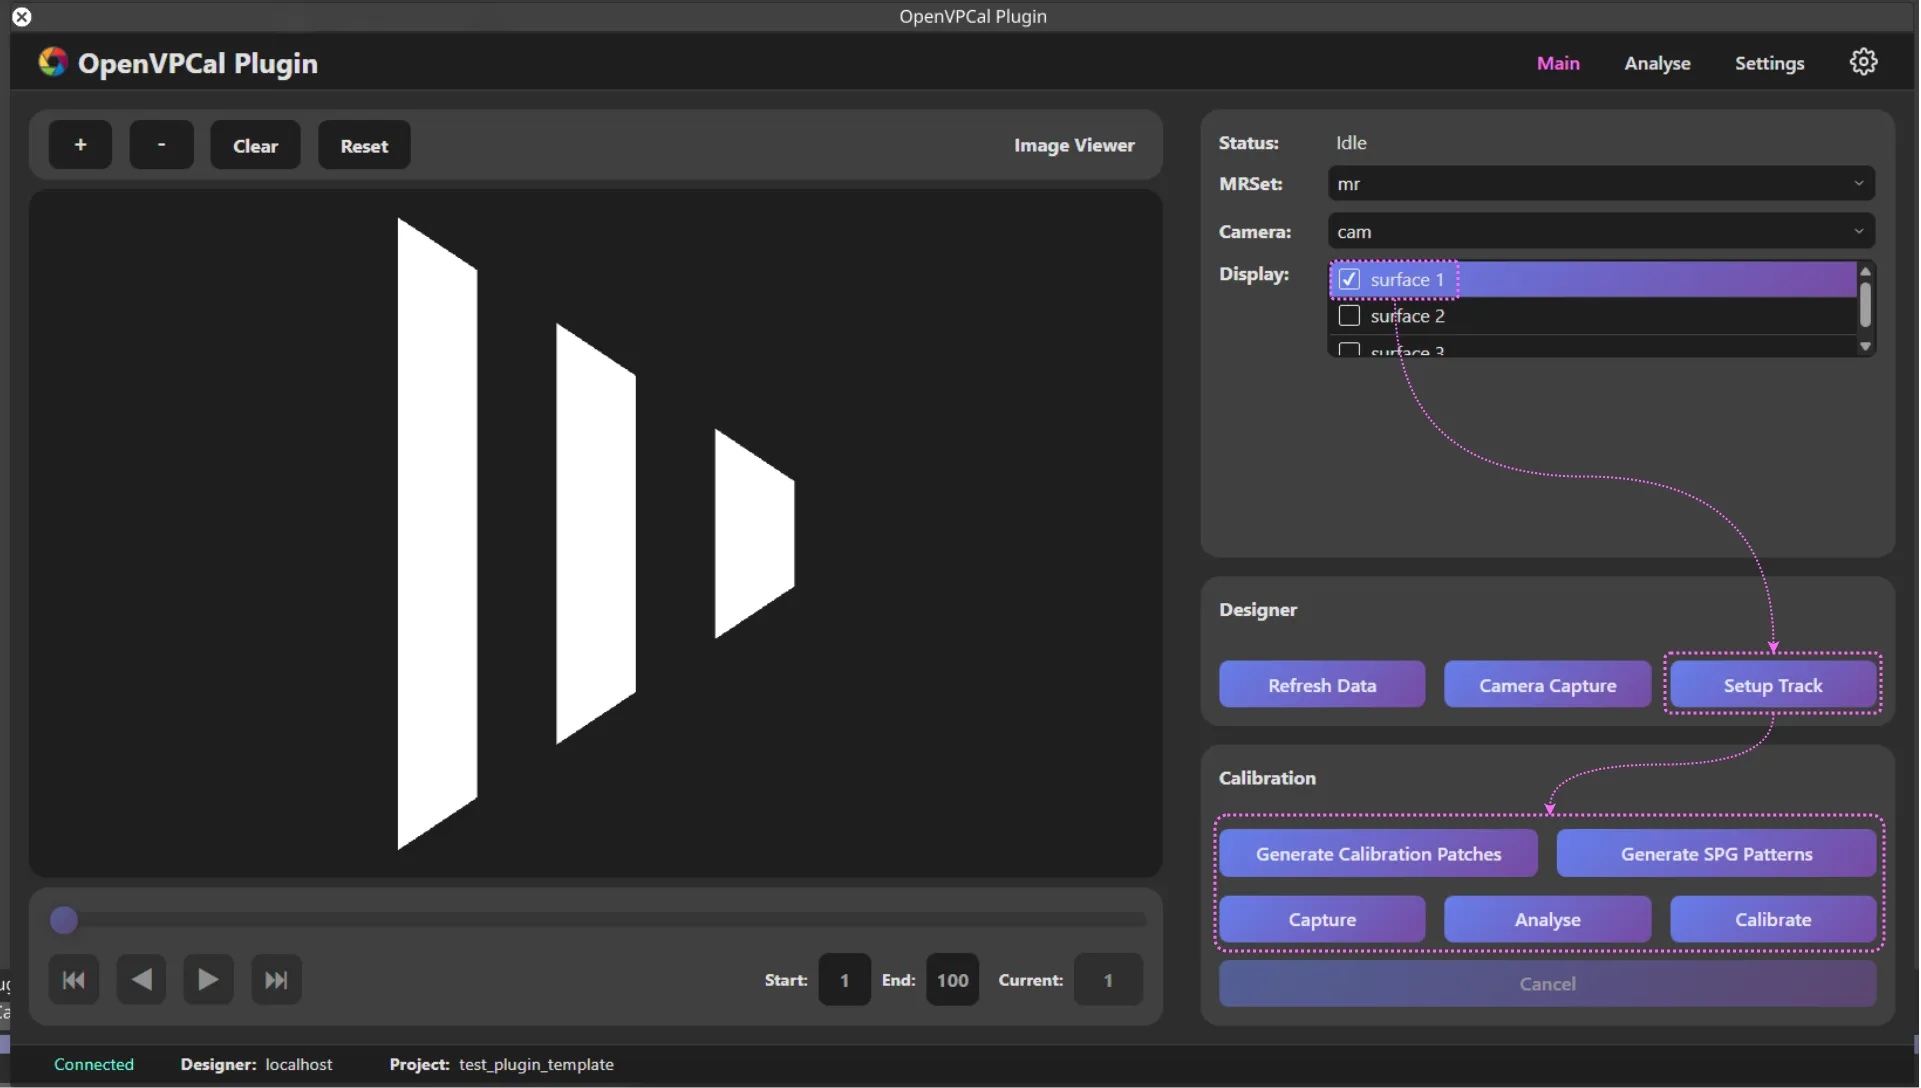
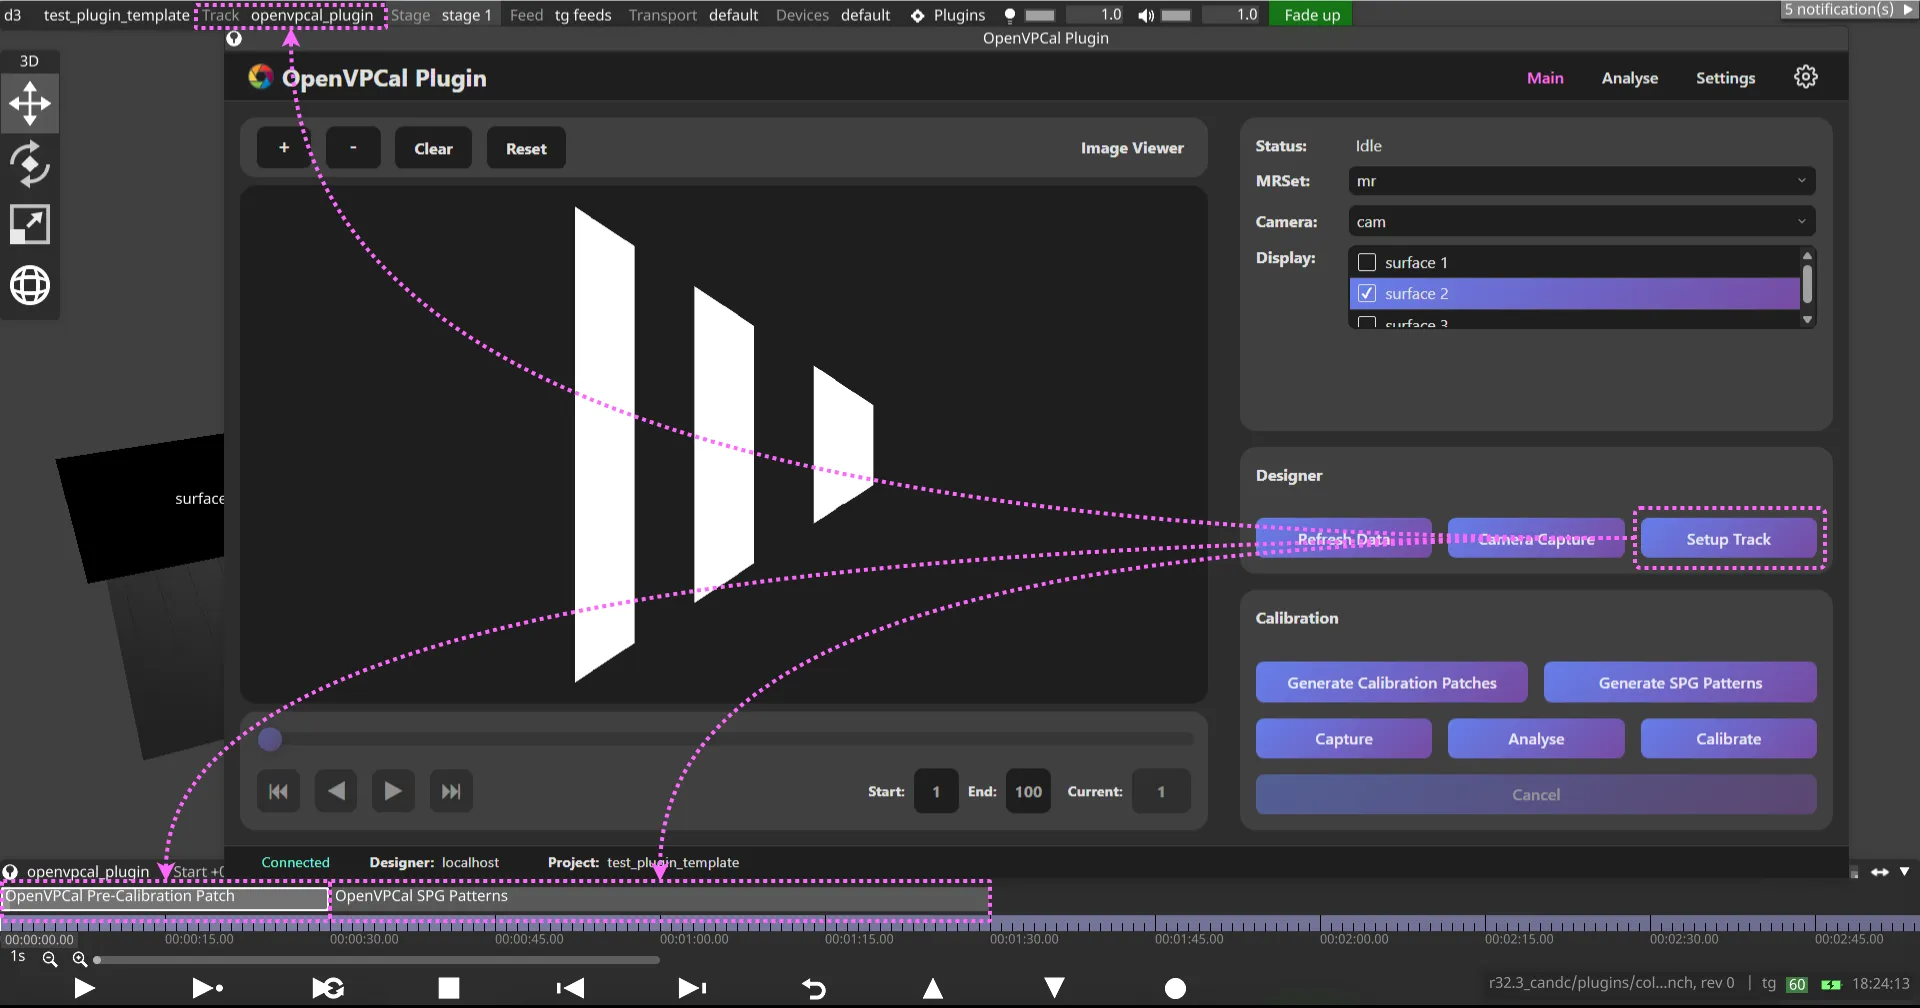
- Setup Track
- Setup Track をクリックして openvpcal_plugin トラックに切り替えます。これにより、Designer に OpenVPCal Pre-Calibration Patch と OpenVPCal SPG Patterns の 2 つのビデオレイヤーが準備されます。
- Setup Track を参照してください。
- [任意] SPG パターンで検証
- LED ウォールで SPG パターンを生成して検査します。
- OpenVPCal SPG ガイド と Generate SPG Patterns を参照してください。
- Generate Calibration Patches
- パッチを生成し、Designer の OCIO 設定を
pre_calibration_openvpcal_<hash>.ocioに更新します。 - トラックが Setup Track で準備されている場合、最初のキャリブレーションパッチが LED ウォールに表示されます。
- 詳しくは Generate Calibration Patches を参照してください。
- パッチを生成し、Designer の OCIO 設定を
- Capture
- チェックされたディスプレイごとに 255 枚の画像をキャプチャーします。
- パターンごとに 5 フレーム ×(21 パターン画像 + 30 グレーパッチ)
- 255 枚未満しかキャプチャーされなかった場合は、キャプチャーを再実行します(キャプチャー済み画像数は Navigation Panel で確認できます)。
- チェックされたディスプレイごとに 255 枚の画像をキャプチャーします。
- Analyse
- キャプチャーした画像を処理し、キャリブレーションのフィードバックを生成します。
- 分析が完了すると、プラグインは自動的に Analyse タブに切り替わり、Analysis Feedback を表示します。
- 進める前にフィードバックを確認してください。
- 解釈については Analyse タブ を参照してください。
- Calibrate
- キャリブレーションを計算し、Designer の OCIO 設定を
post_calibration_openvpcal_<hash>.ocioに更新します。 - 補正された出力トランスフォームをディスプレイに自動的に適用します。
- キャリブレーションが完了すると、プラグインは自動的に Analyse タブに切り替わり、Analysis Feedback を表示します。
- 詳しくは Calibrate を参照してください。
- キャリブレーションを計算し、Designer の OCIO 設定を
- ディスプレイを選択
- キャリブレーション結果を確認する
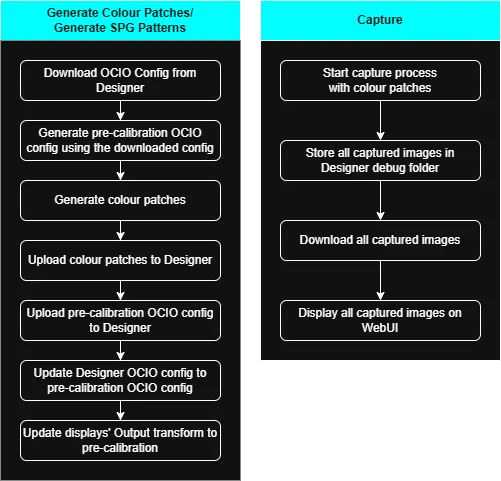
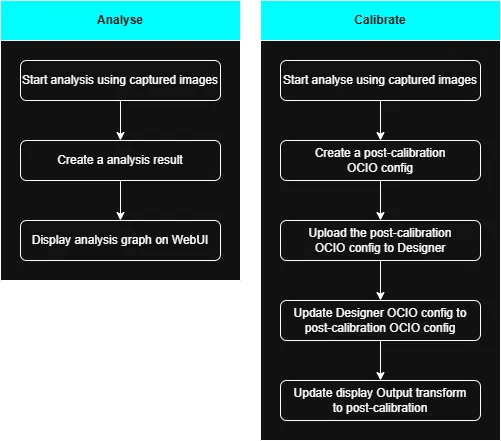
ワークフローの概要
Section titled “ワークフローの概要”次のフローチャートは、メインタブの各ボタンによってトリガーされる処理の概要を示しています。
- Download: Designer からプラグインへデータを転送
- Upload: プラグインから Designer へデータを転送