OSC デバイス
OSC Device は、柔軟なネットワークベースの制御のために Open Sound Control(OSC)メッセージを送受信します。
OSC デバイスの作成
Section titled “OSC デバイスの作成”OSC Device は、他のデバイスタイプと同じ方法で作成します。デバイスの作成手順については デバイスの作成を参照し、デバイスタイプのメニューから OscDevice を選択してください。あるいは、Disguise にはデフォルトで osc 1 という OSC Device が含まれており、Devices マネージャーから選択できます。
OSC Device のプロパティ
Section titled “OSC Device のプロパティ”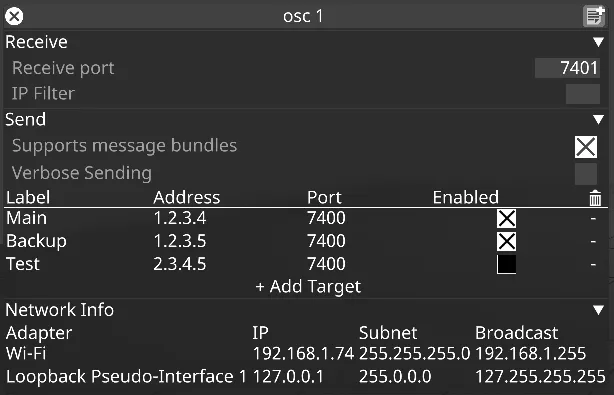
Receive(受信)
Section titled “Receive(受信)”OSC Device は、任意の数のデバイスから 1 つのポートで受信メッセージを受け取ることができます。
Receive port(受信ポート)
Section titled “Receive port(受信ポート)”このプロパティは、受信メッセージのポート番号を指定します。デフォルトはポート 7401 です。
IP アドレスの設定について詳しくは、IP アドレスのセットアップ を参照してください。
IP Filter(IP フィルター)
Section titled “IP Filter(IP フィルター)”このプロパティは、受信 OSC メッセージを IP アドレスでフィルタリングします。設定すると、指定されたアドレスからのメッセージのみが処理されます。空欄のままにするとフィルタリングは行われません。
Send(送信)
Section titled “Send(送信)”OSC Device は、Send Targets ウィジェットで指定できる任意の数のデバイスに送信できます。メッセージはキューに入れられ、フレームごとに 1 回送信されます。
Supports Message Bundles(メッセージバンドル対応)
Section titled “Supports Message Bundles(メッセージバンドル対応)”設定すると、デバイスはキューに入れられたすべてのメッセージを個別に送信する代わりに、1 つのバンドルで送信します。
Verbose Sending(冗長送信)
Section titled “Verbose Sending(冗長送信)”設定すると、デバイスは送信するすべてのメッセージをコンソールにログ記録します。ほとんどまたはすべてのフレームで送信することが予想されるデバイスでは、これをオフにすることを推奨します。
Send Targets(送信ターゲット)
Section titled “Send Targets(送信ターゲット)”このテーブルでは、OSC メッセージを送信する 1 つ以上のターゲットを指定できます。
Label(ラベル)
Section titled “Label(ラベル)”これは便宜上の人間が読める名前です。ホスト名ではなく、アドレス指定には使用されません。
Address(アドレス)
Section titled “Address(アドレス)”メッセージの送信先となるマシンの IP アドレスです。
Port(ポート)
Section titled “Port(ポート)”メッセージの送信先となるマシンのポートです。デフォルトでは 7400 に設定されています。
Enabled(有効)
Section titled “Enabled(有効)”チェックすると、このターゲットにメッセージが送信されます。
Trash(削除)
Section titled “Trash(削除)”この列では、デバイスから送信ターゲットを削除できます。
Network Info(ネットワーク情報)
Section titled “Network Info(ネットワーク情報)”このテーブルは、参照用に、ローカルマシン上の接続されたすべてのネットワークインターフェースカードのアダプター名と IP アドレスを表示します。
OSC Transport Control(OSC トランスポートコントロール)
Section titled “OSC Transport Control(OSC トランスポートコントロール)”タイムライン上で OSC エクスプレッションを使用する方法については、OSC Transport Control ページを参照してください。
OSC アプリケーション
Section titled “OSC アプリケーション”iOS 向けに、OSC メッセージを送信できるアプリケーションがいくつかあります。推奨する 2 つのアプリケーションは Liine by Lemur と TouchOSC by hexler.net です。
TouchOSC と Lemur のレイアウトの例をダウンロードするには、OSC Downloads ページにアクセスしてください。
OSC によるレイヤープロパティの制御
Section titled “OSC によるレイヤープロパティの制御”OSC エクスプレッションを使用してレイヤープロパティを制御する方法については、OSC によるレイヤープロパティの制御 ページを参照してください。
ワークフローの例
Section titled “ワークフローの例”OSC を通じて Disguise を制御するデバイスのセットアップ
Section titled “OSC を通じて Disguise を制御するデバイスのセットアップ”- Disguise Resources ページから Lemur レイアウトの例をダウンロードします。
- Designer にコマンドを送信する iPhone デバイスに Lemur アプリケーションをダウンロードします。
- Lemur レイアウトを iPhone にインポートします。Mac コンピューターを使用している場合は、レイアウトを iPhone に AirDrop すると自動的に Lemur にインポートされます。それ以外の場合は、Lemur アプリの設定から手動で行えます。
- Disguise サーバーを使用している場合は、OSC デバイスがコマンドを送信するサーバーの IP を割り当てるようにネットワーク設定を構成します。Designer マシンを使用している場合は、Wi-Fi 接続に接続できます。
- Disguise プロジェクトを実行します。
- Devices エディターを右クリックします。
- + アイコンを押して新しいデバイスを作成するか、デフォルトで読み込まれた
osc 1デバイスを追加します。 - デバイス名を右クリックして、ネットワーク設定を開きます。
- Send タブの下で、Disguise がコマンドを送信する Send Target を追加します。Lemur アプリケーションでは、この IP はアプリの設定で “Lemur IP” としてアクセスできます。
- Lemur の設定で、OSC ホストをマシンの IP アドレスに設定します。これは OSC デバイスウィンドウの Adapter タブに反映されます。
- Receive タブの Port フィールドの下で、Lemur アプリがコマンドを送信するポート番号を割り当てます。これは Lemur の OSC 設定に反映される番号です。
- Lemur プロファイルから OSC コマンドを切り替えて、OSC デバイスのインジケーターが緑色になるか確認します。これで接続が確立されたことを確認できます。
- OSC デバイスにリンクした OSC Tester デバイスを作成して、接続が確立されたことを確認することもできます。