Depth Map Mapping
Depth Map Mapping は、デプスマップの画像または映像を Depth Map Mesh に適用します。
入力は 白黒のデプスマップ である必要があり、ピクセルの明るさが画像内のオブジェクトの 相対的な深度 を表します。マッピングされると、メッシュの頂点の z 位置が深度値に基づいて動的に変形します。
Depth Map Mapping の使用
Section titled “Depth Map Mapping の使用”- 新しい Depth Map Mesh を作成し、対象のスクリーンに割り当てます。
- デプスマップを生成するレイヤー(例えば Video レイヤー)をトラックに追加します。
- マッピング構成内の Screens 一覧に対象のスクリーンを追加します。
- 適用されたデプスマップのコンテンツに基づいて、スクリーンのメッシュが動的に更新されることを確認します。
共通のマッピングプロパティ
Section titled “共通のマッピングプロパティ”このセクションでは、さまざまなマッピングタイプ間で共有されるプロパティを説明します。
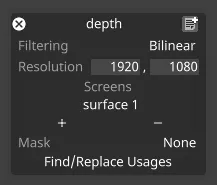
Filtering(フィルタリング)
Section titled “Filtering(フィルタリング)”-
Nearest: 最近傍フィルタリング。最近傍サンプリングを使用し、スケーリング時のピクセル間のブレンドを無効にします。ピクセル化された見た目を作成したり、特定の種類のコンテンツでハードエッジを確保したりするために使用できます。
-
Bilinear: バイリニアフィルタリングは、実際のサイズより大きく、または小さく表示する際にテクスチャを滑らかにするために使用されるテクスチャフィルタリング手法です。
-
2x Multi-sample: マルチサンプルフィルタリングは、スケーリングされたコンテンツの問題を修正するのに役立ちますが、多少のぼかしが生じることがあります。
Resolution(解像度)
Section titled “Resolution(解像度)”これは、レイヤーがレンダリングするキャンバスのサイズをピクセル単位で制御します。ダイレクトマッピングタイプは 256x256 ピクセルのキャンバスから始まり、最初に追加したスクリーンのサイズに合わせてキャンバスサイズを自動的に設定します。
Screens(スクリーン)
Section titled “Screens(スクリーン)”選択したマッピングタイプがコンテンツをコピーできるスクリーンの一覧です。
- + を左クリックして Screens マネージャーを開きます。
- + を左クリックして、マッピングしたいスクリーンを追加します。これにより、個々のキャンバスコンテンツがこれら 3 つのスクリーンへ同時にコピーされ、マッピングオブジェクトエディターにスクリーン名が追加されます。
- マッピングオブジェクトエディターに一覧表示されたスクリーンを左クリックして - へドラッグします。これにより、スクリーンからキャンバスコンテンツが削除され、マッピングオブジェクトエディターからスクリーン名が削除されます。
Mask(マスク)
Section titled “Mask(マスク)”これは、Mask ビットマップを定義する Texture ファイルを指します。このプロパティを使って、マッピングキャンバスに Mask ビットマップを適用できます。このプロパティを選択すると Texture オブジェクトライブラリが開き、ローカルハードドライブの DxTexture フォルダーに保存されているすべての静止画像ファイルが表示されます。
マッピングマスクを適用するには、カスタムの静止画像ファイルを作成してインポートする必要があります。
-
カスタム Population マスクの作成とインポートの手順は、カスタムマッピングマスクの作成にも使用できます。唯一の違いは、マッピングマスクの解像度をマッピングキャンバスと同じにする必要がある点です。Population マスクを d3 プロジェクトに作成してインポートする手順については、[スクリーンの編集] (../content/docs/ja/designer/stage-setup/screens/screen-editor) のサブチャプターの「Population mask」のセクションを参照してください。
-
あるいは、任意のレイヤーのブレンドモードを mask に設定して、レイヤーのコンテンツをマッピングマスクへ流し込むこともできます。
Find/Replace Usages(使用箇所の検索/置換)
Section titled “Find/Replace Usages(使用箇所の検索/置換)”プロジェクト内で現在のマッピングが使用されているすべての箇所を検索し、それらを別のマッピングに置き換えられるようにします。置換は、シーケンス化された、Sockpuppet 化されていないマッピングに対してのみ機能する点に注意してください。