Porta Manager 概要
Porta Manager は、Porta On Prem インストールを管理するための Web ベースのインターフェースです。Porta On Prem をインストールおよび更新するためのインストーラーウィザードに加え、Porta とそのマシンを管理する使いやすいツールを提供します。
Porta Manager の実行には、Porta VM の基本要件以外に追加の要件はありません。基本要件は次のとおりです。
- 最新の Porta On Prem 仮想マシンリリースの zip ファイル。
- この zip には
setup_vm.ps1スクリプトと.ovaVM イメージファイルが含まれます。 - イメージは
.ovaファイルで、VirtualBox にインポートできる仮想マシンイメージです。 - イメージは、Docker と Porta Manager がインストール済みの、設定済み Ubuntu イメージです。
- この zip には
- VirtualBox 7.1.8 がインストールされていること。
- 最新の Porta On Prem アプリケーションの zip ファイル。
- データベースレプリケーションを実行する場合は、最低 3 台の物理マシン。
| コンポーネント | 仕様 |
|---|---|
| Windows 11 64-bit | |
| VirtualBox 7.1.8 | |
| Intel i7 第 4 世代(必須: AVX2 対応 CPU) | |
| 8GB RAM | |
| 100GB 以上の空きディスク容量 |
- Porta 構成管理: マシンの IP アドレスなど、Porta On Prem の技術設定を保存・管理するためのツール。
- Porta インストールウィザード: Porta On Prem のインストールを支援するステップバイステップガイド。
- ダッシュボード: Porta On Prem インストールのステータスを管理・監視する中央ハブ。
- ヘルパー: 一般的な管理タスクを支援する使いやすいツール。
- ロギング: Porta Manager を通じて実行されたインストール、更新、その他の管理アクションのさまざまなログ。
アーキテクチャ
Section titled “アーキテクチャ”Porta Manager は Porta 仮想マシン(Ubuntu 24.04 サーバー)とともにデプロイされ、Docker を使用して実行されます。
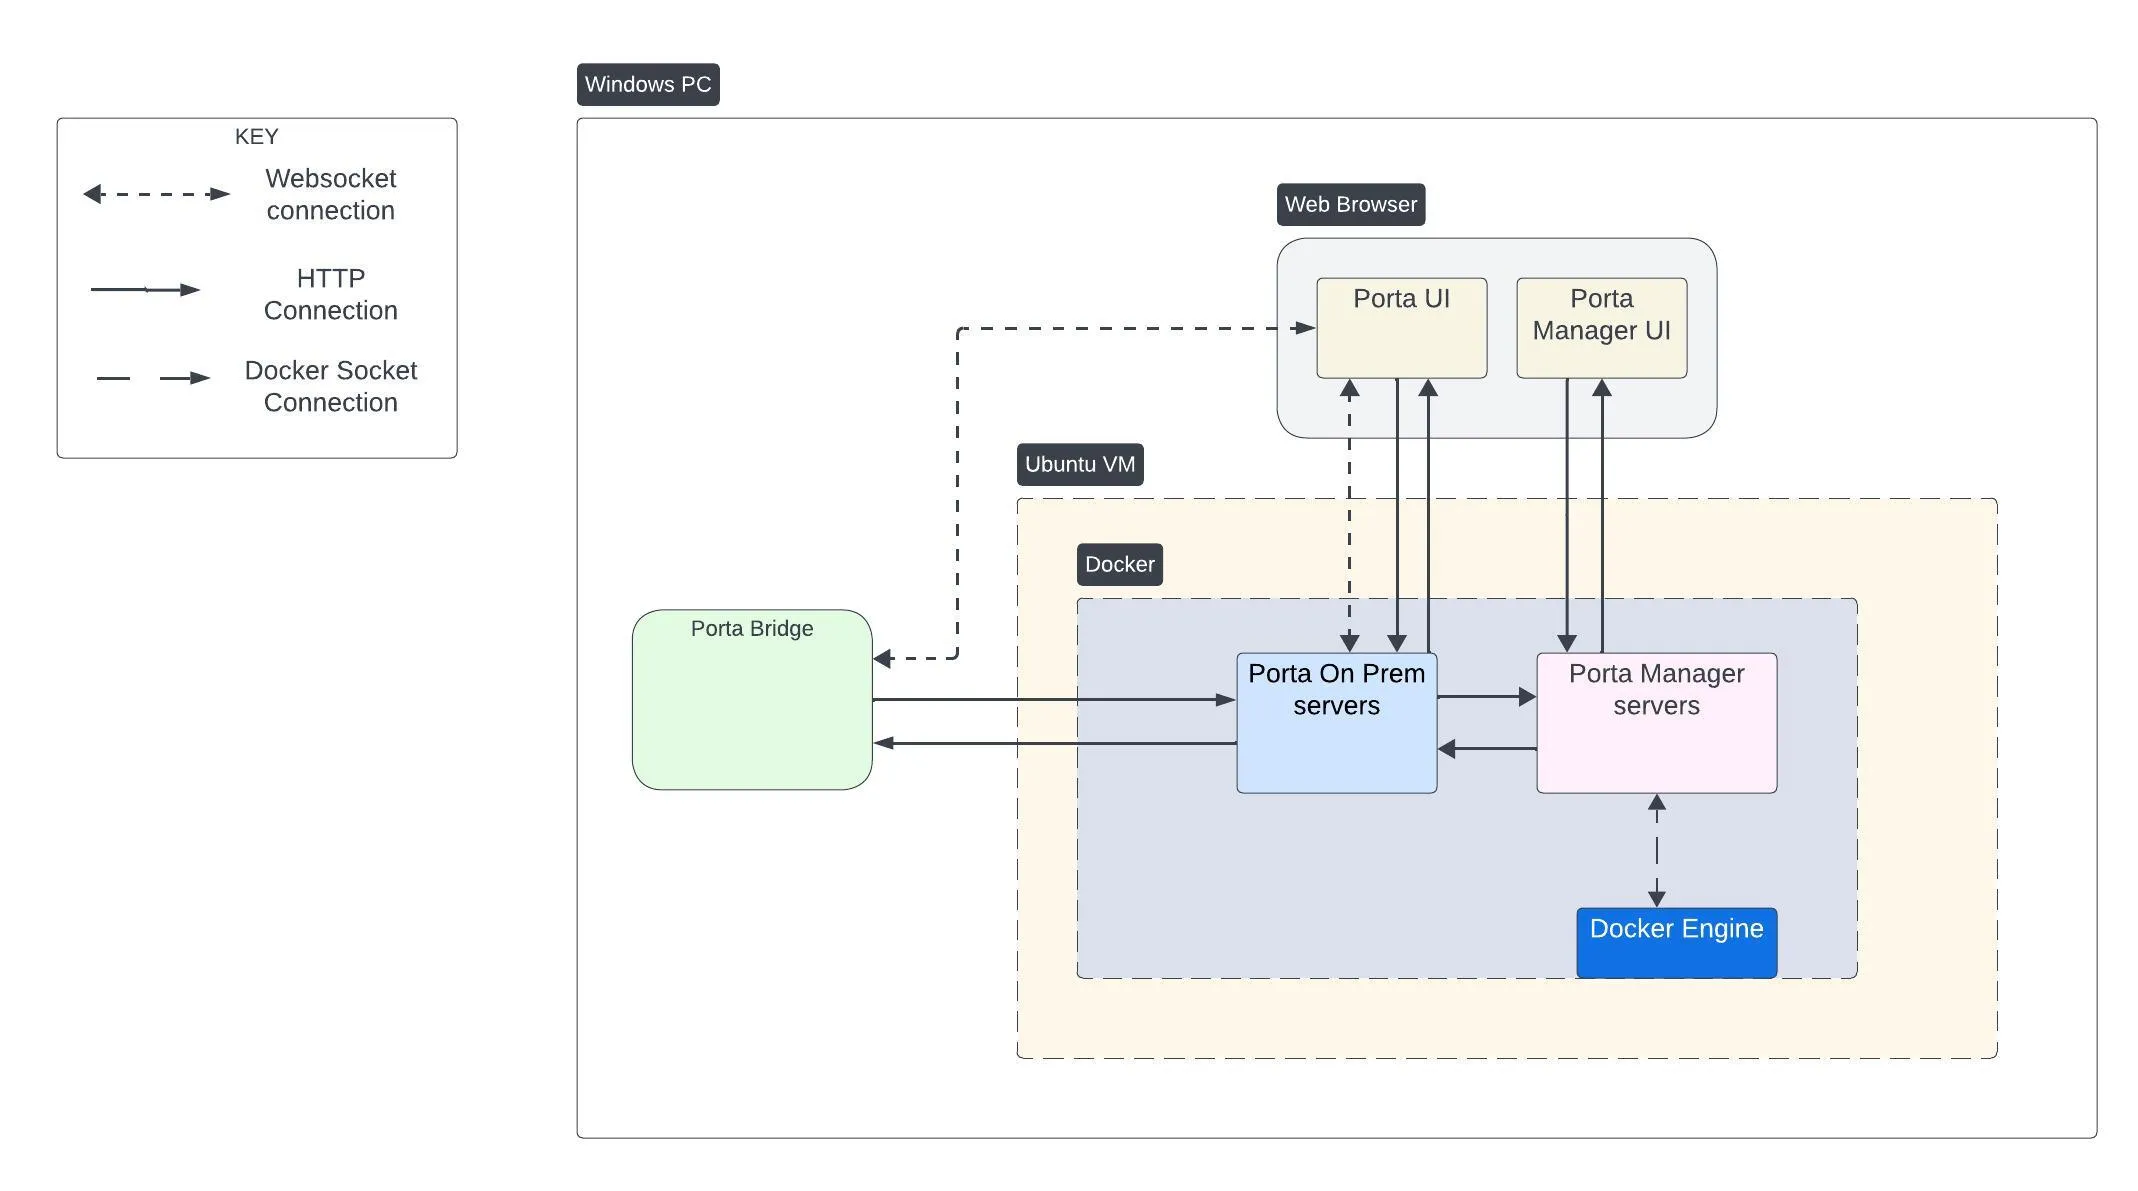
Docker コンテナ
Section titled “Docker コンテナ”Porta Manager はサービスの実行に Docker コンテナを使用します。これらのコンテナ名にはしばしば -1 が付加され(例: porta-manager-app-1)、基本名は次のとおりです。
porta-manager-app コンテナ
Section titled “porta-manager-app コンテナ”| 役割 | Porta Manager Web アプリケーション |
|---|---|
| 説明 | Porta On Prem を管理するためのユーザーインターフェースを提供する Porta Manager Web アプリケーションを実行します。ブラウザで Porta Manager にアクセスする際に操作するのがこれです。 |
| Published Ports | 88 |
porta-manager-horizon コンテナ
Section titled “porta-manager-horizon コンテナ”| 役割 | Porta Manager Horizon(キュー)サービス |
|---|---|
| 説明 | インストーラーウィザードの処理など、キューに入れられたジョブを処理する長時間実行プロセス。 |
| Published Ports | なし |
porta-manager-task コンテナ
Section titled “porta-manager-task コンテナ”| 役割 | Porta Manager スケジュールタスクサービス |
|---|---|
| 説明 | スケジュールされたバックグラウンドタスクを処理する長時間実行プロセス。 |
| Published Ports | なし |
porta-manager-db コンテナ
Section titled “porta-manager-db コンテナ”| 役割 | Porta Manager データベースサーバー |
|---|---|
| 説明 | Porta Manager の MySQL データベースサーバー。 |
| Published Ports | 3310 |
porta-manager-redis コンテナ
Section titled “porta-manager-redis コンテナ”| 役割 | Porta Manager Redis サーバー |
|---|---|
| 説明 | 主にキャッシュドライバーおよびジョブキューとして使用される Redis サーバー。 |
| Published Ports | 6378 |
Porta Manager の更新
Section titled “Porta Manager の更新”最新の Porta Manager は Porta VM にプリインストールされていますが、更新が必要な場合は、次の手順に従って更新できます。
- Windows PowerShell または Terminal を開きます。
- SSH を使用して Porta VM に接続します(以下のコマンドをご自身の値に置き換えてください)。
portavmは接続するユーザー名です。VM-IPはネットワーク上の VM の IPv4 アドレスです。
Terminal window ssh portavm@<VM-IP>- 例:
Terminal window ssh portavm@192.168.50.9
- 次のコマンドを実行して Porta Manager を更新します。
Terminal window update_manager - ターミナルに、既存のマネージャーのシャットダウンと、インストール可能なバージョン一覧の取得に関する情報が表示され始めます。続いて、利用可能なバージョンの一覧が表示されます。
- インストールしたいバージョンに対応する番号を入力し、
Enterを押して選択します。 - スクリプトは、選択した Porta Manager のバージョンのダウンロードと解凍に進みます。
- 新しいバージョンの解凍と読み込みの後、スクリプトはこれがインストールしたいバージョンであることの確認を求めます。対応する番号を入力し、
Enterを押してバージョンを確認します。 - その後、更新が完了し、Porta Manager が起動して、オンラインになるまで待機します。
- 更新が完了したら、Web ブラウザを開いて
http://<VM-IP>:88に移動することで Porta Manager にアクセスできます。<VM-IP>は実際の Porta VM の IP アドレスに置き換えてください。