Porta On Prem WSL データの新しい場所への移行
このガイドでは、Porta On Prem 用の WSL 仮想ディスクをシステム上の新しい場所へ移行する手順を説明します。
1. 仮想ディスクをバックアップする
Section titled “1. 仮想ディスクをバックアップする”まず、問題が発生した場合に備えて復元ポイントを確保するため、データベースのバックアップを作成します。
- システムトレイを使用して Docker Desktop をシャットダウンします。
- Docker のシャットダウンが完了したら、PowerShell を開きます。
wsl --shutdownを実行して、すべてのディストリビューションを停止します。wsl -l -vを実行し、docker ディストリビューションが停止していることを確認します。成功した出力は次のようになります。NAME STATE VERSION* Ubuntu-22.04 Stopped 2docker-desktop-data Stopped 2docker-desktop Stopped 2docker-desktop-dataディストリビューションを.tarファイルにエクスポートします。-
PowerShell を 管理者として 開きます。
-
次を実行して、
docker-desktop-dataが存在し停止していることを確認します。Terminal window wsl -l -v成功した出力は次のようになります。
NAME STATE VERSION* Ubuntu-22.04 Stopped 2docker-desktop-data Stopped 2docker-desktop Stopped 2 -
PowerShell で次のコマンドを実行して、
docker-desktop-dataディストリビューションを.tarファイルにエクスポートします。- コマンド内で、
D:\path\to\backupを希望のバックアップディレクトリに置き換えてください。- このディレクトリはエクスポート前にすでに存在している必要があります。必要に応じて新しいディレクトリを作成してください。
- エクスポート先に十分な空きディスク容量があることを確認してください。
- 仮想ディスクが大きい場合、エクスポートには時間がかかることがあります(5〜15 分程度)。
-
Terminal window wsl --export docker-desktop-data D:\path\to\backup\docker-desktop-data.tar
- コマンド内で、
-
次の行に
PS C:\Users\username>プロンプトが再び表示されたら、エクスポートは完了です。
-
- バックアップファイルが正常に作成されたことを確認します。
- ステップ 2 で指定したバックアップディレクトリに移動します。
docker-desktop-data.tarファイルが存在することを確認します。- ファイルサイズが 0 バイトより大きいことを確認します。
2. ターゲットドライブが NTFS でフォーマットされていることを確認する
Section titled “2. ターゲットドライブが NTFS でフォーマットされていることを確認する”- エクスプローラーで
This PCに移動します。 - 復元先のドライブを右クリックし、コンテキストメニューから
propertiesを選択します。 - 開いたウィンドウで
File systemプロパティを確認します。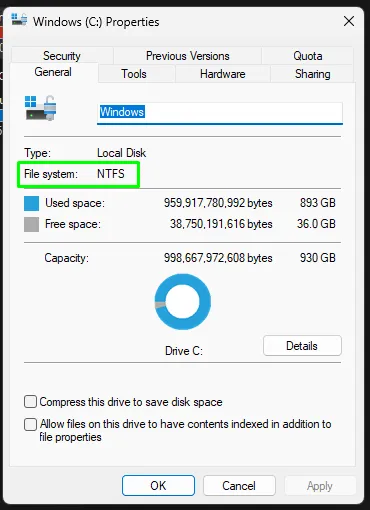
3. 既存の仮想ディスクの場所を確認する
Section titled “3. 既存の仮想ディスクの場所を確認する”- エクスプローラーで
%LOCALAPPDATA%\Docker\wsl\dataに移動し、ext4.vhdxという名前の既存の仮想ディスクファイルを見つけます。 - Docker Desktop の Settings > Resources > Advanced で
Disk image locationを確認することもできます。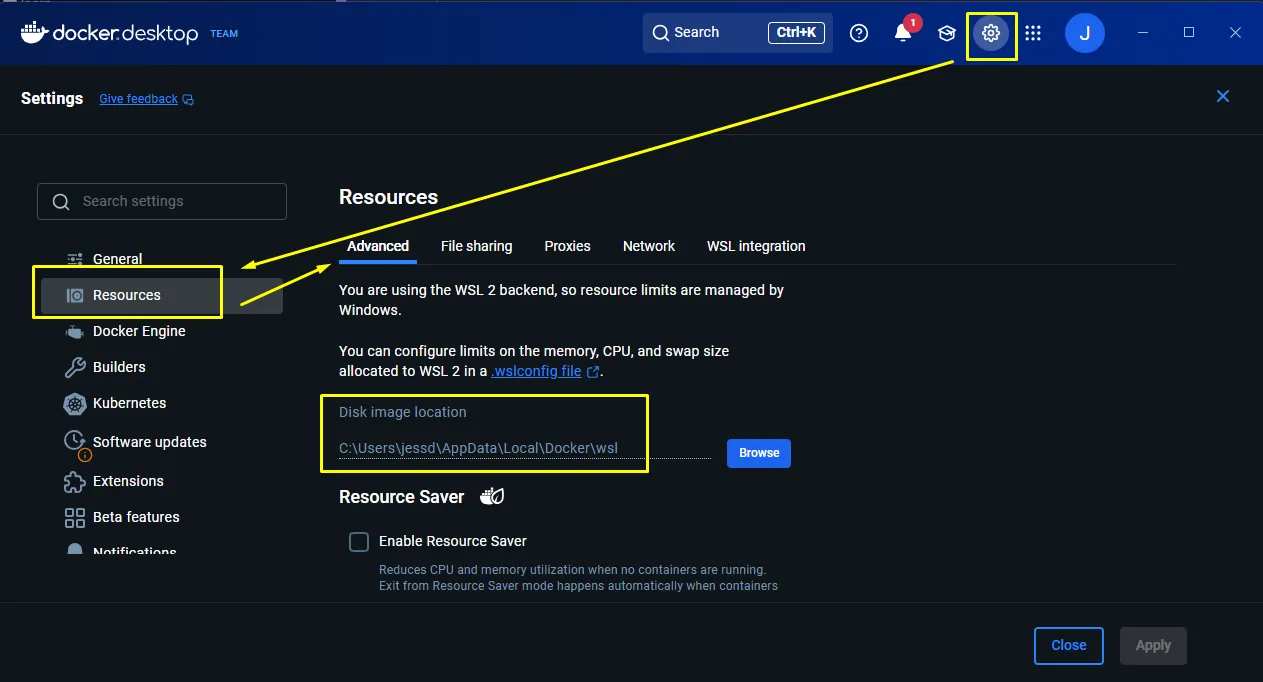
- 後でコピーして使用できるよう、このパスをメモします。
4. Docker Desktop をシャットダウンする
Section titled “4. Docker Desktop をシャットダウンする”- システムトレイを使用して Docker Desktop を終了します。
- PowerShell を開きます。
wsl --shutdownを実行して、すべてのディストリビューションを停止します。wsl -l -vを実行し、docker ディストリビューションが停止していることを確認します。成功した出力は次のようになります。NAME STATE VERSION* Ubuntu-22.04 Stopped 2docker-desktop-data Stopped 2docker-desktop Stopped 2
5. 既存の docker-desktop-data ディストリビューションを登録解除(削除)する
Section titled “5. 既存の docker-desktop-data ディストリビューションを登録解除(削除)する”-
PowerShell を 管理者として 開きます。
-
次を実行して、
docker-desktop-dataが存在し停止していることを確認します。Terminal window wsl -l -v成功した出力は次のようになります。
NAME STATE VERSION* Ubuntu-22.04 Stopped 2docker-desktop-data Stopped 2docker-desktop Stopped 2 -
PowerShell で次のコマンドを実行して、
docker-desktop-dataディストリビューションを登録解除(削除)します。Terminal window wsl --unregister docker-desktop-data -
確認メッセージは表示されませんが、
wsl -l -vを再度実行して削除されたことを確認できます。- 出力に
docker-desktop-dataがもう一覧表示されないはずです。
NAME STATE VERSION* Ubuntu-22.04 Stopped 2docker-desktop Stopped 2 - 出力に
-
Windows エクスプローラーでディスクの場所(おそらく
%LOCALAPPDATA%\Docker\wsl\data)を確認し、ext4.vhdxファイルが削除されたことを確認することもできます。
6. 仮想ディスクを新しい場所に復元する
Section titled “6. 仮想ディスクを新しい場所に復元する”バックアップが作成できたので、仮想ディスクを新しい場所に復元できます。
-
データを復元するフォルダがすでに存在することを確認します(例:
%LOCALAPPDATA%\Docker\wsl\dataまたはD:\wsl\docker-desktop-data)。 -
バックアップ
.tarファイルからデータをインポートして、docker-desktop-dataディストリビューションを復元します。- PowerShell を開きます。
- 次のコマンドを実行してバックアップをインポートします。
D:\path\to\backupをバックアップファイルへのパスに置き換えてください。D:\path\to\restore\folderを復元先ディレクトリへのパスに置き換えてください。
Terminal window wsl --import docker-desktop-data "D:\path\to\restore\folder" "D:\path\to\backup\docker-desktop-data.tar" --version 2 - 次の行に
PS C:\Users\username>プロンプトが再び表示されたら、インポートは完了です。
-
インポートが完了したら、PowerShell を開いて次を実行し、ディストリビューションが WSL で認識されていることを確認します。
Terminal window wsl -l -v成功した出力は次のようになります。
NAME STATE VERSION* Ubuntu-22.04 Stopped 2docker-desktop-data Stopped 2docker-desktop Stopped 2 -
Docker Desktop を再度起動します。新しくインポートされた
docker-desktop-dataディストリビューションを見つけて使用するはずです。 -
Docker の起動後、PowerShell で
docker imagesまたはdocker volume lsコマンドをすばやく実行し、イメージ/ボリュームがまだ存在することを確認します。 -
これで、すべて正常に戻っているはずです。