Trusses and Mounting
Trusses, bases and the mounting workflow let you build the physical rigging plot alongside the projection design. Projectors and LED tiles attach to a truss by clamp position and hang direction; deleting or moving the truss carries everything mounted on it.
Object types
Section titled “Object types”- Truss: a rigging member with a procedural chord-polyline geometry. Seven shapes are supported: Tower, Horizontal Span, Goal Post, A-Frame, Ladder, Arc, Ring. Each truss owns a chord profile (e.g. Square 12” Truss) drawn from the catalogue.
- Base: a procedural box that sits under a Tower / Goal Post / A-Frame, or stands alone as a load-spreader. Sizes are driven by a footprint in mm.
Trusses and bases live in the Scene panel as first-class objects with their own type-dot colour.
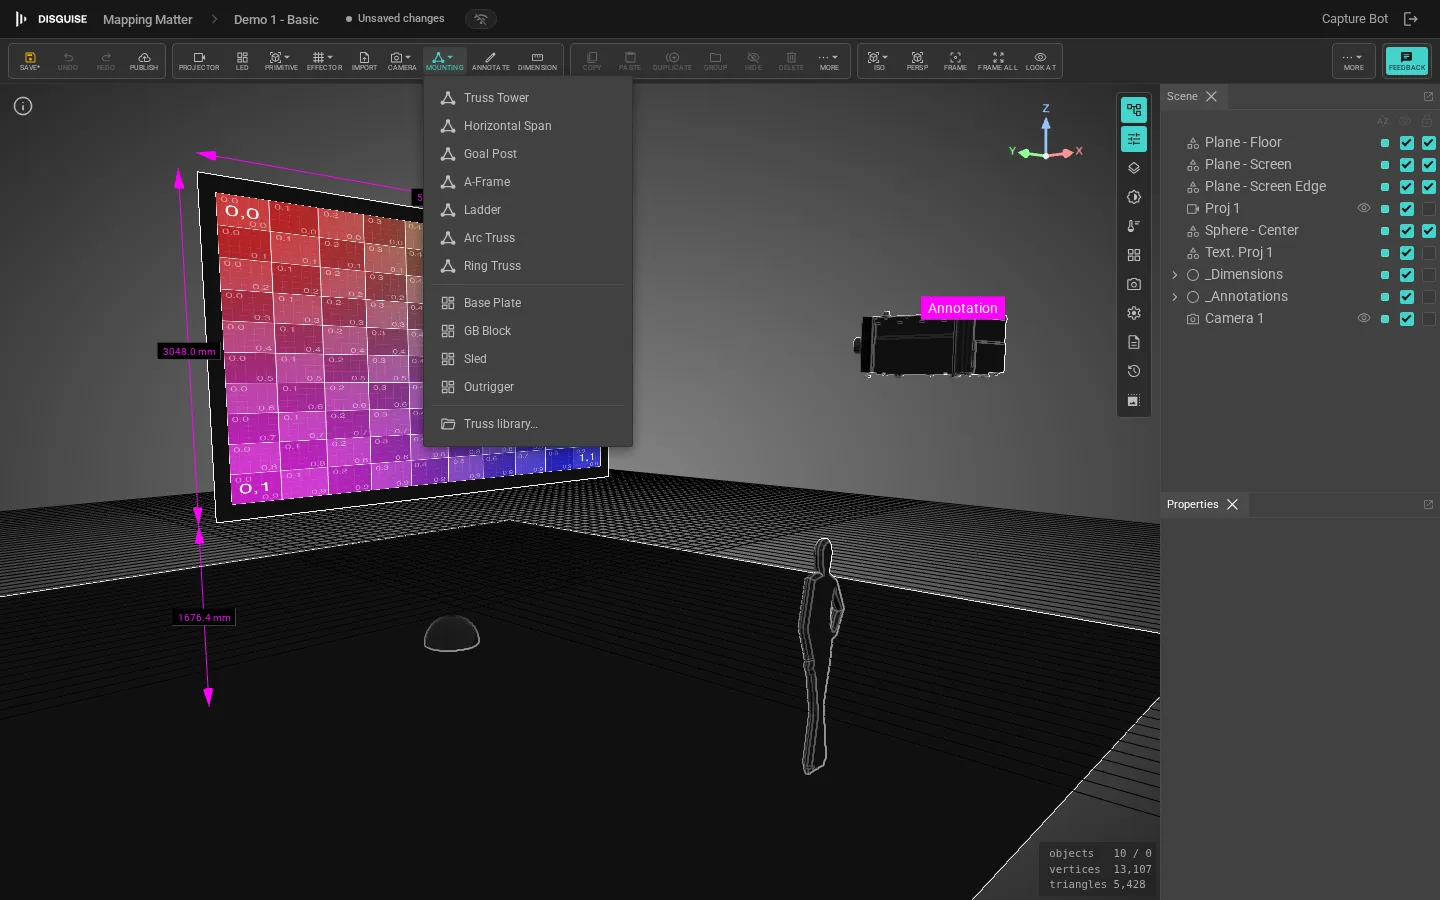
Add a truss or base
Section titled “Add a truss or base”Click Mounting in the viewport toolbar’s add cluster to open the popover. Pick one of:
- A truss type (Truss Tower, Horizontal Span, Goal Post, A-Frame, Ladder, Arc Truss, Ring Truss). Tower, Goal Post and A-Frame instantiate with their default base attached; the others stand alone.
- A base (Base Plate, GB Block, Sled, Outrigger): adds a standalone base mesh.
- Truss library…: opens the full catalogue with cross-section filters and the option to instance a saved custom truss.
Truss properties
Section titled “Truss properties”Click the truss in the viewport, or pick it from the Scene panel, and the sidebar shows:
- Type: switch between the seven truss shapes; geometry rebuilds in place.
- Profile: the chord cross-section (Square 12”, Square 20”, etc.). Drawn from the truss product catalogue.
- Length / Span / Diameter / Apex height: dimension fields specific to the type. Goal Post exposes both leg and span lengths; Arc and Ring expose radius and arc angle.
- Base: when present, links to the Base child the Tower / Goal Post / A-Frame was created with. A Base sidebar appears once you select it.
Custom trusses and bases
Section titled “Custom trusses and bases”The truss library overlay’s + Create custom button opens the same form pattern used for projectors. Set the truss shape, chord profile, span and weight; for bases, set the footprint and mass. Saved custom rows appear under “Project copies” in the library and instance like catalogue rows. Catalogue rows are read-only.
Mount a projector or LED tile
Section titled “Mount a projector or LED tile”Select a projector or LED tile and expand the Mounting collapsible in its Properties panel.
- Show cage: toggles the visual cage / yoke around the projector body. Cage visibility is independent of mounting; you can have a cage in free space, or a mounted projector without one.
- Clamp pickups: the points on the projector body that hang on a truss chord. Most catalogue projectors ship with their factory pickup positions baked in; Edit… opens the Clamp Pickup editor to add per-instance overrides. Reset drops the override and falls back to the catalogue default.
- Mounted to: choose between Nothing (free transform) and Truss (clamped to a truss centreline).
When mounting is set to Truss but no truss is picked yet, three quick-action buttons appear:
- Ground tower: spawns a fresh Truss Tower, parents the projector to it, drops it onto the floor.
- Flown truss: spawns a Horizontal Span at the projector’s current height and parents the projector to it.
- Existing truss: dropdown listing every Truss already in the scene.
Once mounted, the sidebar surfaces the truss-relative pose:
- Clamp position: the parameter
talong the truss centreline (0 = start, 1 = end). Drag the slider to slide the projector along the chord. - Hang from: Below chord, Above chord, Side of chord (left), Side of chord (right). Switches which face of the chord the projector clamps to.
- Height offset: distance from the clamp face along the hang direction, in mm. Useful for chain-motor drops below a flown truss, or stand-off plates on the side of a tower.
- Unmount: returns the projector to free transform, leaving its current world pose intact.
The same Mounting block appears on the LED-tile sidebar with the same fields.
Toggling Show cage draws the projector’s yoke / cage rig over the body, independent of mounting, so a free-standing projector can carry a cage too. When the projector is on a truss, the cage moves with the body as you slide the clamp position.
Mounting arrays
Section titled “Mounting arrays”Mounting a Symmetry-wrapped projector carries the whole array onto the truss, so every copy stays in lockstep. Edit the clamp position once and every projector in the array follows.
Grouped undo
Section titled “Grouped undo”Mounting is a multi-step operation (reparent, set clamp, set offset). Mapping Matter wraps it in an undo group so a single Ctrl+Z reverts the entire flow rather than peeling it back one signal at a time.
Snap to truss on drag
Section titled “Snap to truss on drag”Drag an unmounted projector close to a truss and Mapping Matter prompts:
- Snap: clamp it to the nearest centreline point and switch the projector into mounted mode.
- Always snap this session: same as Snap, plus suppresses the prompt for subsequent near-truss drags for the rest of the session.
- Don’t snap: leaves the projector where you dropped it.
The “Mount on nearest truss” action in the Mounting toolbar popover applies the same nearest-centreline logic without needing a drag.
Collision warnings
Section titled “Collision warnings”Trusses get a continuous spatial-collision check against scene meshes (Reference imports, Primitives). If a truss intersects geometry, its outline pulses red. Move the truss or resize the geometry to clear the warning.
The collision outline is purely a guidance overlay; it does not block the placement.
Selecting a clashing truss surfaces an AId3n suggests hint that names the offending object by its imported file name (e.g. chair.glb, the same label you see in the scene tree) rather than a raw sub-mesh identifier. Translate to clear in the hint nudges the truss along the shortest axis so the whole imported asset is out of the way, not just one sub-mesh.
The Clash button in the viewport toolbar’s display cluster toggles these warnings on and off, useful when you want to position a truss inside a structural column on purpose without the red pulse drawing attention away from the rest of the scene. The setting is per-scene and saved with the project.
Delete with attachees
Section titled “Delete with attachees”Deleting a truss that has projectors or LEDs mounted to it opens a 3-way prompt:
- Delete attachees too: removes the truss and everything mounted on it.
- Unmount and keep: deletes the truss only; the attachees revert to their last truss-relative pose in world space.
- Cancel: closes the prompt without changing anything.
Truss BOM CSV
Section titled “Truss BOM CSV”The toolbar’s Export menu includes Truss BOM as CSV, a rigging bill of materials (BOM). The file rolls up:
- One row per truss (type, profile, dimensions, mass).
- One row per base (product, footprint, mass).
- Per-truss attachees rolled up: projectors and LED tiles walked through any Symmetry copies so the count reflects what’s actually rigged.
Use the BOM as a handoff artefact for the rigger or to sanity-check loading totals before sign-off.
See also
Section titled “See also”- Projectors: the projector-side Mounting collapsible
- LED screens: the LED-tile Mounting block
- Export & PDF layouts: Truss BOM CSV row in the Export menu
- Libraries & assets: managing custom truss and base rows in the project library