

Controlling Skeletons in Unreal Engine
このコンテンツはまだ日本語訳がありません。
The joint data from a Skeleton in Designer can be passed to an instance of Unreal Engine over RenderStream. This allows a skeleton modelled in the game engine to mirror the movement of the skeleton in Designer, and receive motion capture or animation data. Full skeleton feature support requires Unreal Engine versions 5.7 and above.
Designer setup
Section titled “Designer setup”The first step is to set up a Skeleton in Designer. This skeleton may be controlled by live data from a motion capture system, played back from an FBX animation or manually controlled by manipulating the joints. See the Skeleton documentation for further instructions on setting up a Skeleton in Designer.
You must also set up a RenderStream layer with an Unreal Engine asset, following the standard workflow. See the RenderStream Unreal Engine integration for more information.
Exposing a Skeleton parameter to RenderStream
Section titled “Exposing a Skeleton parameter to RenderStream”Skeleton data is passed from Designer to Unreal in a similar way to other exposed parameters. To set up an exposed Skeleton parameter in Unreal Engine:
-
Add a skeleton asset into your Unreal project, e.g. by importing an FBX model. See the Unreal Engine documentation for creating animatable characters.
-
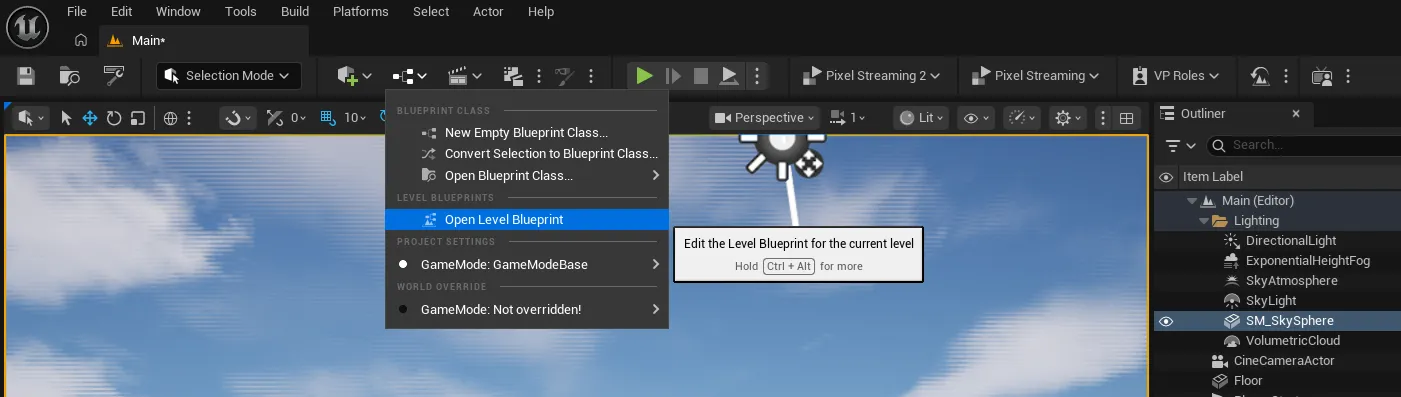
On the chosen Level Map, left-click on the Blueprint icon in menu bar and select Open Level Blueprint.
-
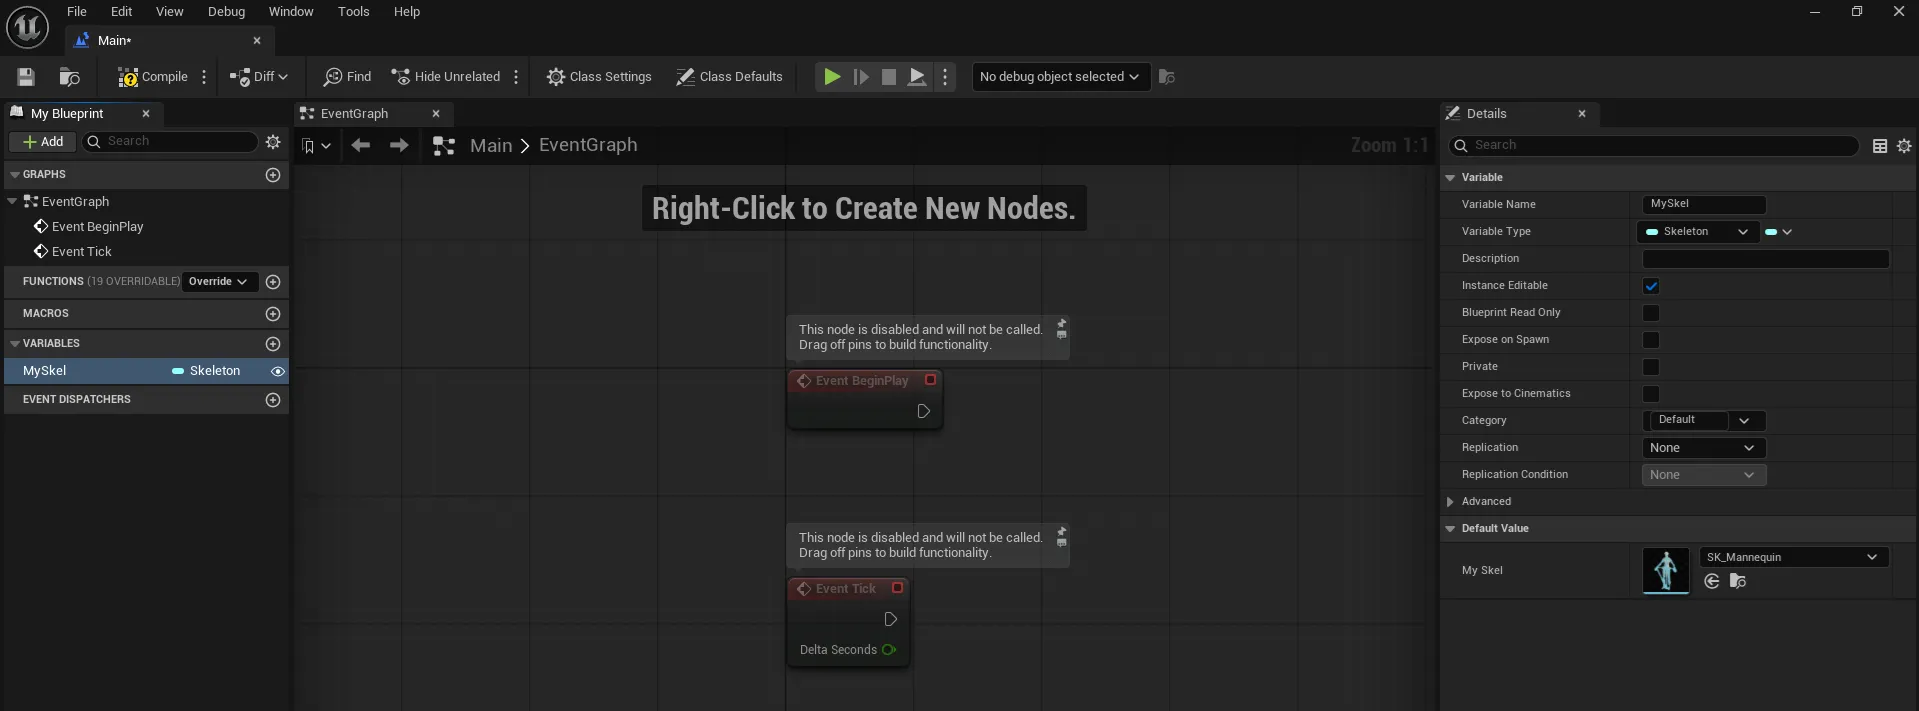
On the left hand side navigate to Variables and click the + icon to add a new variable.
-
Rename the variable, and change the variable type to Skeleton -> Soft Object Reference.
-
Click on the eye icon next to the variable to make it Instance Editable.
-
Press Compile
-
Then, while the new variable is selected, choose your Skeleton of choice in the Default Value field located under the Details panel.
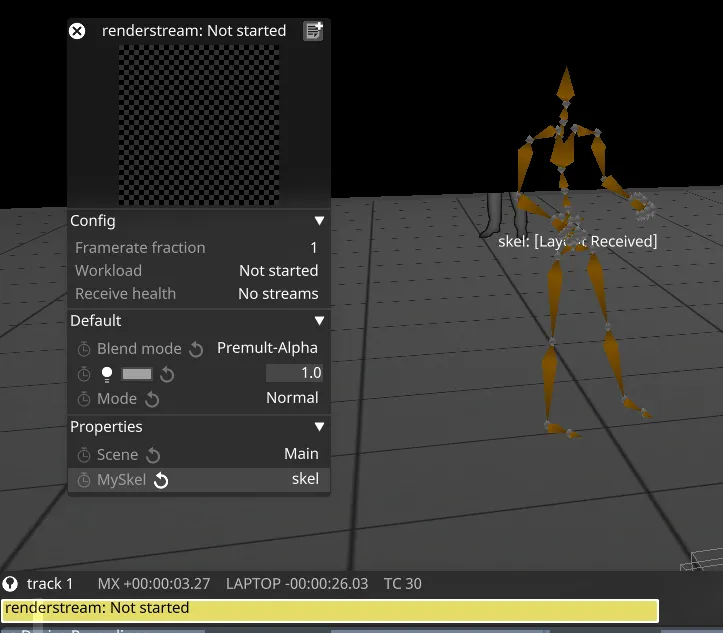
- Save the Unreal project, and select the asset in a RenderStream layer in Designer. The Skeleton variable should now appear as an exposed parameter, which can be linked to a corresponding skeleton object in Designer.
Applying Skeleton tracking data
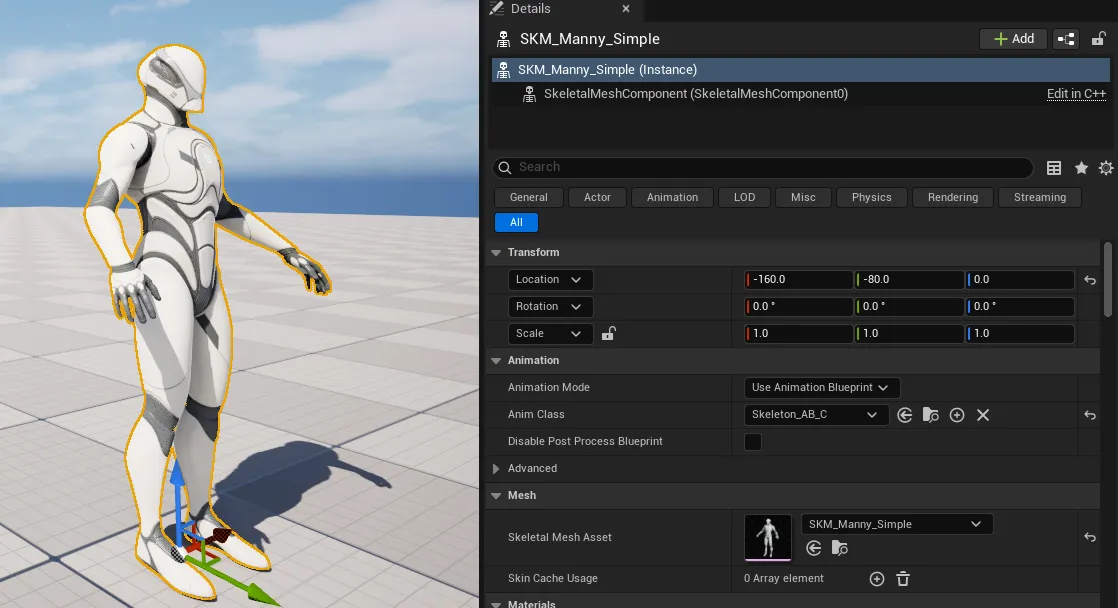
Section titled “Applying Skeleton tracking data”- Any skeleton in Unreal Engine will be referenced by a Skeletal Mesh that uses it. Select the Skeletal Mesh and find the Anim Class under the Details panel. Either open the pre-existing Anim Blueprint, or create a new Anim Blueprint.
-
Go to the AnimGraph tab. Right-click and add a RenderStream Skeleton Pose node to the graph. It is not usually necessary to connect anything to the Base Pose input.
-
Connect the RenderStream Skeleton Pose node to the Output Pose node. More complex graphs may seek to process the pose in the graph before it is given to the Output Pose node, but this is not usually necessary.
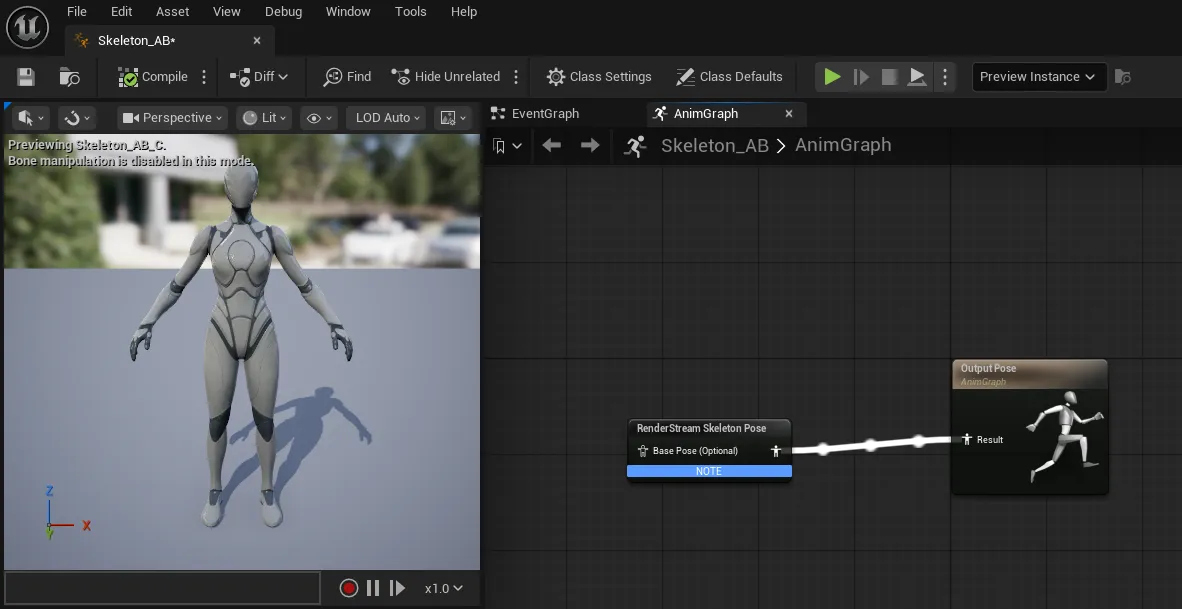
- If the skeleton in Unreal Engine exactly matches the skeleton in Designer, this should be all you need to do to apply the skeleton joint data. However, in most cases you will need to retarget the data onto your particular Skeleton layout.
Retargeting skeletons data
Section titled “Retargeting skeletons data”In Designer we identify joints by a name unique to each joint within the skeleton, which may come from a tracking source or FBX file. In a RenderStream asset we are targeting an existing character that will have a predefined skeleton of its own. This skeleton may have different conventions for identifying joints. For example, it may have many more joints than our Designer skeleton, or different joint names. Therefore, we need to remap the skeletal data received over RenderStream onto the target character.
The Disguise RenderStream plugin applies automatic retargetting as part of the RenderStream Skeleton Pose node, which should make it simple to apply the skeleton joint data from Designer to a range of similar bone layouts in Unreal. All you need to do is select the bones in the Unreal skeleton which correspond to the equivalent bones in the Designer skeleton:
- Open the Anim Blueprint
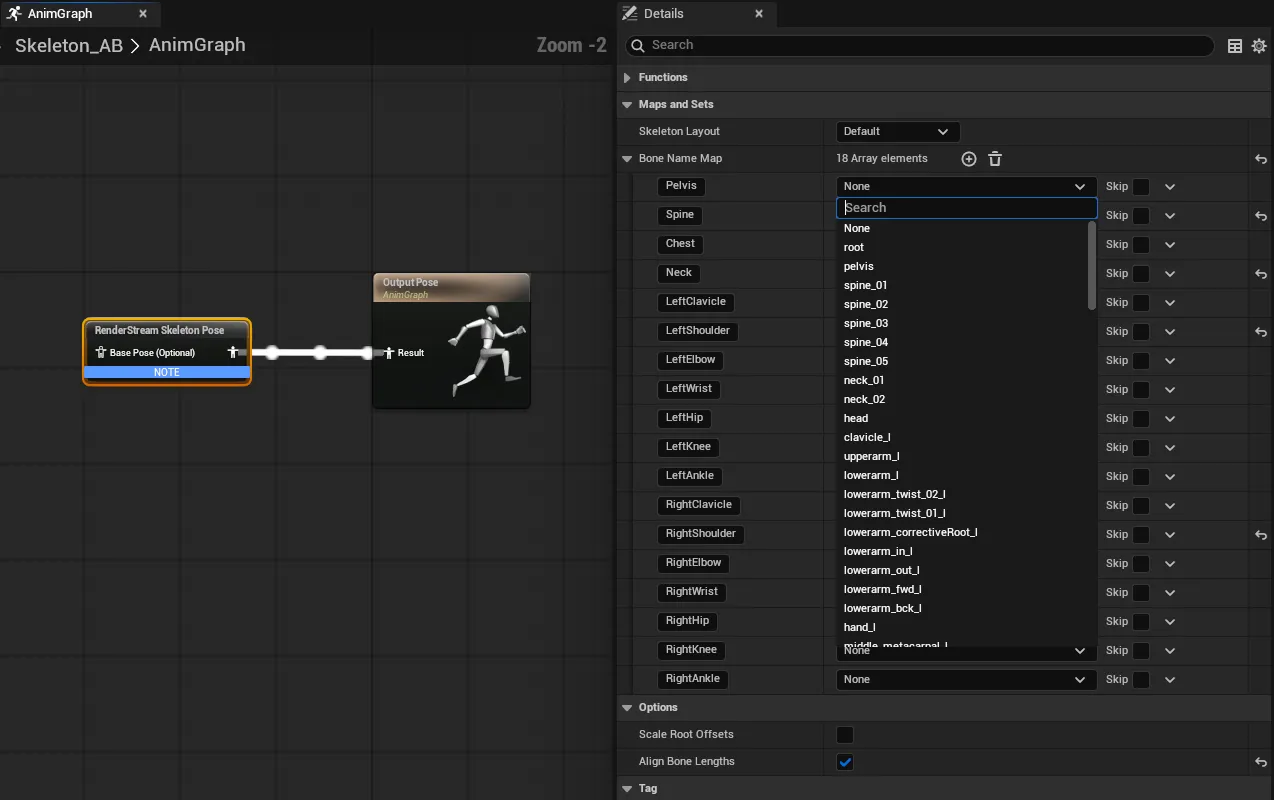
- Select the RenderStream Skeleton Pose node, and expand Maps and Sets in the Details panel.
- Expand and populate the Bone Name Map. This connects the bones streamed from Designer (on the left hand side) with the Unreal skeleton (on the right hand side).
- Change the Skeleton Layout to populate the map with a known set of bone names. Alternatively, manually add/remove/change entries to reflect the bone names coming from Designer. These can be seen under the Joints separator in the skeleton editor in Designer.
- Pick the corresponding bone for the Unreal skeleton on the right hand side of the map.
- If there are particular bones that are already in the correct rest pose and shouldn’t be adjusted, select the corresponding Skip option. This can be useful for bones such as ankles where their skinning differs between skeletons.
- By default the retargeting will apply rotations only and keep the lengths of the bones unmodified. To align the bone lengths with the incoming data too, select the Align Bone Lengths option.
- If you are unsure if the bones are correctly retargeted, you can test the retargeting by clicking Zero Pose under Joints in the skeleton editor in Designer, then adjust the joint rotations one by one while RenderStream is running and check how the skeleton moves.
The retargeting in the RenderStream Skeleton Pose node can account for Unreal skeletons in a variety of different starting poses, however it is most likely to be successful if the skeleton is in a neutral T or A pose, with palms facing down. To change the default pose if required:
- Create a static animation for the skeleton if there is not one already. From the animation blueprint window, go to Create Asset → Create Animation → Reference Pose.
- Manipulate bones in the animation, then click + Key to ensure the manipulation is saved.
- In the animation blueprint, add a Sequence Player node connected to the optional Base Pose input of the RenderStream Skeleton Pose.
- In the Sequence Player details, select your new animation as the Sequence.
- Compile and save the blueprint.